User Manual
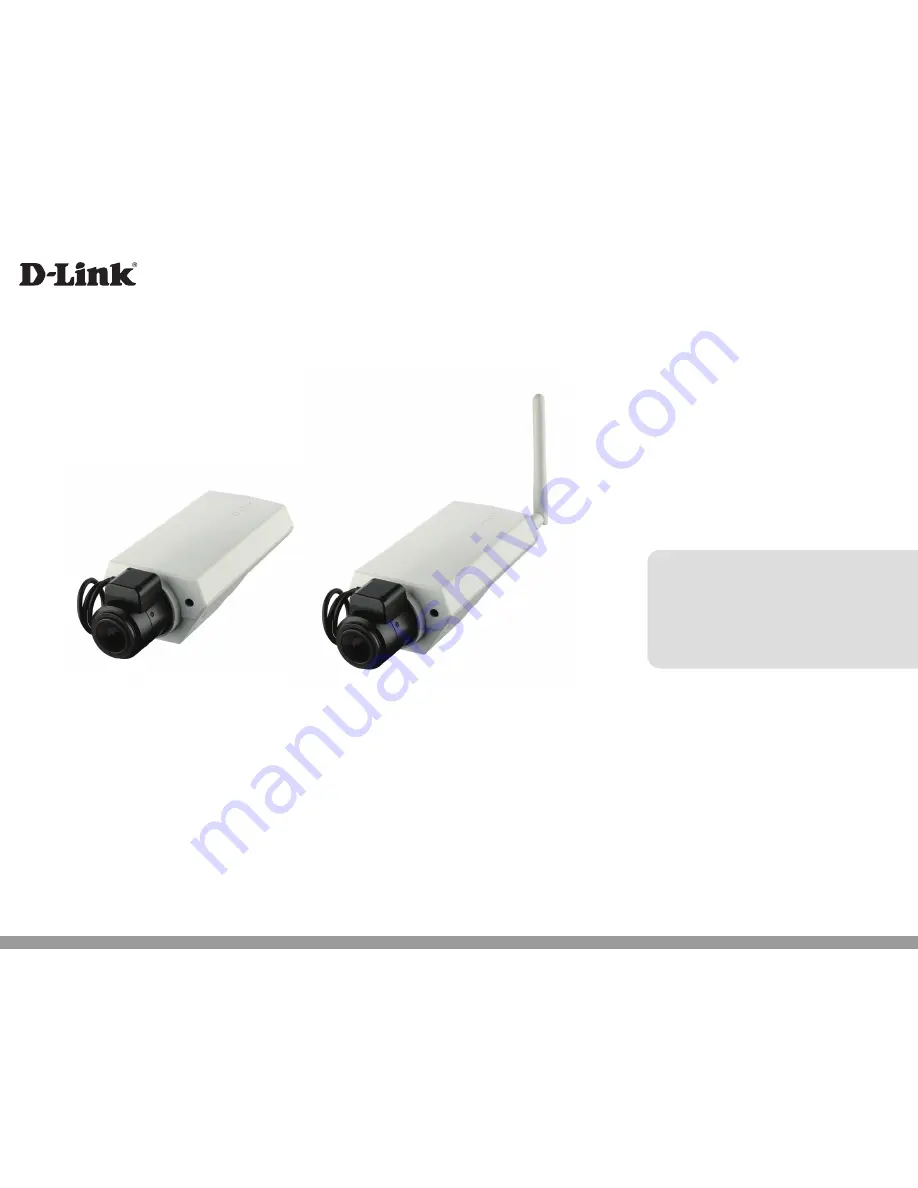
DCS-3511 HD PoE Network Camera
DCS-3530 HD Wireless Network Camera
DCS-3511/DCS-3530
Version 1.10 | 11/05/2014
Page 1: ...User Manual DCS 3511 HD PoE Network Camera DCS 3530 HD Wireless Network Camera DCS 3511 DCS 3530 Version 1 10 11 05 2014 ...
Page 2: ...oration or its subsidiaries in the United States or other countries All other company or product names mentioned herein are trademarks or registered trademarks of their respective companies Copyright 2014 by D Link Corporation All rights reserved This publication may not be reproduced in whole or in part without prior expressed written permission from D Link Corporation Revision Date Description 1...
Page 3: ...23 Client Setup 27 Setup 28 Standard Setup 28 Advanced Setup 29 System Overview 30 Video 31 Video Settings 31 Image Settings 34 Audio Settings 36 Day and Night Settings 37 Network 38 IP Settings 38 Wireless Settings 40 Port and Access Name Settings 41 Dynamic DNS 44 HTTPS 45 Access List 47 Advanced Settings 49 Event Management 53 Motion Detection 53 Tamper Detection 54 DI and DO 55 Event Settings ...
Page 4: ...4 D Link DCS 3511 DCS 3530 User Manual Parameter List 72 Logs 73 Appendix A Technical Specifications 74 Technical Specifications 74 ...
Page 5: ...DCS 3511 DCS 3530 HD Network Camera Mounting Bracket Power Adapter CAT5 Ethernet Cable User Manual and Software on CD ROM Quick Install Guide FULLHDDAY NIGHT DCS 3715 Ver 1 00 WW 2010 D Link Corporation D Link Systems Inc All Rights Reserved Package Contents Accessory Wrench lens ring fixture I O connectors Video Cable Antenna DCS 3530 only ...
Page 6: ... 256MB of memory 512MB recommended Web Browser Internet Explorer 7 or higher Firefox Chrome Safari VGA card resolution SVGA or XGA 1024x768 or above CPU 1 7GHz or above 2 8GHz plus processor with 512MB memory and a 32MB video card is required for multiple camera viewing and recording in IP surveillance program An available Ethernet connection ...
Page 7: ...flexible viewing window settings for different purpose of surveillance either for regular recording or mobile view Built in microSD card slot can record important events in microSD card as a local backup and it s very easy to retrieve The included D Link D ViewCam is sophisticated software which allows users to manage up to 32 network cameras set e mail alert notifications create recording schedul...
Page 8: ...e settings to monitor multiple ROI Region of Interest by a single camera And the ePTZ can also simulate wide area surveillance by digital zoom and pan tilt control Flexible Connectivity The DCS 3511 incorporates Power over Ethernet PoE allowing it to be easily installed in a variety of locations without the need for supplemental power cabling The DCS 3530 works with a 10Mbps Ethernet based network...
Page 9: ...9 D Link DCS 3511 DCS 3530 User Manual Product Overview Hardware Overview Front Panel ICR Sensor The IR Cut Removable sensor judges lighting conditions and switches from color to infrared accordingly ...
Page 10: ... PoE RJ 45 connector for Ethernet which can also be used to power the camera using PoE PoE only available on the DCS 3511 Reset Press and hold this button for 10 seconds to reset the camera back to the factory default settings Audio Input Output Use to connect an external microphone or speaker LED Power and network indicator Antenna connector Connect wireless DCS 3530 only ...
Page 11: ...ct Overview Side Panel microSD Card Slot Local microSD card for storing recorded images and video DC Iris Connector Connector for DC iris lens Wireless Antenna DCS 3530 only Focal Length Manually adjust the focal length Focus Manually adjust focus ...
Page 12: ... 3530 User Manual Product Overview Button Panel Mounting Nut 1 4 x 20 nut for affixing camera to mounting bracket Built in MIC Internal microphone I O Connector I O connectors for external devices Wire Clip Cable management ...
Page 13: ...on Using a PoE Switch If using a PoE switch or router connect the network camera via Ethernet cable PoE will transmit both power and data over a single cable Note Once power has been established the LED will turn red When the device has obtained an IP address and is accessible the LED will turn green Attach the Antennas DCS 3530 only Locate the antenna included with your DCS 3530 and attach it to ...
Page 14: ...3530 CD into your computer s CD ROM drive to begin the installation If the Autorun function on your computer is disabled or if the D Link Launcher fails to start automatically click Start Run Type D autorun exe where D represents the drive letter of your CD ROM drive After clicking Setup Wizard the following window will open Click Next to continue ...
Page 15: ...15 D Link DCS 3511 DCS 3530 User Manual Installation Click Yes to accept the License Agreement To start the installation process click Next Note The installation may take several minutes to finish ...
Page 16: ...D Link DCS 3511 DCS 3530 User Manual Installation Click Finish to complete the installation Click on the D Link Setup Wizard SE icon that was created in your Windows Start menu Start D Link Setup Wizard SE ...
Page 17: ...d left blank Click Next to proceed to the next page The Setup Wizard will appear and display the MAC address and IP address of your camera s If you have a DHCP server on your network a valid IP Address will be displayed If your network does not use a DHCP server the network camera s default static IP 192 168 0 20 will be displayed Click the Wizard button to continue ...
Page 18: ...ke a moment to confirm your settings and click Restart Select DHCP if your camera obtains an IP address automatically when it boots up Select static IP if the camera will use the same IP address each time it is started Click Next to proceed to the next page ...
Page 19: ...lick on the D Link Setup Wizard SE icon that was created in your Windows Start menu Start D Link Setup Wizard SE Select the camera and click the button labeled Link to access the web configuration The Setup Wizard will automatically open your web browser to the IP address of the camera ...
Page 20: ...ive video You can select your video profile and view or operate the camera For additional information about web configuration please refer to the user manual included on the CD ROM or the D Link website Enter admin as the default username and leave the password blank Click OK to continue ...
Page 21: ...or to manage multiple D Link IP cameras remotely You may use the software to configure all the advanced settings for your cameras D ViewCam is a comprehensive management tool for IP surveillance Insert the CD ROM into the CD ROM drive A menu screen will appear as shown below Follow the Installation Wizard to install D ViewCam ...
Page 22: ...r Manual Installation Click Finish to complete the installation To start D ViewCam select Start All Programs D Link D ViewCam Main Console For more information about D ViewCam please refer to the documentation on the D ViewCam CD ROM ...
Page 23: ...amera s web interface you will see the following page This is the Live Video page which will allow you to view the camera s video feed and control basic camera functions using the icons on the screen Please refer to the tables on the following pages for detailed information about the icons on this screen ...
Page 24: ...ces are available Advanced Setup for professional users and Basic Setup for entry level users Digital output Click this button to turn the digital output device on or off Video Stream This camera supports multiple streams stream 1 4 simultaneously You may select one for live viewing Global View Click on this item to display the Global View window The Global View window contains a full view image t...
Page 25: ...sition Direction Control the camera s pan or tilt directions up down left right Focus Control camera focus to get a clear image Available only under mechanical PTZ mode Focus Near Focus Far Zoom Zoom in out to magnify or shrink the digital image Zoom in Magnify image Zoom out Diminish image Patrol Auto Pan Patrol Patrol executes a pre defined sequence of pan tilt zoom and focus features Before sel...
Page 26: ... again to stop talking or disable this function Microphone Level Microphone Level When the mute function is not active move the slider bar to adjust the level of the microphone internal external that is connected to your network camera Microphone Mute Microphone Mute Un mute Click to turn off the microphone internal external that is connected to your network camera Press again to turn the micropho...
Page 27: ...rding Options Folder Select the folder where you would like the recording file saved on your desktop computer File name prefix Enter a file name prefix for the recording files Add date and time suffix to file name Select this checkbox if you would like the date and time to be added to the end of each filename Local Streaming Buffer Time Enter the buffer time in milliseconds The buffer will cause a...
Page 28: ...Settings Audio Settings Day and Night Settings Network IP Settings Wireless Settings Event Management Motion Detection Tamper Detection DI and DO PTZ Control Digital PTZ Mechanical PTZ System User Settings Device Settings Time and Date Maintenance Function for DCS 3530 only Setup The DCS 3511 DCS 3530 includes standard and advanced setup screens Both screens include a tree view with multiple setup...
Page 29: ...System Overview Audio and Video Video Settings Image Settings Audio Settings Day and Night Settings Network IP Settings Wireless Settings Port Access Name Settings Dynamic DNS HTTPS Access List Advanced Settings Event Management Motion Detection Tamper Detection DI and DO Event Settings Recording Recording Settings Local Storage PTZ Control Digtal PTZ Mechanical PTZ System User Settings Device Set...
Page 30: ...er Manual Configuration System Overview The system overview page contains a summary of the camera s current settings For more information about adjusting these settings please consult the subsequent instructions found in this manual ...
Page 31: ...ired position with your mouse 3 Choose a proper Output Frame Size from the drop down list according to the size of your monitoring device Note All the items in the Output Frame Size should not be greater than the Region of Interest current maximum resolution The definition of multiple streams Stream 1 3 Users can define the Region of Interest viewing region and the Output Frame Rate size of the li...
Page 32: ...re level You can manually set the Exposure level which ranges from 1 to 8 dark to bright Max Gain Auto Gain Control You can manually set the AGC level 2x 4x 8x 16x 32x The higher the value the brighter the image will be Enable BLC Back Light Compensation Enable this option when the object is too dark or too bright to recognize It allows the camera to adjust to the best light conditions in any envi...
Page 33: ... for smoother video quality but it requires more storage usage 10 options for selection customize 1 2 3 5 8 10 15 20 25 30 fps 30 fps is recommended real time video on a computer monitor 5 fps is ideal for mobile viewers Intra Frame Period Determines the frequency and I frame is planted The shorter the duration the more likely you will get better video quality but at the cost of higher network ban...
Page 34: ...ve amount of red green and blue primary colors in the image so that the neutral colors are reproduced correctly Auto The camera automatically adjusts the color temperature of the light in response to different light sources The white balance setting defaults to Auto and works well in most situations Fixed Follow the steps below to manually set the white balance to compensate for the ambient lighti...
Page 35: ...video streams Note The Sensor Settings and Image Settings share the same Profile 2 settings Privacy Mask In this page you can block out certain sensitive zones for privacy concerns To set up a Privacy Mask Window follow the steps given below 1 Click New to add a window 2 The height and width of the window can be resized and drag dropped the window 3 Enter a descriptive Window Name and click Save t...
Page 36: ...ithm that exploits two primary coding strategies to dramatically reduce the amount of data needed to convey high quality digital audio Select a higher bit rate number for better audio quality AAC bit rate Select an AAC bit rate from the drop down list Higher bit rate means higher audio quality but it takes more network bandwidth to transmit G711 bit rate Select an G711 bit rate from the drop down ...
Page 37: ...es on the IR cut filter at all times which will block the infrared light from reaching the sensor so that the colors are not distorted Night Mode The camera switches off the IR cut filter to allow the infrared light to pass through This helps the camera to see more clearly in low light conditions Synchronize with Digital Input The camera automatically removes the IR cut filter when DI triggers Sch...
Page 38: ...r your camera IP Address Enter an IP address Subnet Mask The default value is 255 255 255 0 This helps to determine if the designated IP address is on the same subnet Default Router This is the gateway used to forward frames to destinations in a different subnet Invalid router setting will cause the transmission to fail if its destination is in a different subnet Primary DNS The Primary Domain Nam...
Page 39: ...worked devices such as printing and file sharing are available among each other without bothersome network configuration In the case of Network Cameras you will see Network Camera shortcuts at My Network Places PPPoE Select this option to configure the camera to make it accessible from anywhere with an Internet connection Note that to utilize this feature it requires an account provided by your IS...
Page 40: ...e of the wireless network you wish to connect to Infrastructure is normally used to connect to an access point or router Ad Hoc is usually used to connect directly to another computer Channel If you are using Ad Hoc mode select the channel of the wireless network you wish to connect to or select Auto Authentication Select the authentication you use on your wireless network Open Shared WPA PSK or W...
Page 41: ...rt number between 1025 and 65535 To access the Network Camera on the LAN both the HTTP port and secondary HTTP port can be used to access the Network Camera For example when the HTTP port is set to 80 and the secondary HTTP port is set to 8080 You can login camera as example link as below Http 192 168 0 20 or Http 192 168 0 20 8080 Authentication Depending on your network security requirements the...
Page 42: ...ur web browser NOTE 1 Microsoft Internet Explorer does not support server push technology therefore using http ip address http port access name for stream 1 4 will fail to access the Network Camera RTSP Authentication Depending on your network security requirements the Network Camera provides three types of security settings for streaming via RTSP protocol disable basic and digest If basic authent...
Page 43: ...ways an odd number When the RTP port changes the RTCP port will change accordingly Multicast Click the items to display the detailed configuration information Select the Always multicast option to enable multicast for stream 1 4 Unicast video transmission delivers a stream through point to point transmission multicast on the other hand sends a stream to the multicast group address and allows multi...
Page 44: ...s option to enable the DDNS setting Server Name Select a DDNS server name from the provider drop down list With a Dynamic DNS account the camera automatically updates your IP address To enable DDNS enter your host information Click Next to continue Host Name Enter the host name of the DDNS server Username Enter your username or e mail used to connect to the DDNS Password Enter your password used t...
Page 45: ...Create Self signed Certificate Automatically 1 Select this option 2 In the first column select Enable HTTPS secure connection then select a connection option HTTP HTTPS or HTTPS only 3 Click Save to generate a certificate 4 The Certificate Information will automatically be displayed in the third column You can click Property to view detailed information about the certificate 5 Click Live Video to ...
Page 46: ...hority that issues digital certificates Enroll the camera Wait for the certificate authority to issue a SSL certificate Click Browse to search for the issued certificate then click Upload in the second column How do I cancel the HTTPS setting 1 Deselect Enable HTTPS secure connection in the first column and click Save A warning dialog will pop up 2 Click OK to disable HTTPS 3 The webpage will redi...
Page 47: ...apsed time How much time the client has been at the webpage User ID If the administrator has set a password for the webpage the clients have to enter a user name and password to access the live video The user name will be displayed in the User ID column If the administrator allows client to link to the webpage without a user name and password the User ID column will be empty There are some situati...
Page 48: ...e clients whose IP addresses are on the Access List below can access the camera and the others cannot access On the contrary if you choose Deny Type those clients whose IP addresses are on the Access List below will not be allowed to access the camera and the others can access Filter Then you can add a rule to the following Access List Please note that the IPv6 access list column will not be displ...
Page 49: ...ode on a managed network For example routers switches bridges hubs computer hosts printers IP telephones network cameras web server and database Before configuring SNMP setting on this page please enable your NMS first Enable SNMPv1 SNMPv2c Select this option and enter the names of Read Write community and Read Only community according to your NMS setting Enable SNMPv3 This option contains cryptog...
Page 50: ...ver 2 Connect the camera to a PC or notebook outside of the protected LAN Open the configuration page of the camera as shown below Select EAP PEAP or EAP TLS as the EAP method In the following blanks enter your ID and password issued by the CA then upload related certificate s 3 When all setting are complete move the camera to the protected LAN by connecting it to an 802 1x enabled switch The devi...
Page 51: ...es of service are available The priority is set up on the network switches which then use different queuing disciplines to forward the packets Please follow the steps below to enable CoS settings 1 Click Enable CoS 2 Enter the VLAN ID of your switch 0 4095 3 Choose the priority for each application 0 7 Note The VLAN Switch 802 1p is required The web browsing may fail if the CoS setting is incorrec...
Page 52: ...describes a particular service level in terms of bandwidth queuing theory and dropping discarding the packet decisions Routers at each network node classify packets according to their DSCP value and give them a particular forwarding treatment For example how much bandwidth should be reserved Quality of Service refers to a resource reservation control mechanism which guarantees a certain quality to...
Page 53: ... and a lower percentage will make motion easier to be detected New Click to add a new window A maximum of three motion windows can be opened simultaneously Use your mouse to drag the window frame to resize or the title bar to move Clicking on the x at the upper right corner of the window will close the window Save Save the configured settings To enable motion detection follow the steps below 1 Cli...
Page 54: ...able camera tampering detection 2 Enter the tamper trigger duration 10 sec 10 min The tamper alarm will be triggered only when the tampering factor the difference between current frame and pre saved background exceeds the trigger threshold Set up the event source as Camera Tampering Detection on Event Settings Server Settings how to send alarm message Media Settings send what type of alarm message...
Page 55: ...ital input and digital output for device control The I O connector provides the physical interface for digital input DI GND and digital output DO GND that is used for connecting a diversity of external alarm devices to the camera such as IR Sensors and alarm relays Once triggered images will be taken and e mailed DI DO Schematics ...
Page 56: ...Select to send the media files via e mail when a trigger is activated Sender e mail address Enter the e mail address of the sender Recipient e mail address Enter the e mail address of the recipient Server address Enter the domain name or IP address of the e mail server User name Enter the user name of the e mail account if necessary Password Enter the password of the e mail account if necessary Se...
Page 57: ...st txt file on the FTP server Click Save to enable the settings then click Close to exit the page HTTP Select to send the media files to an HTTP server when a trigger is activated URL Enter the URL of the HTTP server User name Enter the user name if necessary Password Enter the password if necessary To verify if the HTTP settings are correctly configured click Test The result will be shown in a po...
Page 58: ... before a trigger is activated Up to 7 images can be generated Send post event images Enter a number to decide how many images to capture after a trigger is activated Up to 7 images can be generated File name prefix Enter the text that will be appended to the front of the file name Add date and time suffix to the file name Select this option to add a date time suffix to the file name Click Save to...
Page 59: ...ded to the front of the file name Click Save to enable the settings then click Close to exit the page System log Select to send a system log when a trigger is activated Click Save to enable the settings then click Close to exit the page When completed click Save to enable the settings and click Close to exit this page The new media settings will appear on the Event Settings page Event Settings In ...
Page 60: ... event It is being used for both events of motion detection and digital input trigger Trigger This is the cause or stimulus which defines when to trigger the camera The trigger source can be configured to use the camera s built in motion detection mechanism There are several choices of trigger sources as shown below Select the item to display the detailed configuration options The input type that ...
Page 61: ...r data Camera tampering detection This option allows the camera to trigger when the camera detects that it is being tampered with To enable this function you need to configure the Tamper detection option first Please refer to Tamper detection for detailed information Event Schedule Specify the period for the event 1 Select the days of the week 2 Select the recording schedule in 24 hr time format A...
Page 62: ...ding source stream 1 4 Trigger Select a trigger source Schedule The server will start to record files on the network storage NAS Recording Schedule Specify the recording duration 1 Select the days of the week 2 Select the recording start and end times in 24 hr time format Destination You can select the network storage or local SD card that was set up for the recorded video files Capacity You can c...
Page 63: ...t to enable recording notification please click Application to set up Please refer to Trigger Recording notify for detailed information When completed select Enable this recording Click Save to enable the setting and click Close to exit this page When the system begins recording it will send the recorded files to the Network Storage The new recording name will appear in the drop down list on the r...
Page 64: ...r the number of days you wish to retain a file For example if you enter 7 days the recorded files will be stored on the SD card for 7 days Click Save to enable your settings Searching and Viewing the Records This column allows the user to set up search criteria for recorded data If you do not select any criteria and click Search button all recorded data will be listed in the Search Results column ...
Page 65: ... on the main page Please refer to the illustration on the next page 6 Click Save to enable the setting The Preset Positions will also be displayed on the Live Video Select one from the drop down list and the camera will move to the selected preset position Patrol Setting You can select some preset positions for the camera to patrol Please follow the steps below to set up a patrol schedule 1 Click ...
Page 66: ...nd A higher baud rate will reduce the distance of the two devices transmitter and receiver Values range from 2400 default to 19200 bps Data Bits This value is the number of data bits in a transmission The data bit can be 7 or 8 default Stop Bits The stop bit is used to signal the end of communication for a single packet The more bits used for stop bits the greater the lenience in synchronizing the...
Page 67: ...r account name is admin which is permanent and cannot be deleted The default of password is empty Add user account Add a new user account Username Enter a username for the new account Password Enter a password for the new account Privilege Select the access rights for the new user Manage user Manage the accounts for existing users Authentication The access rights for existing users System ...
Page 68: ...l Configuration Device Settings Turn off the LED indicator Select this option to turn off the LED next to the lens This will prevent anyone from observing the operation of the network camera Camera Name Create a unique name for your camera ...
Page 69: ...tart and end date and time of Daylight saving time according to your location Automatic Time Configuration Enable this feature to obtain time configuration automatically from NTP server NTP Server Network Time Protocol NTP synchronizes the network camera with an Internet time server Choose the one that is closest to your location Update Interval The time interval for updating the time information ...
Page 70: ... resume the connection Restore to default This feature allows you to restore the camera to factory default setting Export Upload Files This feature allows you to Export Upload setting backup files Export setting backup file Click to export all parameters for the device and user defined scripts Upload setting backup file Click Browse to upload a setting backup file Please note that the model and fi...
Page 71: ...are file from the D Link website The file is in pkg file format 2 Click Browse and specify the firmware file 3 Click Upgrade The camera starts to upgrade and will reboot automatically when the upgrade completes If the upgrade is successful you will see Reboot system now This connection will close After that re access the camera ...
Page 72: ...1 DCS 3530 User Manual Configuration Parameter List The Parameters List page lists the entire system s parameters in alphabetical order If you need technical assistance please provide the information listed on this page ...
Page 73: ...on explains how to configure the camera to send the system log to the remote server as backup Current Log This column displays the system log in chronological order The system log is stored in the camera s buffer area and will be overwritten when reaching a certain limit ...
Page 74: ... 264 MPEG 4 multicast streaming JPEG for still images Video Resolution 16 9 1280 x 800 1280 x 720 640 x 360 480 x 270 320 x 176 up to 30 fps recording1 4 3 1024 x 768 800 x 600 640 x 480 320 x 240 up to 30 fps recording1 Audio Features G 711 audio encoding bit rate 8 kbps to 64 kbps MPEG 4 AAC audio encoding bit rate 16 kbps to 32 kbps External Device Interfaces 10 100 BASE TX Fast Ethernet port 8...
Page 75: ...for iOS and Android mobile devices D ViewCam System Requirements Operating System Microsoft Windows 7 Vista XP Web Browser Internet Explorer 7 or higher Protocol Standard TCP IP D ViewCam Software Functions Remote management control of up to 32 cameras Viewing of up to 32 cameras on one screen Scheduled motion triggered or manual recording options Supports all management functions in web interface...
Page 76: ...76 D Link DCS 3511 DCS 3530 User Manual Appendix A Technical Specifications Order Information Part Number Description DCS 3511 HD PoE Network Camera DCS 3530 HD Wireless N Network Camera ...