background image

5

D-Link DCS-3110 Quick Install Guide

Hardware Installation

Hardware Installation

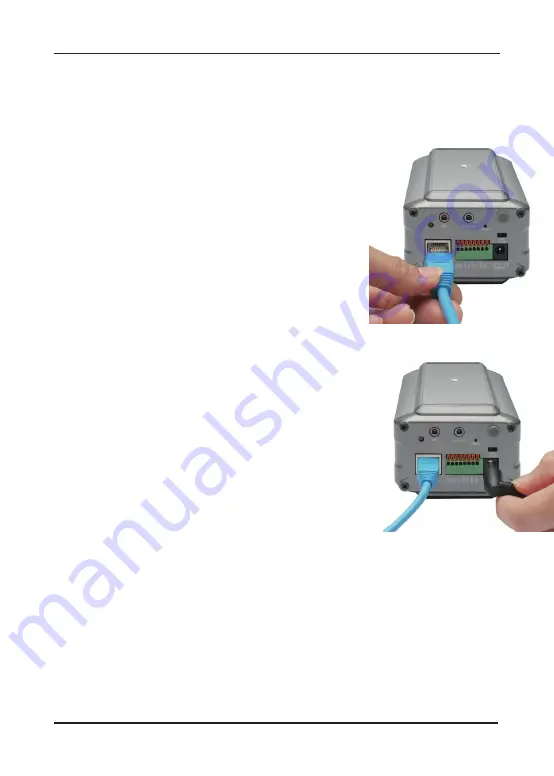
Connect the Ethernet Cable

Connect  an  Ethernet  cable  to  the  network  cable 

connector located on the Network Camera’s back 

panel and attach it to the network.

Connect Using Power-Over-Ethernet

Once you connect an Ethernet cable to your PoE 

switch or adapter, the Power LED on the DCS-3110 

will turn green to indicate a proper connection.

Attach the External Power Supply

Attach the external power supply to the DC power 

input  connector  located  on  the  Network  Camera’s 

back panel (labeled DC 12V) and connect the other 

end to an AC power outlet.

Note: The LED on the network camera will turn green, when you have a proper 

connection. The light might go on and off and your computer may show an 

intermittent loss of connectivity, this is normal until you have configured 

your Network Camera.

Summary of Contents for DCS-3110 - SECURICAM Fixed Network Camera

Page 1: ......

Page 2: ...ve An available Ethernet connection CAT5 Ethernet Cable Package Contents DCS 3110 Megapixel PoE Network Camera Minimum System Requirements If any of the above items are missing please contact your res...

Page 3: ...rnal device like IR light RS485 Port is designed for external pan tilt zoom devices Ethernet Port PoE Connect the Network Camera to your network using a CAT5 Ethernet cable This port supports the NWay...

Page 4: ...IR Cut Removable ICR Sensor The IR Cut removable sensor will judge the light conditions and then switches from color to B W accordingly CF card slot CompactFlash CF is a mass storage device format use...

Page 5: ...adapter the Power LED on the DCS 3110 will turn green to indicate a proper connection Attach the External Power Supply Attach the external power supply to the DC power input connector located on the N...

Page 6: ...th a swivel ball screw head that can be attached to the Network Camera bottom socket cavity Attach the camera stand to the Network Camera and station it for your application There are holes located in...

Page 7: ...M drive The following step by step instructions displayed are shown when using Windows Vista operating system The steps and screens are similar when using other Windows operating systems Software Inst...

Page 8: ...110 Quick Install Guide Software Installation Click Finish to complete the installation To start the installation click Install Note The installation may take several minutes to complete Click Install...

Page 9: ...r and show the MAC address of your DCS 3110 and an IP Address which may or may not be correct depending on what you have your DCS 3110 connected to If you have a DHCP server on your network there will...

Page 10: ...further information refer to the user manual for details Check the Get IP by DHCP Server automatically box to obtain a new IP address every time the camera starts up Click Next to continue Select UPn...

Page 11: ...king you if you want to access the DCS 3110 via mobile phone Clicking Yes will set the video resolution to 176x144 Click Apply to apply the settings listed in the window to the device Application may...

Page 12: ...ck Add to my favorite to save the address and then click Exit to complete the installation A window will pop up to confirm that the application was successfully configured Click OK to continue Click E...

Page 13: ...as the default username and leave the password blank Click OK to continue This section shows your camera s live video You can control your settings using the buttons at the bottom For more informatio...

Page 14: ...14 D Link DCS 3110 Quick Install Guide Notes Notes...

Page 15: ...15 D Link DCS 3110 Quick Install Guide Notes Notes...

Page 16: ...D Link Corporation D Link Systems Inc All rights reserved D Link and the D Link logo are registered trademarks of D Link Corporation or its subsidiaries in the United States and other countries Other...

Reviews: