background image

Quick Installation Guide

3

ENGLISH

Figure 5: Connecting the Ethernet Cable
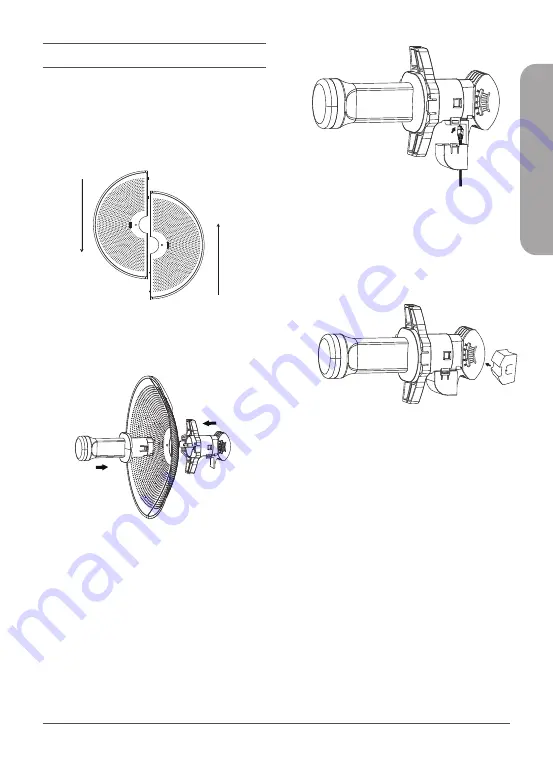
4. 

Connect the adjustment kit to the base of 
the DAP-3712 by pressing it in until it clicks 
and locks in place. Use the adjustment 
kit to position the antenna at the desired 
angle

Figure 6: Attaching the Adjustment Kit

Preparation before Installation

Before installing the DAP-3712, check the 
distance between the two sides and ensure 
that they are within wireless signal range of 
each other. It may be helpful to use a Graphic 
Information System (GIS) program such as 
Google Earth to check for obstructions between 
the two sites. If there is an obstruction, it may 
help to install the DAP-3712 as high as possible 
to prevent the signal from being blocked.

Installation

Assembling the Access Point

1. 

Assemble the dish of the DAP-3712 by 
sliding the two halves together until they 
lock in place.

Figure 3: Assembling the Dish

2. 

Connect the antenna and base through 
the hole in the center of the dish.

Figure 4: Attaching the Antenna

3. 

Thread a standard RJ-45 Ethernet cable 
through the cover for the PoE port on 
the underside of the DAP-3712. Insert the 
cable into the PoE port, then attach the 
cover to the device. 

Summary of Contents for DAP-3712

Page 1: ...Additional documentation is also available on the D Link website DAP 3712 Quick Installation Guide 20 km Long Range 802 11ac Wireless Bridge ...

Page 2: ...stalling the DAP 3712 on your network The device should be ensured that systems employing high gain directional antennas are used exclusively for fixed point to point operations For additional information about how to use the access point please see the User Manual from the D Link support website Package Contents This DAP 3712 should include the following items 20kmLongRange802 11acWirelessBridge ...

Page 3: ...e a Graphic Information System GIS program such as Google Earth to check for obstructions between the two sites If there is an obstruction it may help to install the DAP 3712 as high as possible to prevent the signal from being blocked Installation Assembling the Access Point 1 Assemble the dish of the DAP 3712 by sliding the two halves together until they lock in place Figure 3 Assembling the Dis...

Page 4: ... 3712 access point cannot accept a CAT 5 cable that has an uneven sheath the RJ 45 connector on the cable will not fit properly into the receptacle on the access point Configuring the First DAP 3712 in Access Point Mode 1 Use an Ethernet cable to connect the LAN port on the DAP 3712 to the PoE Out port on the PoE injector Using another cable attach the PoE injector to your switch or management com...

Page 5: ...r of the Setup Wizard Wireless select Client from the drop down list Enter the same SSID and key that you entered when configuring the first device Figure 11 Configuring Client Mode 4 To confirm that wireless connectivity between the two devices is configured correctly navigate to the Statuspage and check the information under Associated Stations shown below Figure 12 Checking Wireless Connectivit...

Page 6: ...e metal mounting tie through the hole on the base of the DAP 3712 and and wrap it around the pole Fasten the tie to secure the device against the pole TECHNICAL SUPPORT dlink com support Figure 14 Completed Installation Once completed your network will resemble the following diagram PoE injector PoE injector DAP 3712 DAP 3712 Switch PC1 PC2 Switch PC3 PC4 AP mode Client mode Figure 15 DAP 3712 Net...

Page 7: ...r an uncontrolled environment and it also complies with Part 15 of the FCC RF Rules This equipment must be installed and operated in accordance with provided instructions and the antenna s used for this transmitter must be installed to provide a separation distance of at least 20 cm from all persons and must not be co located or operating in conjunction with any other antenna or transmitter End us...

Page 8: ...Ver 1 01 WW _130x183 2020 11 02 ...

Reviews: