background image

Your Installation is Complete!

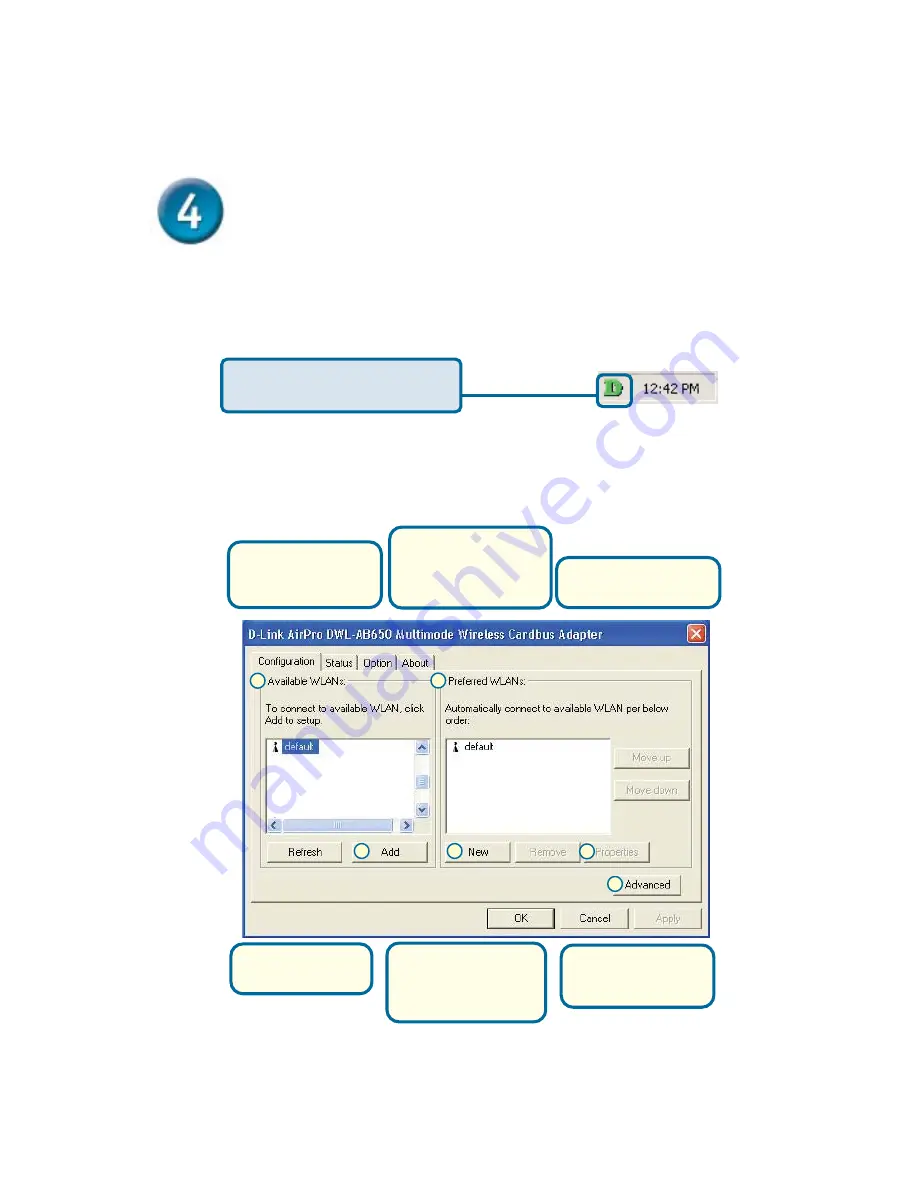
Double-click the 

utility icon

 to

use the configuration utility.

After you’ve continued in Windows XP (or after the computer restarts in the other
Windows operating systems), the D-Link 

Air

Pro DWL-AB650 

Configuration Utility

 will

automatically start and the utility icon will appear in the bottom right hand corner of the
desktop screen (systray).

Appendix

B.

  Preferred WLAN’s: is a

list of all wireless 802.11a
and 802.11b networks that
you have connected to or
are currently connected to.

C.

  Add : If an Access Point

is not listed, click the add
button to add it.

A.

  Available WLAN’s: is a

list of all available
wireless 802.11a and
802.11b networks.

D.

  New : Allows you to

add a Preferred WLAN
manually.

E.

  Properties : Allows you

to chage IP Address and
Encryption settings for
highlighted Preferred
WLANs.

F.

  Advanced : Allows you

to change the the
connection type from
Infrastructure to Adhoc.

Using the Configuration Utility

E

C

D

F

B

A

Summary of Contents for AirPro DWL-AB650

Page 1: ...Insert the D Link AirPro DWL AB650 Driver CD in the CD ROM drive The step by step instructions that follow are shown in Windows XP The steps and screens are similar for the other Windows operating sys...

Page 2: ...start on your computer type D Setup exe If it does start proceed to the next screen The letter D represents the letter of the CD ROM drive Your CD ROM drive may be a different drive letter Type D Set...

Page 3: ...connector This is the connector that fits into the Cardbus slot of your laptop Antenna Used to wirelessly connect to 802 11a or 802 11b networks Link Activity LED Indicates that the DWL AB650 is prop...

Page 4: ...ter B Locate the Cardbus slot on your laptop computer C Gently insert the DWL AB650 into the Cardbus slot in your laptop computer as shown Restart Your Computer When you restart your computer this Fou...

Page 5: ...ding This product has already been tested to work properly in the designated Windows Operating Systems You can ignore this message and click Yes Click Finish to finalize the installation For Windows 2...

Page 6: ...ppendix B Preferred WLAN s is a list of all wireless 802 11a and 802 11b networks that you have connected to or are currently connected to C Add If an Access Point is not listed click the add button t...

Page 7: ...ion Shows MAC Address of your DWL AB520 I Advance State Shows current settings for Turbo Mode and Ratio State G Connection State Shows current settings and signal strength Appendix Using the Configura...

Page 8: ...the Wireless Router or Access Point Static IP address setup Click OK IP address 192 168 0 51 Subnet mask 255 255 255 0 Click OK Click Internet Protocol TCP IP Click Properties Select Obtain an IP addr...

Page 9: ...static IP address in the same range as the Wireless Router or Access Point Click Properties Click OK IP address 192 168 0 51 Subnet mask 255 255 255 0 Click OK Click Internet Protocol TCP IP Select O...

Page 10: ...lect Obtain an IP address automatically if the Wireless Router or Access Point has DHCP server enabled Select Detect connection to network media Click OK IP address 192 168 0 51 Subnet mask 255 255 25...

Page 11: ...Notes...

Page 12: ...mers within the United States for the duration of the warranty period on this product U S customers can contact D Link technical support through our web site or by phone D Link Technical Support over...

Reviews: