background image


Version 1.0 


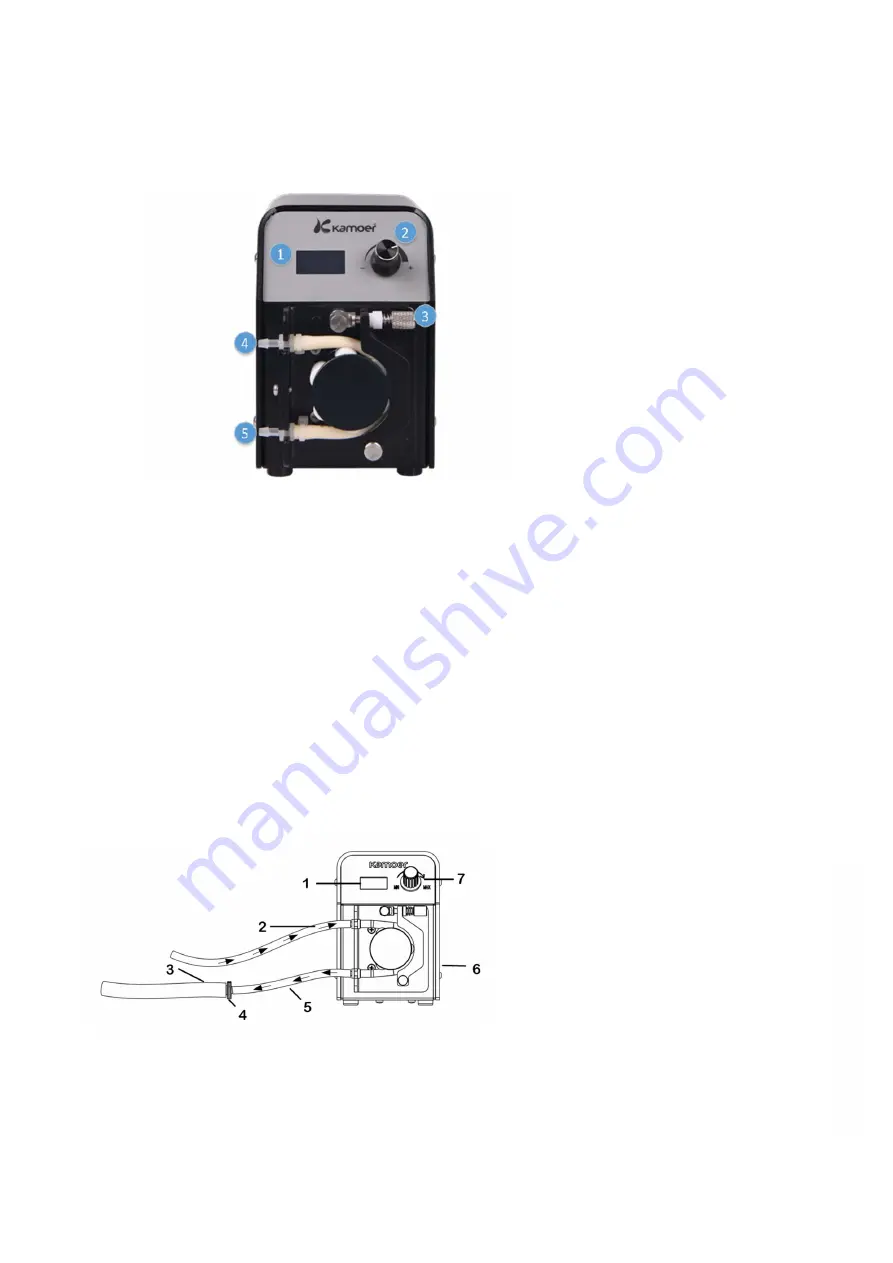
Product Layout 


1.LCD Display 

2.Controll Dial 

3. Pump head adjustment screw 

4. Inlet 

5. Outlet 


Installation


Positioning the pump 

The FX-STP is a self-priming pump so can sit above or below the water level in the aquarium or sump. 
To avoid excess pressure on the pump head the tubing should be kept as short as possible. 

Please carefully check that the inlet and outlet tube connections are correct on the pump head and 
that the hoses are pushed fully onto connections before installation.  

The pump head adjustment screw should never be over tightened, this will cause excessive wear on 
moving components. Only tighten enough to ensure a reliable pinch on the Pharmed hose.


The pump should be secured into place or installed in a stable location not above open water, in areas 
prone to splashing or in very humid environments. 


1.


LCD Display 

2.


Inlet tube 3.2 x 6.4mm 

3.


Outlet tube 6.4 x 9.6mm 

4.


Tube connector 

5.


Outlet tube 3.2 x 6.4mm 

6.


Power connection 

7.


Control Dial 


w

w

w

.th

ea

qu

ari

um

so

lu

tio

n.c

om


Summary of Contents for Kamoer FX-STP WIFI

Page 1: ...FX STP WIFI PERSTALTIC PUMP USER MANUAL...

Page 2: ...your pump to the app 5 Programming the pump in the app 6 Manual app override 7 Manual pump operation 7 Calibration Using the app 7 Manual calibration 8 Advanced Settings Settings in the app Renaming...

Page 3: ...fers long life heat resistance acid alkali resistance and ozone UV resistance Min flow rate 0 1ml minute Max flow rate 140ml minute Easily calibrated via the Kamoer Remote app or manual control dial T...

Page 4: ...orrect on the pump head and that the hoses are pushed fully onto connections before installation The pump head adjustment screw should never be over tightened this will cause excessive wear on moving...

Page 5: ...Play store search for Kamoer Remote and download the app with the corresponding icon above Kamoer Remote app supports Android 4 4 and above and supports iOS 9 1 and above Register your cloud account Y...

Page 6: ...o two separate 2 4 and 5ghz networks before attempting to connect the pump Connect the power supply to the DC socket on the back of the pump and plug in to a mains power source Open the App click the...

Page 7: ...e flow rate of the pump can be set by tapping on the flow setting number and entering the desired flow rate or by moving your finger along the flow curve above the number When the desired flow rate ha...

Page 8: ...screen and then re select the device Manual pump operation The FX STP Wi Fi does not need to be connected to the app for basic operation To set the flow rate of the pump press the control dial to set...

Page 9: ...t up to 60 seconds For increased accuracy a longer calibration time is best Please be aware the measuring cylinder needs to be large enough to hold the volume of the water for the calibration Tap on S...

Page 10: ...Turn the control dial to select 60s then press The pump will run for 60 seconds as it does the time will countdown on the LCD screen When finished place the measuring cylinder on a flat level surface...

Page 11: ...he maximum life can be achieved and that the head runs smoothly Calibrate the pump Used to calibrate the unit to ensure correct flow rate Please see calibration in this instruction manual Reset progra...

Page 12: ...displayed in the top right corner of the LCD screen built into the pump NET 0 Indicates that the network is connected and functioning NET S The pump is in distribution state and is ready to be connec...

Page 13: ...of the date of purchase D D The Aquarium Solution Ltd undertakes to repair or at our decision replace the defective part free of charge Our policy is one of continual technical improvement and we rese...

Reviews: