background image

3

6. OPERATION CONTROLS AND FUNCTIONS

6.1 Front Panel

PUSH

Coaxial In  -20.0 dB

 44.1K  ->   44.1K

EXIT POWER

MIC

SERVICE

Digital Presentation Amplifier 

MENU

1

2

3

4

5

6

7

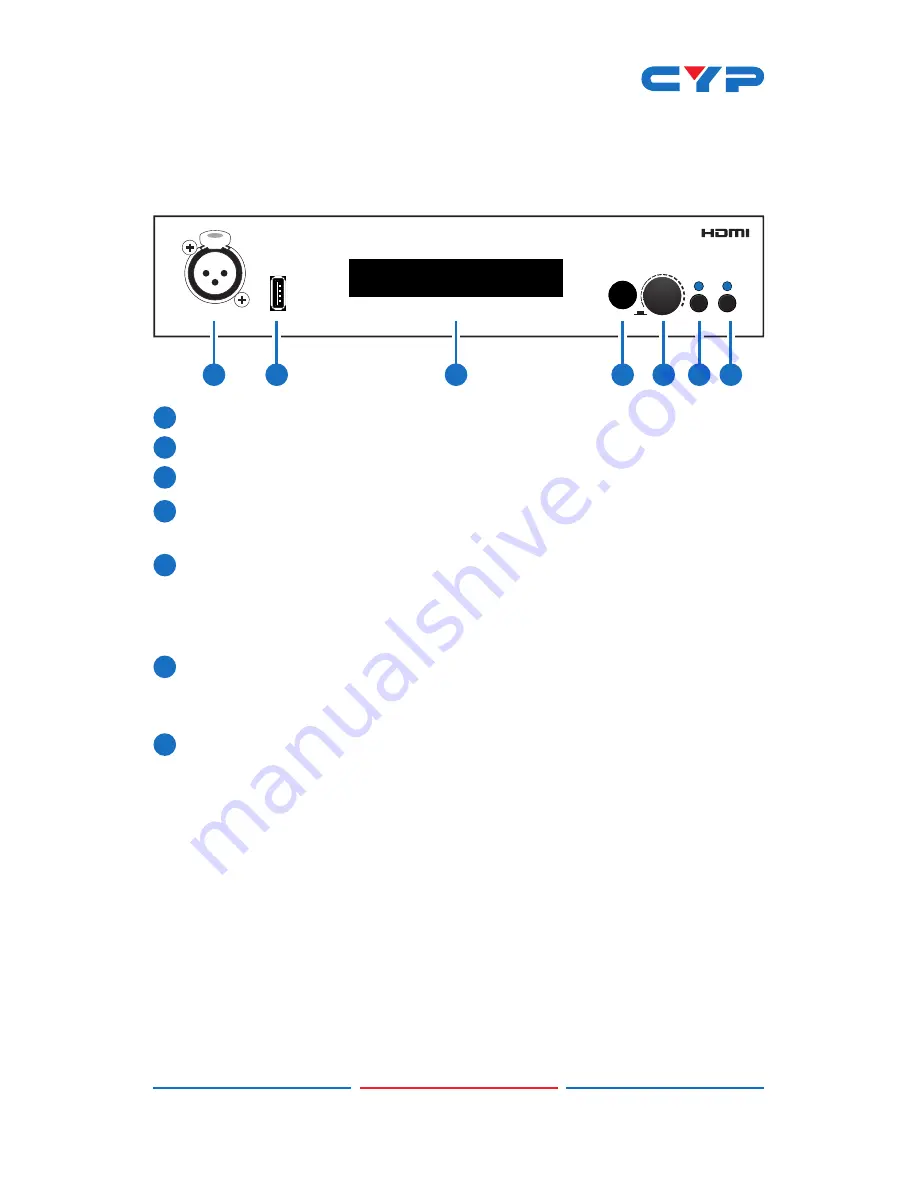
1


MIC: 

Connect to a microphone or a mono balanced source.

2


UPDATE: 

Manufacturer use only. 

3


OLED: 

Display current  source selection and volume setting.

4


IR WINDOW: 

Accepts the IR signal from the supplied remote 

control.

5


CONTROL: 

Press this button to enter the OLED menu. Turn the wheel 

to navigate the menu and press it again to enter or confirm the 

selection. When not in the menu turn the wheel to directly adjust 

the volume level.

6


EXIT: 

Press this button to exit the OLED menu. When not in the menu 

press this button to mute the output, the LED will illuminate in red. 

Press it again to unmute.

7


POWER: 

Press this button to turn on the unit, the LED will illuminate 

in blue to indicate that it is powered. Press it again to switch to 

standby mode, the LED will turn red to indicate that it is in standby.

Summary of Contents for DCT-23

Page 1: ...DCT 23 Integrated Zone Amplifier Operation Manual Operation Manual ...

Page 2: ...serves the right to make improvements to this document and or product at any time and without notice COPYRIGHT NOTICE No part of this document may be reproduced transmitted transcribed stored in a retrieval system or any of its part translated into any language or computer file in any form or by any means electronic mechanical magnetic optical chemical manual or otherwise without express written p...

Page 3: ...t through any openings or empty slots in the unit as you may damage parts inside the unit Do not attach the power supply cabling to building surfaces Use only the supplied power supply unit PSU Do not use the PSU if it is damaged Do not allow anything to rest on the power cabling or allow any weight to be placed upon it or any person to walk on it To protect the unit from overheating do not block ...

Page 4: ...nctions 3 6 1 Front Panel 3 6 2 Rear Panel 4 6 3 Remote Control 5 6 4 OLED Menu 5 6 5 RS 232 Protocols 7 6 6 RS 232 and Telnet Commands 7 6 7 Telnet Control 9 6 8 WebGUI Control 11 7 Connection Diagram 12 8 Specifications 13 8 1 Technical Specifications 13 8 2 Audio Specifications 14 8 3 Amplifier Specification 14 9 Acronyms 15 ...

Page 5: ...ound amplification With output audio sampling rate support up to 48kHz and I O data rate support up to 24 bit it provides a high quality sound reproduction 2 APPLICATIONS Public speech Corporate events Home systems Ceiling speaker systems Matrix zone amplification 3 PACKAGE CONTENTS 1 Integrated Zone Amplifier 1 Remote Control CR 126 1 IR Extender 1 24V 3 75A DC Power Adaptor 1 Power Cable 1 Rack ...

Page 6: ...o bypass output Supports a wide range of resolutions from 480i to 1080p and VGA to WUXGA RB Dedicated XLR microphone input with independent volume control Supports microphone sound being embedded into video output Simultaneous output of sound on both digital and analog Analog line output selectable to be either fixed or variable output level Supports control via IR Remote and IR Extender input RS ...

Page 7: ... CONTROL Press this button to enter the OLED menu Turn the wheel to navigate the menu and press it again to enter or confirm the selection When not in the menu turn the wheel to directly adjust the volume level 6 EXIT Press this button to exit the OLED menu When not in the menu press this button to mute the output the LED will illuminate in red Press it again to unmute 7 POWER Press this button to...

Page 8: ...gnal from the unit s remote control 5 RS 232 Connect to a PC Laptop or control system with D sub 9 pin cable for RS 232 control 6 LINE IN Connect to an audio source with 3 5mm mini jack cable for stereo audio signal input 7 OPT and COAX IN Connect to source equipment such as a Set top box or games console with an optical or coaxial digital output 8 OPT and COAX OUT Digital audio output Connect to ...

Page 9: ...d input source directly 5 MENU Press this button to enter the OLED MENU then press the up or down buttons to select the required option and press it again to confirm the selection 6 EXIT Press this button to go back one step or exit from the menu 6 4 OLED Menu MAIN MENU SUB MENU ADJUSTMENTS Function Select Audio In HDMI Set Display Set MIC Set Line Out Set IP Config Reset to Default CR 126 MUTE PO...

Page 10: ...l In Coaxial In Line In RCA L R In HDMI Setting Video HDMI 1 HDMI 2 Audio HDMI 1 Ext Audio Display Set Timeout 5s Timeout 10s Timeout 15s Mic Setting Off Normal Phantom Line Mode Volume Line Out Setting Fix Level Default IP Configuration IP SN GN Reset To Default OK ...

Page 11: ...NC 8 NC 8 NC 9 NC 9 NC Baud Rate 115200bps Data bit 8 bits Parity None Flow Control None Stop Bit 1 6 6 RS 232 and Telnet Commands COMMAND DESCRIPTION HELP Display list of commands H Alias for HELP Alias for HELP PWR S 0 1 Power control S Status 0 Off 1 On SOURCE S 0 5 Source in selection S Status 0 HDMI 1 1 HDMI 2 2 Opt 3 Coax 4 Line In 5 RCA In ...

Page 12: ...nt the IP configuration to the screen RESETIP Reset the IP configuration to factory defaults SHOWMAC Print the MAC address to the screen SHOWTPORT Print the Telnet communication port to the screen SHOWHPORT Print the HTTP communication port to the screen SIPADD Set the IP address SNETMASK Set the Net Mask address SGATEWAY Set the Gateway address SHTTPPORT Set the HTTP communication port 1 62235 De...

Page 13: ...n the Search field then press enter Under Windows XP go to the Start menu and click on Run type cmd with then press enter In the Mac OS X Finder select Go Applications Utilities Terminal from the taskbar See below for reference Once in the command line interface CLI type telnet then the IP address and hit enter Note The IP address of the Integrated Zone Amplifier can be displayed on the unit s OLE...

Page 14: ...le commands Type IPCONFIG to show all IP configurations To reset the IP type RESETIP Note All the commands will be not executed unless followed by a carriage return Commands are case sensitive If the IP is changed then the IP Address required for Telnet access will also change accordingly ...

Page 15: ...ol On a PC Laptop that is connected to the same active network as the Integrated Zone Amplifier open a web browser and type unit s IP address into the web address entry bar The browser will display the unit s control page ...

Page 16: ... IR IN OUT IN R L R L DC 24V 1 2 3 4 V GND GND GND V 7m 3m 3m 60 m m 3m IR Extender Modem Router HDTV Power Supply Speakers Active Speakers Amplifier DVD Player Blu ray Player Set top Box Smartphone or Tablet PC or RS 232 Control System CD Player Analog Stereo Output RS 232 Analog Stereo Input Analog Stereo Input Digital Optical and Coaxial Inputs Digital Optical Output Digital Coaxial Output Spea...

Page 17: ... Output Level 2 Vrms 0 2 HDMI Cable Distance Up to 15m 1080p 12 bit IR Frequency 38kHz ESD Protection Human body model 8kV air gap discharge 4kV contact discharge Power Supply 24V 3 75A DC US EU standards CE FCC UL certified Dimensions 215mm W 172 5mm D 46mm H Weight 1060g Chassis Material Aluminum Silkscreen Color Black Operating Temperature 0 C 40 C 32 F 104 F Storage Temperature 20 C 60 C 4 F 1...

Page 18: ...Level T H D N Freq Response SNR HDMI 1 2 OPTICAL COAX 0dBFS 1kHz HDMI 0dB 1dB 0 01 1dBFS 80dB OPTICAL COAX L R 2 0Vrms 10 0 1 1dBFS 70dB Analog L R Phone Jack 2 0Vrms 1kHz HDMI 0dB 1dB 0 01 1dBFS 80dB OPTICAL COAX L R 2 0Vrms 10 0 1 1dBFS 80dB 8 3 Amplifier Specification ...

Page 19: ...15 9 ACRONYMS ACRONYM COMPLETE TERM CAT5e Category 5 Cable CAT6 Category 6 Cable COAX Coaxial HDMI High Definition Multimedia Interface OLED Organic Light Emitting Diode OPT Optical ...

Page 20: ...Home page http www cypress com tw CYPRESS TECHNOLOGY CO LTD ...

Reviews: