background image

14

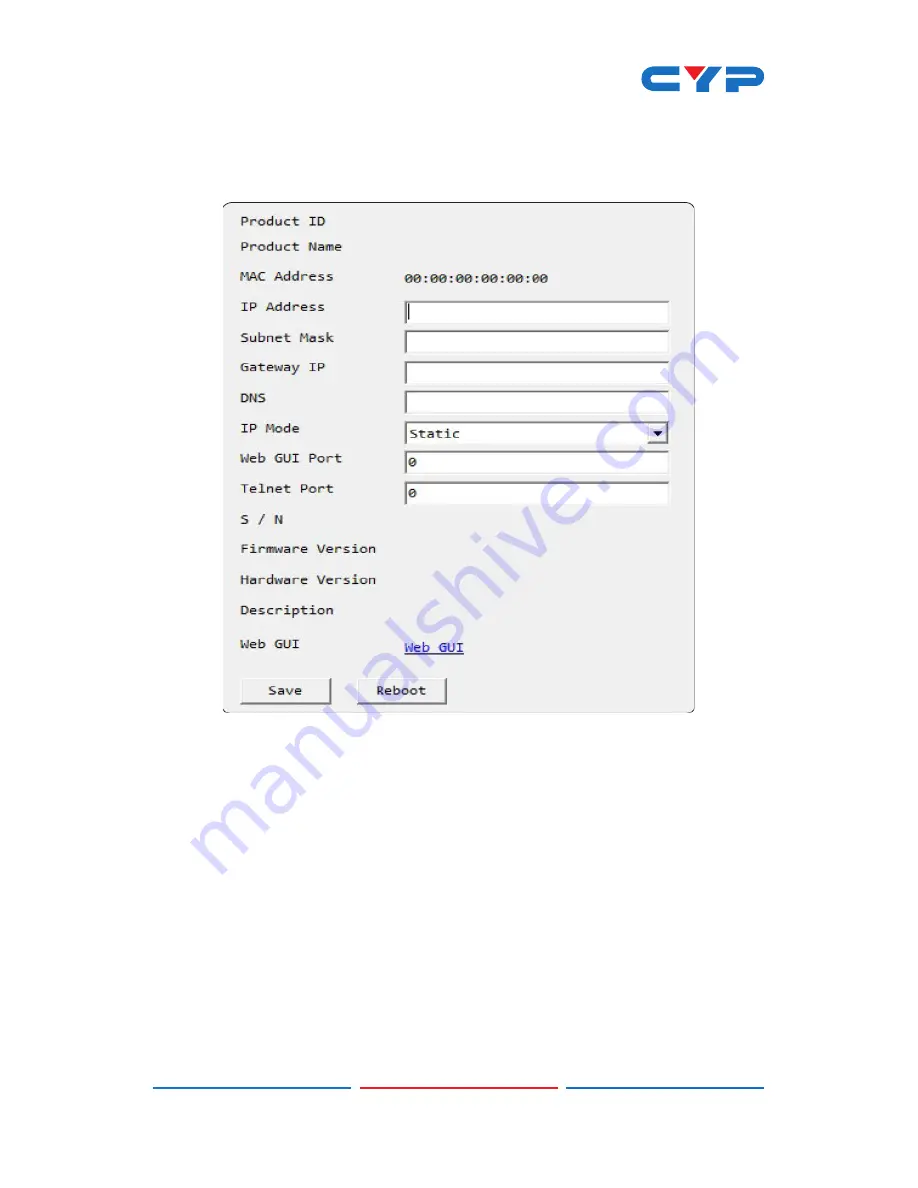
switch the unit into DHCP mode to automatically obtain proper 

network settings from a local DHCP server. To switch to DHCP 

mode, please select DHCP from the IP mode drop-down, then 

click “Save” followed by “Reboot”.

(4) 

Once you are satisfied with the network settings, you may use 

them to connect via telnet or WebGUI. The network information 

window provides a convenient link to launch the WebGUI di-

rectly.

 

Login to the WebGUI:

(1) 

By default, both the Username and Password are “admin” for 

the WebGUI. The administrator password can be changed within 

the “System Settings” tab of the WebGUI if desired.

Summary of Contents for CPLUS-V4H4HP

Page 1: ...CPLUS V4H4HP 4K UHD 4 x 4 Matrix with USB Power Supply Operation Manual Operation Manual ...

Page 2: ......

Page 3: ...echnology reserves the right to make improvements to this document and or product at any time and without notice COPYRIGHT NOTICE No part of this document may be reproduced transmitted transcribed stored in a retrieval system or any of its part translated into any language or computer file in any form or by any means electronic mechanical magnetic optical chemical manual or otherwise without expre...

Page 4: ... product Never push an object of any kind into this product through any openings or empty slots in the unit as you may damage parts inside the unit Do not attach the power supply cabling to building surfaces Use only the supplied power supply unit PSU Do not use the PSU if it is damaged Do not allow anything to rest on the power cabling or allow any weight to be placed upon it or any person walk o...

Page 5: ... Panel 5 6 3 Remote Control 6 6 4 LCD Menu Tree 7 6 5 IR Cable Assignments 7 6 6 RS 232 Protocol 8 6 7 RS 232 Command 9 6 8 Telnet Control 12 6 9 WebGUI 13 6 9 1 Switch 15 6 9 2 EDID Settings 18 6 9 3 System Setting 21 6 9 4 Admin log out 21 7 Connection Diagram 22 8 Specifications 23 8 1 Technical Specification 23 8 2 Support Timing 24 8 3 HDMI Cable Length 25 ...

Page 6: ...problems This unit also features four USB ports which supply up to 5V 1A power for use with connected optical fiber or AOC fiber cable extenders By using these specialized cables your HDMI content can be extended much further than would be possible with normal HDMI cables The built in OSD has the ability to display user editable general information text so each output can display up to 2 lines of ...

Page 7: ...liant Supports HD resolutions up to 3840x2160 60 Hz YUV 4 4 4 8 bit 4096x2160 60 Hz YUV 4 4 4 8 bit Supports 48 bit Deep Color up to 1080p60 Supports pass through of LPCM 7 1 bitstream and HD bitstream audio formats Supports six internal EDIDs four external EDIDs copied from connected devices and four user provided EDIDs Four USB ports to supply 5V 1A power to optical fiber and AOC fiber extension...

Page 8: ...ection and execute the routing change 4 CONFIRM Press this button to confirm newly made input output routing selections CANCEL Press this button to cancel newly made input output preset routing selections before they have been confirmed 5 MENU Press to enter the LCD menu or to back out from menu items ENTER Press to confirm a selection within the LCD menu or to go deeper into a menu item Press to ...

Page 9: ...the function is active 9 MUTE The MUTE button functions as a blank audio video source To use it follow the standard matrix routing instructions but use the MUTE button as the input to blank out the selected outputs When a MUTE input is in use it will show up as M within the routing display 10 LCD window Displays the unit s menu settings and information ...

Page 10: ... be the same as the HDMI output it is paired with 3 USB POWER OUTPUT 1 4 Each USB port provides 5v 1A of power intended for use with HDMI over AOC Active Optical Cables fiber optic video extension cables 4 SERVICE This slot is reserved for firmware update use only 5 CONTROL Connect directly or through a network switch to your PC laptop to control the unit via telnet WebGUI 6 RS232 Connect directly...

Page 11: ...o output Press the key of the input 1 4 you wish to route then press mute key to mute video output INFO Switches the information displayed on each output s OSD between the user customized text and the current video Ethernet details PRESET Press to enter the preset call menu in the LCD window Press the buttons followed by the ENTER button to select and activate the preferred preset 4 a MENU Press t...

Page 12: ...et Setup 1 2 3 4 Network Status Link Valid Mode Static DHCP IP Mask Gate MAC Network Setup Mode Static DHCP Static IP Mask Gate Firmware Version Firmware Update USB update Factory Reset Factory reset 6 5 IR Cable Assignments 3 1 2 3 2 1 IR Signal Power Grounding IR Extender ...

Page 13: ... MATRIX REMOTE CONTROLLER Pin Assignment Pin Define TX RX 1 NC 1 NC 2 TX 2 RX 3 RX 3 TX 4 NC 4 NC 5 GND 5 GND 6 NC 6 NC 7 NC 7 NC 8 NC 8 NC 9 NC 9 NC Baud Rate 115200bps Data Bits 8 Parity None Flow Control None Stop Bits 1 ...

Page 14: ...TIP P1 P2 P3 P1 IPADDRESS P2 NETMASK P3 GATEWAY P1 P3 X X X X X 0 255 IPCONFIG Display the cur rent IP configu ration NONE REBOOT System reset NONE QUIT Telnet QUIT NONE P0 Power off NONE P1 Power on NONE STORE Store current I O position STORE P P Port 1 4 SHOW Show current port s I O posi tion STORE P P Port 1 4 PRESET Preset the store I O position PRESET P P Port 1 4 NAME Set Preset name NAME NA...

Page 15: ...E USB port note Device will wating for the USB device plug in or power cycle to reboot NONE A Set output A source AP P Input Port 1 4 B Set output B source BP P Input Port 1 4 C Set output C source CP P Input Port 1 4 D Set output D source DP P Input Port 1 4 AB Set output ABCD source at the same time AB P P Input Port 1 4 USEREDID Set user EDID name USEREDID P1 P2 P1 Port 1 4 P2 Name 1 8 Characte...

Page 16: ... OSDFSIZE P1 P2 P1 Output Port 1 4 P2 Size 1 3 OSDFCOLOR Set OSD font color OSDFCOLOR P1 P2 P1 Output Port 1 4 P2 Font Color 1 9 OSDBGCOLOR Set OSD back ground color OSDBGCOLOR P1 P2 P1 Output Port 1 4 P2 Background Color 1 9 OSDTS Set OSD back ground transpar ent level OSDTS P1 P2 P1 Output Port 1 4 P2 Transparent Level 1 8 OSDINFO Set OSD informa tion on off OSDINFO P P Action ON OFF ROSDINFO Ge...

Page 17: ...s Telnet in Windows 7 click on the Start menu and type cmd in the search field then press Enter Under Windows XP go to the Start menu click on Run type cmd then press Enter Under Mac OS X go to Go Applications Utilities Terminal See below for reference Once in the CLI Command Line Interface type telnet followed by the IP address of the unit and 23 then hit Enter ...

Page 18: ... unit s default IP address is 192 168 1 50 2 Connect the unit and your PC Laptop to the same active net work and execute the Device Discovery software Click on Find Devices on Network and a list of devices connected to the local network will show up indicating their current IP address 3 By clicking on one of the listed devices you will be presented with the network details of that particular devic...

Page 19: ...followed by Reboot 4 Once you are satisfied with the network settings you may use them to connect via telnet or WebGUI The network information window provides a convenient link to launch the WebGUI di rectly Login to the WebGUI 1 By default both the Username and Password are admin for the WebGUI The administrator password can be changed within the System Settings tab of the WebGUI if desired ...

Page 20: ... new video route please click the button of the HDMI output you wish to send video to and then click on the button of the preferred HDMI input port If desired you may select more than one output prior to selecting the input As you select each button they will change their color to orange The new route will become active immediately after selecting the input port and the routing information display...

Page 21: ... within the ap propriate output button To unmute the output please click the icon a second time Output and Input Naming All inputs and outputs can be renamed as required To rename the input and output ports please click the edit icon Click the Save button to confirm the change Note Blank spaces are not allowed in names ...

Page 22: ...changes occur as soon as they are made Preset Setting This matrix can store up to four video routing presets Presets can be utilized to store multiple different routing states in advance for rapid hassle free recall Store Once you have the matrix set the way you like you can click the Preset Set icon in the upper right corner of the window and the Preset Set window will open You may also name the ...

Page 23: ... routes stored within it The preset will load immediately upon select ing the preset 6 9 2 EDID Settings This matrix provides the option of six standard EDIDs four sink sourced EDIDs and four customer uploaded EDIDs that can be assigned to each input port individually The names of the four customer upload ed EDIDs can changed if desired Customer EDID Settings To upload a custom EDID please click t...

Page 24: ...ected please click the Upload button in the window and the file will be trans ferred to the matrix Sink EDID Download To save an existing custom EDID to your local PC please press the Download button next to the Customer EDID Settings item you would like to save Depending on your browser settings you will either be asked where to save the downloaded file or the file will be transferred to the defa...

Page 25: ...080p 60Hz 148MHz LPCM 2 0 8 bit color 2 FHD MCH 1080p 60Hz 148MHz LPCM 7 1 bitstream 8 bit color 3 4K UHD 2CH 3840 2160p 30Hz 297MHz LPCM 2 0 Deep Color 8 10 12 bit 4 4K UHD MCH 3840 2160p 30Hz 297MHz LPCM 7 1 bit stream Deep Color 8 10 12 bit 5 4K UHD 2Ch 3840 2160p 60Hz 594MHz LPCM 2 0 Deep Color 8 10 12 bit 6 4K UHD MCH 3840 2160p 60Hz 594MHz LPCM 7 1 bit stream Deep Color 8 10 12 bit Note In s...

Page 26: ...urn ing the unit s power on off turning the USB power support on off changing the network settings resetting the system to fac tory defaults and updating the firmware 6 9 4 Admin log out Clicking the Logout tab will automatically log the user out of the WebGUI and return to login page ...

Page 27: ... 3 4 V GND GND GND V USB POWER OUTPUT 5V 1A Blu ray PS4 Player HDMI TV Display HDMI TV Display HDMI TV Display HDMI TV Display HDMI TV Display HDMI TV Display PC HDMI TV Display HDMI TV Display Active Speakers AOC Cable Active Speakers Amplifier Amplifier Blu ray PS4 Player Blu ray PS4 Player Blu ray PS4 Player ...

Page 28: ...Control Output Ports 4 x HDMI 4 x USB port 5V 1A power supply Supported Resolutions 480i 4K 24 50 60Hz 4K 50 60Hz VGA WUXGA IR Frequency 38kHz Baud Rate 115200 bps Power Supply 24VDC 3 75A US EU standards CE FCC UL certified Chassis Material Metal Color Black Dimensions 438mm x 49mm x 269mm W H D Case Only 482mm x 49mm x 274mm W H D All Inclusive Weight 2966g ...

Page 29: ...p 50 59 94 60 V V 1280x768 60 75 V V 1280x800 60RB 60 V V 1280x960 60 V V 1280x1024 60 V V 1360x768 60 V V 1366x768 60 V V 1440x480i 59 94 60 V V 1440x576i 50 V V 1400x1050 60RB 60 V V 1440x900 60RB 60 V V 1600x900 60 V V 1600x1200 60 V V 1680x1050 60RB 60 V V 1920x1080 60RB V V 1920x1080i 60 V V 1920x1080p 23 97 24 25 29 97 30 59 94 60 V V 3840x2160p 24 25 30 V V 3840x2160 50 60 4 4 4 50 60 4 2 0...

Page 30: ...25 8 3 HDMI Cable Length Timing Input Output 1080p 10M 10M 4k2k 30 10M 10M 4k2k 60 certified HDMI cable 3M 10M ...

Page 31: ......

Page 32: ...Home page http www cypress com tw CYPRESS TECHNOLOGY CO LTD MPM V4H4HP ...

Reviews: