Level-Eye
®
Installation
The Level-Eye® installation should be performed before the filling
process. Only install the Level-Eye® head & wand onto an empty tank.
1. IMPORTANT!
Verify all the tank contents are removed and the tank
is at atmospheric pressure.
2. Verify the wand and sealing nut are the correct sizes for the
targeted tank model.
3. Verify that the O-ring Seal is in place on the sealing nut.
4. Remove the old float rod from the knuckle on top of the tank.
5. Remove the sealing nut from the Level-Eye wand, thread the nut
into the tank knuckle, and wrench-tighten the nut.
(NOTE: DO NOT
over-tighten or damage may occur.)
6. Guide the wand through the sealing nut and wrench-tighten the
compression fitting.
(NOTE: DO NOT over-tighten or damage may
occur.)
7. Remove the cover from the Level-Eye and insert the provided
battery. Confirm that the LCD display turns on.
(NOTE: Because
the head is not yet connected to the wand, a “no symbol”
will
appear on the right side of the LCD.)
8. Attach the cover onto the Level-Eye head. Hand-tighten firmly to
fully engage waterproof seal.
9. Ensure the O-ring is in place on top of the wand.
10. Lift up the wingnut on the Level-Eye base to expose Brass
Connector Jack #1.
11. Push the Level-Eye head onto the wand firmly until both Brass
Connection Jacks #1 & #2 are fully engaged with each other.
(NOTE:
There should be no gap or obstruction with the connection.)
12. Hand-tighten the wingnut.
(NOTE: DO NOT wrench-tighten or
irreversible damage may occur that is not under warranty!)
13. Ensure the “no symbol”
is no longer displayed on the LCD
screen. This confirms a proper electronic connection of the Level-
Eye head with the wand.
14. Proceed to low and high calibrations. (
NOTE: Level-Eye will NOT
provide accurate readings until the entire low and high calibration
process is complete. See reverse side for instructions.)
BATTERY PERCENTAGE
Level-Eye® is able to calculate the amount of battery power remaining
and display it by percentages on the LCD screen at any time.
To check the battery level:
1. Single press and release the “L” button to view the
battery percentage remaining.
NOTE: The display
will read “bxx%” to indicate the remaining battery
life (i.e. b54%).
2. If battery level is less than 10%, a
symbol will appear.
U.S. TOLL
FREE
888-429-5832
www.cyl-tec.com
Level-Eye
®
User Manual
Sealing Nuts
(including O-ring)
3/4" UNF
(Cyl-Tec / TW tanks)
7/8" UNF
(Chart tanks)
Level-Eye
®
Battery CR2477
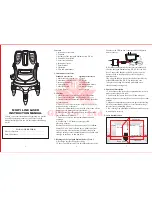
LEVEL-EYE® HEAD
LEVEL-EYE® WAND
SPARE PARTS
LCD Display
CylConnect®
connector
Wingnut
Buttons
Brass Connector
Jack #1 (inside)
Brass Connector
Jack #2 (inside)
Compression Fitting
O-ring (Wand)
O-ring Seal
(Sealing Nut)
Sealing Nut