


AlterPath KVM QuickStart Guide
Page 4
4.
Optionally, connect the KVM RP to your local work
station: Use a KVM cable to connect the VGA port
and PS/2 keyboard and mouse ports on the back of
your PC to the PC VGA port and PS/2 keyboard and
mouse ports on the KVM RP.
5.
Plug in the KVM RP’s power cord. If you performed
Step 4, you can skip this step.
The PC can supply power to the KVM RP.
6.
Go to “Power On the KVM and Connected Devices”
on page 4.
8. Power On the KVM and
Connected Devices
1.
Make sure the KVM’s power switch is off.
2.
Plug in the power cable.
3.
Turn on the power switches of the KVM, its
connected devices, and, if needed, the KVM RP.
9. Perform Basic Network
Configuration
Do one of the following to assign a fixed IP address to
the KVM, and to specify the netmask and other
networking parameters:
• Through a console connection to the console port, log
in and use the wiz command.
See “Configuring Basic Networking Using the wiz
Command” on page 4.
• Through a local KVM connection to the User 1 or
User 2 ports, log into the OSD and configure
networking through the network screen.
See “Configuring Basic Networking Using the OSD”
on page 5.
Before you start, collect the following network
information from network administrator.
Configuring Basic Networking Using
the wiz Command
The following procedures require a hardware
connection already made between the KVM’s console
port and the COM or USB port (through a USB to serial
adapter) of a computer, as described under “To Connect
to the Console Port” on page 3.
!
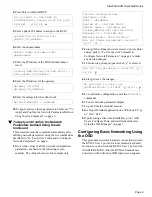
To Log Into the KVM Through the Console
From your terminal emulation application, log into the
console port as root.
As shown in the previous screen, the default password
is “cyclades.”
If the password has been changed from
the default, use the new password.
!
To Change the Password Through the
Console
If the default password “cyclades” is still in effect,
change the root password.
Important!
Changing the default password closes a
security hole that could be easily exploited.
1.
Enter the
passwd
command.
2.
Enter a new password when prompted.
!
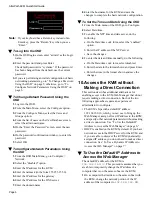
To Use the wiz Command to Configure
Network Parameters
1.
Launch the Configuration Wizard by entering the
wiz
command.
2.
At the prompt, enter
n
to change the defaults.
3.
Press Enter to accept default hostname, otherwise
enter your own hostname.
!
Hostname:
!
KVM’s public IP address:
!
Domain name:
!
DNS server’s IP address:
!
Gateway IP address:
!
Network mask:
!
KVM’s MAC address:
!
NTP server’ IP address:
KVM login:
root
Password:
cyclades
[root@KVM /]#
passwd
New password:
new_password
Re-enter new password:
new_password
Password changed
[root@KVM /]#
wiz
Set to defaults (y/n)[n]:
n
Hostname [KVM]:
kvm_hostname


