background image

Page 5 of 12

www.cybexintl.com 

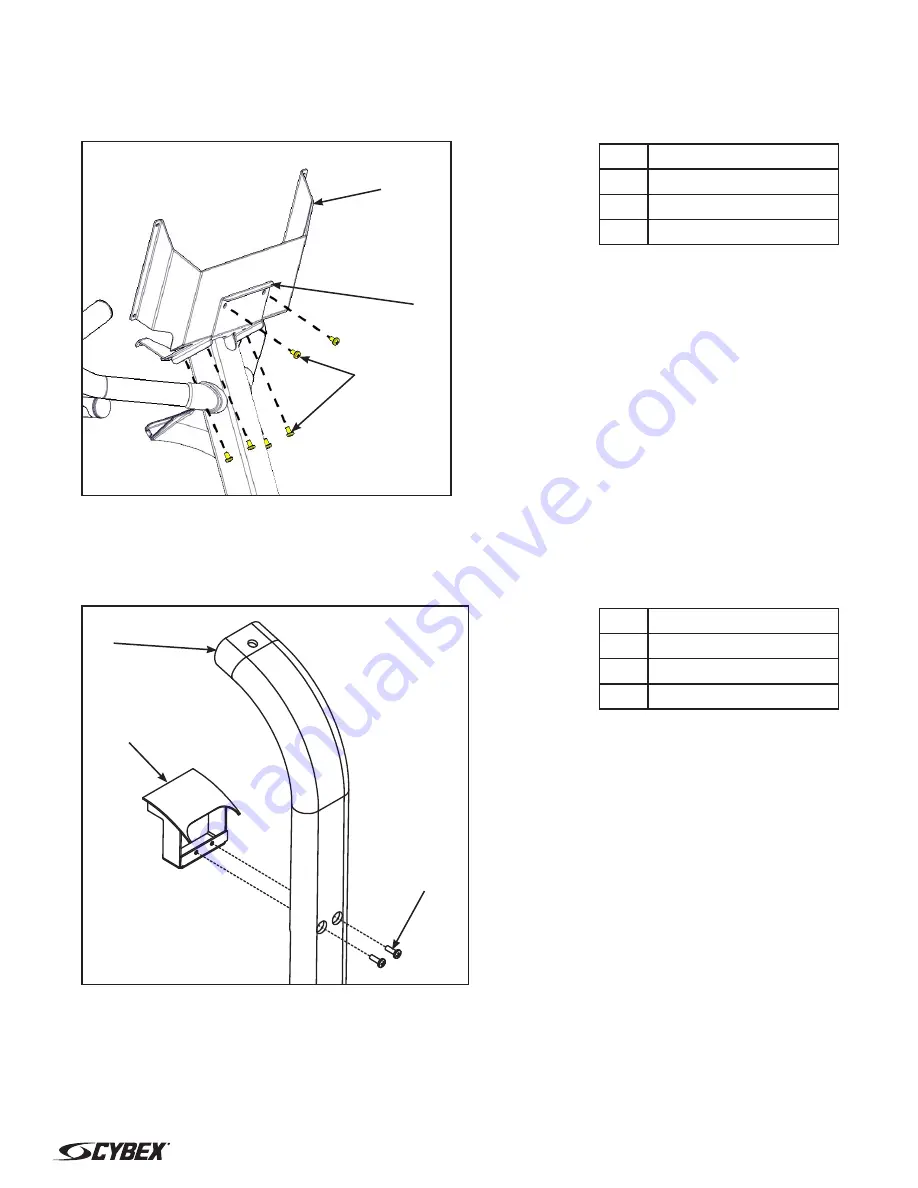
Remove console support screws

Remove and discard the six screws securing the console support to the weldment using a Phillips 

screwdriver.

3

1

2


Description

1

Console support

2

Weldment

3

Screw (6)

Assemble monitor bracket

1. 

Install the two 1/2” screws securing the hood to the monitor bracket using a Phillips 

screwdriver.

2

1

3


Description

1

Monitor bracket

2

Hood

3

1/2” Screw (2)

Summary of Contents for Netpulse 770C

Page 1: ...hly before installing this kit Verify the kit contents shown Netpulse monitor not included 8 1 2 3 4 5 6 7 9 10 11 12 13 14 15 16 17 Description 1 Back cover PL 24438 2 5 16 Locknut HN 42063 3 Washer HW 18123 4 Bolt HS 18157 5 1 Bolt 6 HS 00489 6 1 4 Locknut 6 HN 12079 7 1 2 Screw 2 HS 21672 8 Hood AF 24436 9 Decal DE 24616 10 Vesa mount HX 24440 11 Monitor bracket AF 24437 12 Coupler RJ45 CN 2274...

Page 2: ...p water and liquids away from electrical parts NOTICE Component damage Wear an ESD grounding strap during this procedure Connect ESD grounding strap to frame bolts or unpainted metal of frame If ESD grounding strap is not available touch frame bolts or unpainted metal of frame before handling any electronics Remove back cover Remove the four screws securing the back cover to the console assembly u...

Page 3: ...rd 3 Console support 4 Screws 6 2 Unplug cables from the MCC board by un latching connectors with the following procedure A Press in the top of the cable connector Latch Pull Straight Out From Connector DO NOT PULL CONNECTOR OUT BY THE WIRES B Ensure the latch disengages the connector C Unplug cable by holding down the latch and pulling straight out from the connector Do not pull on wires remove b...

Page 4: ... optional 3 Unplug CardioTouch cable The CardioTouch cable is held in place by a notch in the access cover A Press in both side latches of the cable connector A B C DO NOT PULL CONNECTOR OUT BY THE WIRES B Ensure the latches disengage from the connector C Unplug cable by holding down the latches on both sides and pulling straight out from the connector Do not pull on wires remove by connector 4 Un...

Page 5: ...g the console support to the weldment using a Phillips screwdriver 3 1 2 Description 1 Console support 2 Weldment 3 Screw 6 Assemble monitor bracket 1 Install the two 1 2 screws securing the hood to the monitor bracket using a Phillips screwdriver 2 1 3 Description 1 Monitor bracket 2 Hood 3 1 2 Screw 2 ...

Page 6: ... 1 Bolt 2 Washer 3 5 16 Locknut 4 Vesa mount 5 Monitor bracket Install monitor bracket 1 Install the six bolts securing the console support to the weldment using a 7 16 wrench 4 1 3 2 5 Description 1 1 4 Locknut 6 2 Monitor bracket 3 Console support 4 Weldment 5 Bolts 6 2 Install the six 1 4 locknuts securing the monitor bracket to the console support and weldment using a 7 16 wrench ...

Page 7: ...ps screwdriver 2 1 Description 1 Front right cover 2 Screws 2 770R Remove the three screws securing the front left cover using a Phillips screwdriver 3 2 1 Description 1 Plastic connectors 2 Front left cover 3 Screws 2 In addition to the mounting screws there are five plastic connectors that secure the front covers together ...

Page 8: ...own into the weldment The CAT6 cable will plug into the console 1 3 4 5 2 Description 1 Monitor bracket 2 Weldment 3 Power and COAX 4 CAT6 5 CSAFE 770C Route the power and coax cable and CAT6 cable into the top of the upright tube until it exits through the lower hole in the upright tube 2 1 3 Description 1 Cables 2 Upright tube 3 Lower hole ...

Page 9: ...top of the upright tube until it exits through the lower hole in the upright tube 2 3 1 Description 1 Cables 2 Upright tube 3 Lower hole Install front covers 770C Install the two screws securing the front right cover using a Phillips screwdriver 2 1 Description 1 Front right cover 2 Screws 2 ...

Page 10: ...astic connectors that secure the front covers together Ensure that all five plastic connectors are inserted properly in each front cover Install console assembly 1 Plug cables into the MCC board on the console assembly MCC board cables 1 2 3 4 5 6 7 8 9 10 Description 1 Wireless audio optional 2 CSAFE optional 3 Display 4 Fan 5 LED display board 6 Headphone jack 7 iPod optional 8 Heart rate 9 Hand...

Page 11: ...he console support using a Phillips screwdriver 1 3 2 Description 1 Console Assembly 2 Console Support 3 Screw 6 Install back cover Install the four screws securing the back cover to the console assembly using a Phillips screwdriver 3 2 1 Description 1 Console assembly 2 Back cover 3 Screw 4 ...

Page 12: ... cybexintl com Copyright 2013 Cybex International Inc All rights reserved LT 24878 4 A November 2013 Page 12 of 12 www cybexintl com Install decal Place decal on top of hood 2 1 Description 1 Decal 2 Hood Complete installation 1 Plug the optional power supply cord into the power outlet 2 Operate the unit at all levels to verify proper operation ...

Reviews: