11
Cybex 18030 Bravo Lift Owner’s Manual
Assembly Procedure
Two people will be required for this procedure.
Read and understand all instructions thoroughly before assembling this unit. Check all items
carefully. If there is damage, see the Customer Service section of this manual for proper procedure to
return, replace, or reorder parts.
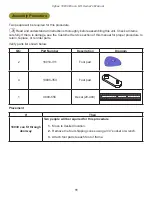
Verify parts list shown below.
Qty
Part Number
Description
Diagram
2
16010-311
Foot pad
4
13000-353
Foot pad
13000-354
13000-353
13000-354
13000-354
13000-355
13000-354
13000-355
16010-311
16010-311
12090-322
17000-320
12000-345
PR07004
1
4800-556
Decal (20-400)
125
1:1
OWATONNA
MFG. APPR.
TECH. PUBS. APPR.
DATE
DATE
REV.
DWG. NO.
SCALE
SIZE
CHECKED BY
DWG. BY
TITLE:
FINISH:
MATERIAL:
B/C
SHEET
OF
2
2
EXCEPT AS NOTED
GENERAL
TOLERANCES:
2 DECIMALS ± .03
3 DECIMALS ± .015
ANGLES ± 1°
FEATURES SHOWN
PERPENDICULAR OR
PARALLEL SHALL BE
SO WITHIN ± 1°
REMOVE ALL BURRS
BREAK SHARP EDGES
.005/.010 R
SURFACE FINISH
INDICATED PER
ANSI B46.1-1985
GENERAL
MACHINING
DIMENSIONS
IN INCHES
DATE
DATE
THIS NOTE REFERS TO ALL PLASTIC PARTS
AND ASSEMBLIES CONTAINING PLASTICS.
RAW MATERIAL AND COMPONENTS ON
SUB-ASSEMBLIES AND ASSEMBLIES MUST
COMPLY WITH EUROPEAN DIRECTIVE
RoHS 2002/95/EC.
REMOVE CARBURIZATION
AND SCALE FROM LASER
AND PLASMA CUT EDGES
4800-556
DECAL, WT PLATE (20 - 400)
9/14/05
REL
9/16/05
BB
NOTES:
1. FONT - 40 POINT HELVETICA BOLD.
HORIZONTAL SCALE 80%.
TRACKING -50.
.50
0
.750
1.018
2.034
3.050
4.066
5.082
6.098
7.114
8.128
9.146
10.162
11.178
12.194
13.208
14.226
15.242
16.258
17.274
18.290
19.306
1.47
1.69
Ø .406 3 PLCS
3.38
20.85
SPLIT BACKING
HERE
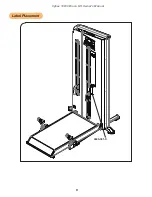
Placement
If
Then
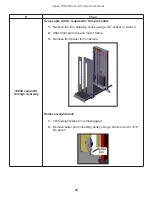
18030 can fit through
doorway
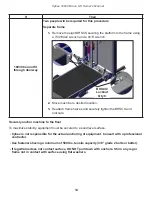
Two people will be required for this procedure
1.
Move to desired location.
2.
Remove the four shipping cones using a 3/4” socket or wrench.
3.
Attach foot pads to each foot of frame.


