background image

RKP220   


                                                                              User Manual


Rev. 

2.0 


P.5


Please read all of these instructions carefully before you use the device. 
Save this manual for future reference. 

● 

Unplug the LCD Keyboard Drawer from the power outlet before cleaning. 

● 

Do not spray liquid cleaners or aerosol directly on the device. Wet a cloth with a 
neutral detergent (e.g. clean water) and squeeze it tight, then clean the screen 
slightly with it. 

● 

Do not expose the LCD Keyboard Drawer directly to rain, water, moisture or 
sunlight. 

● 

Avoid pressure on the LCD screen to prevent permanent damage to the display. 

● 

Do not attempt to service the device yourself. Improper operation may void your 
warranty. Refer all servicing to qualified service personnel. 

● 

Safe storage environment of the LCD Keyboard Drawer is ranging between –20

o

and 60

o

C. Permanent damage could occur if the LCD Keyboard Drawer is stored 

outside the safe range. 

● 

Unplug  the  LCD  Keyboard  Drawer  immediately  and  call  qualified  service         
personnel under the following conditions: 
1.  If the monitor has been exposed to rain, liquid or water. 

2. 

If the monitor has been dropped or the casing has been damaged.


What the warranty does not cover 

1. 

Any product, on which the serial number has been defaced, modified or removed. 

2. 

Damage, deterioration or malfunction resulting from: 

a)  Accident, misuse, neglect, fire, water, lightning, or other acts of nature,    

unauthorized product modification, or failure to follow instructions supplied 
with the product. 

b)  Repair or attempted repair by anyone not authorized by us. 

c)  Any damage of the product due to shipment. 

d)  Removal or installation of the product. 

e)  Causes external to the product, such as electric power fluctuation or failure. 

f)  Use of supplies or parts not meeting our specifications. 

g)  Normal wear and tear. 

h)  Any other causes which does not relate to a product defect. 

 
3.     Removal, installation, and set-up service charges.


7. Important 

Safeguards


Summary of Contents for RKP220

Page 1: ...Toll Free 1 888 865 6888 Tel 510 226 8368 Fax 510 226 8968 Email sales RackmountMart com...

Page 2: ...User Manual 2U Rackmount LCD Keyboard Drawer RKP220 Series 20 LCD Optional KVM 8 16 Ports PS 2 KVM single console...

Page 3: ......

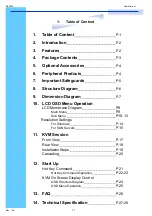
Page 4: ...10 LCD OSD Menu Operation LCD Membrane Diagram P 9 Main Menu P 9 Sub Menu P 10 13 Resolution Settings For Windows P 14 For SUN Servers P 15 11 KVM Session Front View P 17 Rear View P 18 Installation S...

Page 5: ...h LCD and keyboard drawer Build in slide rail and mounts easily in any 19 cabinet Built in On Screen Display controlled by integral membrane switches Lightweight Aluminium construction with black anod...

Page 6: ...m sources of excessive dust dirt heat water moisture and vibration Convenience for connecting the LCD Keyboard Drawer to the related facilities should be well considers too Unpacking The LCD keyboard...

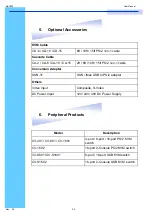
Page 7: ...6ft 10ft 15ft PS 2 3 in 1 cable Conversion Adapter SUN 31 SUN iMac USB to PS 2 adapter Video Input Composite S Video DC Power Input 12V 24V 48V DC Power Supply Others Model Description CV 401 CV 801 C...

Page 8: ...stored outside the safe range Unplug the LCD Keyboard Drawer immediately and call qualified service personnel under the following conditions 1 If the monitor has been exposed to rain liquid or water 2...

Page 9: ...inium front panel 3 Class A active matrix TFT LCD panel 4 Rear metal case 5 LCD inverter 6 LCD membrane 7 Ball bearing telescopic slides with stopper 8 Adjustable mounting bracket 9 KVM switch module...

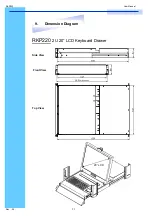
Page 10: ...RKP220 User Manual RKP220 2U 20 LCD Keyboard Drawer 9 Dimension Diagram Rev 2 0 P 7 Side View Front View Top View 20 LCD...

Page 11: ...RKP220 User Manual Rev 2 0 P 8 LCD Session...

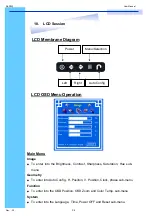
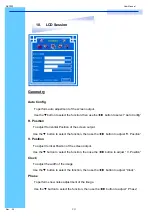
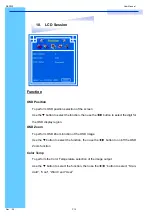
Page 12: ...Image To enter into the Brightness Contrast Sharpness Saturation Hue sub menu Geometry To enter into Auto Conflg H Position V Position Clock phase sub menu Function To enter into the OSD Position OSD...

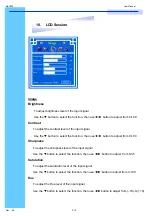
Page 13: ...tion then use W X button to adjust from 0 100 Sharpness To adjust the sharpness level of the input signal Use the T button to select the function then use W X button to adjust from 0 35 Saturation To...

Page 14: ...T button to select the function then use the W X button to adjust H Position V Position To adjust Vertical Position of the screen output Use the T button to select the function then use the W X button...

Page 15: ...on to select the digit for the OSD display region OSD Zoom To perform OSD Zoom function of the OSD image Use the T button to select the function then use the W X button to on off the OSD Zoom function...

Page 16: ...panol Italiano and Japanese Time To perform time setting of the system Use the T button to select the function then input the time setting and restore Power OFF To perform preset power off setting Use...

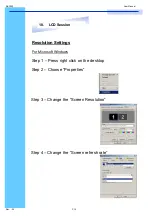
Page 17: ...nual Rev 2 0 P 14 10 LCD Session Step 2 Choose Properties Step 3 Change the Screen Resolution Step 4 Change the Screen refresh rate Resolution Settings For Microsoft Windows Step 1 Press right click o...

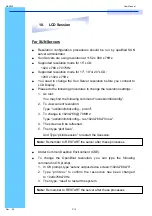
Page 18: ...find the following command usr sbin m64config 2 To view current resolution Type usr sbin m64config prconf 3 To change to 1024x768 70MHz Type usr sbin m64config res 1024x768x70 now 4 The screen will be...

Page 19: ...RKP220 User Manual Rev 2 0 P 16 KVM Session...

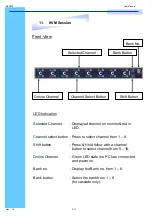
Page 20: ...ation Selected Channel Displayed channel on monitor red in LED Channel select button Press to select channel from 1 8 Shift button Press Hold follow with a channel button to select channel from 9 16 O...

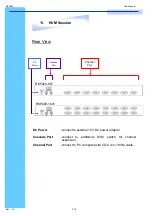
Page 21: ...Session Cascade Port Channel Port DC Power RKP220 801 RKP220 1601 DC Power connect to external 12V DC power adapter Cascade Port connect to additional KVM switch for channel expansion Channel Port co...

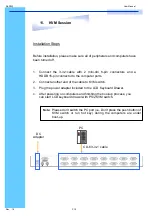
Page 22: ...n connector to the computer ports 2 Connect another end of the cable to KVM switch 3 Plug the power adapter included to the LCD Keyboard Drawer 4 After powering on computers and finishing the boot up...

Page 23: ...Channel button on the front of the PS 2 KVM switch to reset the PS 2 KVM switch CA 6 PS 2 KVM cable CA 6 PS 2 KVM cable Bank 1 Bank 2 Bank 8 Max Cascade level Max 8 level Max PC connection is 128 or...

Page 24: ...Press channel button to select the channel 5 Enter the password default is 00000000 eight zeros 6 Otherwise the keyboard mouse will be locked 7 If you forget your password send back to Manufacturer Ho...

Page 25: ...ed on PC only 4 Switch to Previous Bank 5 Switch to Specific Port Example a Bank 1 Port 4 b Bank 2 Port 16 Bank 1 8 No 0 or 1 First digit of Port Number 0 for Port 0 9 1 for Port 10 16 No 0 9 Second d...

Page 26: ...g 10 Find Port by name ROM REFLASH F I N D Note The default Beeper function is ON and beeper control is only for Note Not available for password reset PgDn B S Scroll Scroll R F Scroll Scroll Scroll S...

Page 27: ...TER COMPLETE TAB NEXT INSERT EDIT SELECT PORT PgDn PgUp BANK SELECT 04 OSD Structure Diagram Bank Session PC Session KVM Settings Session Menu Information OSD Menu Operation Use Tab key to select sess...

Page 28: ...KVM Setting Session Key in the existing password Enter the New Password Re Enter the New Password Changing Password complete The steps are shown as next picture 4 Console On OFF ON any user can use t...

Page 29: ...is set for PS 2 mode with the correct adapter Try a different mouse Avoid moving the mouse or pressing the mouse buttons when switching ports Avoiding switching ports during shutting down the PC proc...

Page 30: ...GA HDDB 15pin Female Cascade Port Connector PS 2 Keyboard Mini Din 6 pin Female PS 2 Mouse Mini Din 6 pin Female VGA HDDB 15pin Female KVM Cable Connection 3 in 1 HDDB 15 pin KVM Cable CA 6 10 15 PC s...

Page 31: ...M Contrast Ratio 800 1 Viewing Angle H x V 160 x 160 Display Area 408 x 306 Pixel Pitch 0 255 mm Response Time Tr 1ms Response Time Tf 4ms Back Light 2 Dual CCFTs Cold Cathode Fluorescent Tube Horizon...

Reviews: