background image

Smart Tower UPS 10-30KVA User Manual 

Chapter 6 Operator Control and Display Panel


28

6.2.3 Setting Display screen 

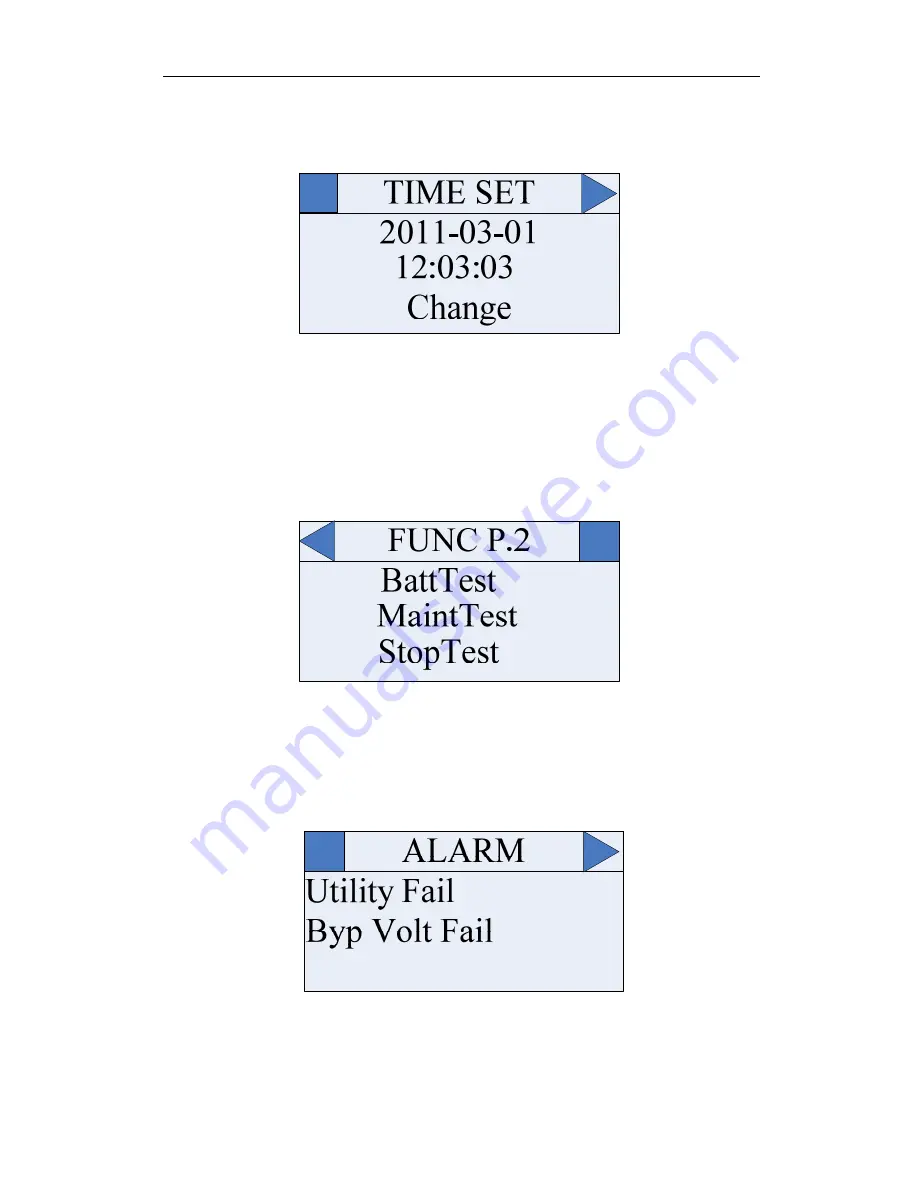
It is the time setting screen as below Fig.6-4 (Press left and right buttons to select “set” in homepage, 

then press “ENTER”.) 


Fig.6-4 Time Setting for 10KVA~30KVA UPS 

Press “ENTER” to confirm modification, then you can enter the time setting: from the second value 

of year, it jumps automatically when the value has been changed through left and right buttons; after all 
values have been changed, it will select “Confirm” automatically, then press ”ENTER” to finish time set. 

Other settings are similar with time setting. 

6.2.4 Function screen 

The function page 2 is shown as below (press left and right buttons to select “SET” in homepage and 

press ”ENTER”, then press right button several times): 


Fig.6-5 Function page.2 for 10KVA~30KVA UPS 

In  this  interface,  you  can  select  each  function  and  press  “ENTER”,  press  “ENTER”  again,  it  will 

display “Confirm” interface. 

6.2.5 State Screen 

The  alarm  page  is shown  as below  (press  left and  right  buttons to select  “STA”  in  homepage  and 

press 

ENTER”): 


Fig.6-6 Alarm page for 10KVA~30KVA UPS 

All the alarm information scrolls in this page. If none, it would be blank. 

Summary of Contents for STP3T10KE

Page 1: ...User s Manual STP3T10KE STP3T15KE STP3T20KE STP3T30KE CyberPower Systems Inc www cpsww com...

Page 2: ......

Page 3: ...urrent exceeds 3 5 mA and is less than 1000 mA Transient and steady state earth leakage currents which may occur when starting the equipment should be taken into account when selecting instantaneous R...

Page 4: ...standby time When replacing the batteries using the same type and modal and the same quantity When batteies connected the battery terminal voltage will exceed 400Vdc dangerous voltage to avoid electr...

Page 5: ...icable to Build in Battery UPS model 7 2 6 Control and Communication Cable 8 2 6 1 Battery and Environmental Temperature Detection Dry Contacts Optional 9 2 6 2 Remote EPO Input Port Optional 9 2 6 3...

Page 6: ...4 Procedure of Completely Power the UPS down 23 5 5 EPO Procedure 23 5 6 Language Selection 24 5 7 Password Control 24 Chapter 6 Operator Control and Display Panel 25 6 1 Introduction 25 6 1 1 LED In...

Page 7: ...ces 1 3 Environment Inspection Confirm the items as following before UPS installation 1 Check the environment temperature if above 25 please add cool system Note Environment temperature above 20 b att...

Page 8: ...tentially lethal Eye protection should be worn to prevent injury from accidental electrical arcs Remove rings watches and all metal objects Only use tools with insulated handles Wear rubber gloves If...

Page 9: ...from heat and air vents UPS use external batteries and the battery protection device a DC circuit breaker must be mounted close to batteries as possible Between it with batteries use the shortest powe...

Page 10: ...s well as the environment please refer to table 7 2 2 3 2 UPS Composition UPS compositions refer to fig 2 2 a 10KVA 30KVA cabinet without built in battery b 10KVA 30KVAcabinet with built in battery Fi...

Page 11: ...ve C normal thermal magnetic circuit breaker Note For IT power system 4 pole protective device must be installed in power input distribution cabinet external of UPS If install UPS higher input power d...

Page 12: ...D H 540 690 1100 with built in battery 280 730 668 without built in battery 320 781 788 Main Input Rated current A 15 22 5 30 45 Cable mm2 4 6 10 10 Output Rated current A 15 22 5 30 45 Cable mm2 4 6...

Page 13: ...itch ENSURE battery cable CORRECT polarity connection Warning Hazardous battery terminal voltage exceed of 400Vdc Ensure the connection from battery terminals to battery Circuit breack and to UPS term...

Page 14: ...d by Anderson terminals as shown below according to the mark of cables connect cables W404 W405 W406 to K K N K Fig 2 5b Build in battery connection diagram 2 6 Control and Communication Cable As show...

Page 15: ...3 interfaces diagram is shown in fig 2 7 interface description refer to table 2 2 J2 J3 Fig 2 7 Temperature dry contacts J2 and J3 Table 2 2 Description of input dry contact J2 and J3 Position Name De...

Page 16: ...or NC remote switch to the J10 port if the function is not in use disconnect the pin 2 and pin 3 and short the pin1and pin2 of J4 Note 1 The UPS emergency stop action will shut down rectifier inverte...

Page 17: ...cription J6 1 BCB_DRV BCB drive signal providing 24V 20mA drive signal J6 2 BCB_CONT BCB contact status connect to BCB s normal open signal J7 1 GND Power ground J7 2 BCB_ONL BCB online input normal o...

Page 18: ...ct interface diagram Table 2 7 Integrated alarm dry contact interface description Location Name Description J9 1 ALARM_NC Integrated warning relay normally closed will be open during warning J9 2 ALAR...

Page 19: ...ed during warning J10 3 GND Centre of mains failure warning relay 2 6 8 RS232 Port and SNMP Card Port RS232 and RS485 Ports provide serial data for authorized maintenance or commissioning engineers an...

Page 20: ...2 Installation Guidance Smart Tower UPS 10 30KVA User Manual 14 a 10KVA 30KVA wiring diagram with built in battery b 10KVA 30KVA wiring diagram without built in battery Fig 2 13 10 30KVA UPS wiring d...

Page 21: ...control DSP technology high reliability convenient for use 3 1 1 Work Principle As shown in fig 3 1 the AC input from mains transformer to DC Power in rectifier The inverter transformer this DC power...

Page 22: ...rom this bypass power supply Note When the UPS is running in bypass mode or supporting power for load on maintenance bypass there is no abnormal ac power protection for load equipment 3 1 3 Battery Te...

Page 23: ...mode first then remove the anti manipulation cover rotate the handle to maintenance then disconnect all the mains bypass and internal battery switches and the external battery cabinet switches Warnin...

Page 24: ...time discharge 30 capacity The actual load must exceed 30 of the UPS nominal capacity If the load is below 30 it does not perform automatic discharge maintenance The periodic interval can be set from...

Page 25: ...recommended to use an external bypass cabinet to facilitate maintenance and system testing Fig 4 1 Typical 1 N parallel operation system Note when the load exceeds the capacity of a single device the...

Page 26: ...f UPS the power switch is visible it includes input switch output switch and maintenance bypass switch with anti misoperation stop plate a 10KVA 30KVA without built in batteries b 10KVA 30KVA with bui...

Page 27: ...ould be out of the system s control During the inverter starts up time the inverter indicator flashes After the rectifier enters normal operation state UPS power supply will transfer from bypass to in...

Page 28: ...0KVA without built in battery b 10KVA 30KVA with built in battery Fig 5 2 Diagram of battery starting button location 5 3 Procedures of Switch between Operation Modes 5 3 1 Procedure of Switch the UPS...

Page 29: ...1 Close the bypass switch Q2 and switch the rotary switch to UPS output after 10 seconds The indicator light of the bypass become green and the power is supplied for the load by the bypass 2 Close the...

Page 30: ...l 24 5 6 Language Selection There are two languages available can be shown on the LCD Chinese and English The language can be selected through LCD prompt windows 5 7 Password Control When the LCD disp...

Page 31: ...on we can control the UPS and inspect all the UPS parameters UPS and battery status and alarm logs The operator control panel is divided into three functional areas as shown in fig 6 1 analogue of cur...

Page 32: ...ault Flashing red Bypass voltage abnormal Off Bypass normal Inverter indicator Steady green Load power supplied by inverter Flashing green Inverter On start synchronization of standby ECO mode Steady...

Page 33: ...six main menus turn on off UPS mute or not button Fig 6 2 Homepage display 6 2 1 Default Screen During the system running progress if there is no alarm in 2 minutes the system will show default Screen...

Page 34: ...changed it will select Confirm automatically then press ENTER to finish time set Other settings are similar with time setting 6 2 4 Function screen The function page 2 is shown as below press left and...

Page 35: ...me C Events close S Events start 6 3 Detailed Description of Menu Items UPS menu and data window UPS menu window displays the menu name of data window while the data window displays the related conten...

Page 36: ...scription time year month day time set cancel To press left or right arrow to change pages STA Status ALARM Current UPS alarm information automatically rolling SYS CODE For maintenance engineers autom...

Page 37: ...elf check success Battery normal during system self check Battery manual check failure Battery fault during system self check Battery maintenance The system is in battery maintenance status Battery ma...

Page 38: ...ypass Module Suppose UPS is running in normal mode and the bypass is normal 1 Select LCD touch screen manual switch of bypass the UPS power will be supplied by bypass 2 The rotary circuit breaker is s...

Page 39: ...nd immunity IEC EN AS61000 series and construction IEC EN AS60146 series and 60950 and related terms of general standard 8 2 Environmental Characteristics Table 8 2 Environmental Characteristics Items...

Page 40: ...r 30 or inhibit Ripple voltage V float 1 Ripple current C10 5 Equalized charge voltage VRLA 2 4V cell selectable from 2 30V cell 2 45V cell Constant current and constant voltage charge mode Final disc...

Page 41: ...Vac 380 400 415 three phase four wire sharing neutral with input of rectifier and providing neutral reference for output Rated current A 15 380V 14 5 400V 14 415V 23 380V 22 400V 20 5 415V 30 380V 29...

Page 42: ...Product Specification 36 8 8 Efficiency Table 8 8 Efficiency Items Unit STP10K STP30K Efficiency Normal mode dual conversion 95 ECO mode 99 Battery discharge efficiency DC AC battery nominal voltage i...

Page 43: ...V3 0...

Reviews: