CyberPower OL10000RT3UPDU User Manual Download Page 8


Copyright ©  2017 CyberPower Systems, Inc.


INSTALLING YOUR UPS SYSTEM


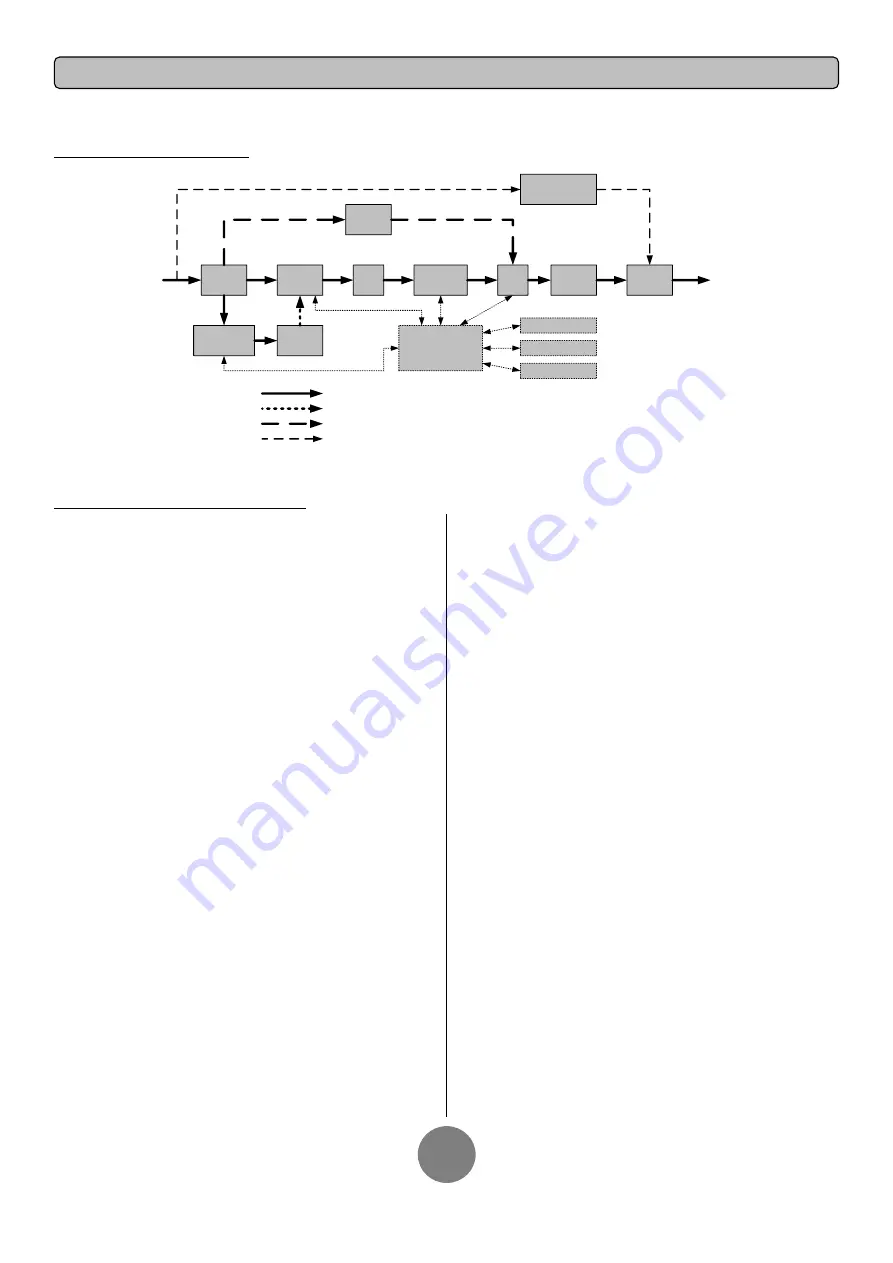
SYSTEM BLOCK DIAGRAM


Output

Input

Filter

PFC

AC/DC

BUS

Inverter

DC/AC

STS

Charger

AC/DC

Internal

Bypass

Battery

Output

Filter

Input

Line Mode

Battery Mode

Bypass Mode

Control

&

Monitoring

LCD Module

USB & DB9

SNMP Slot

Bypass

Switch

Maintenance

Bypass

Maintenance Bypass


HARDWARE INSTALLATION GUIDE


1.


Battery  charge  loss  may  occur  during  shipping  and  storage.  Before 

using  the  UPS,  it’s  strongly  recommended  to  charge  batteries  for  four 
hours to ensure the batteries’ maximum charge capacity. To recharge the 
batteries, simply plug the UPS into an AC outlet.   

2.


When  using  the  included  software,  connect  either  the  serial  or  the 

USB cable between the computer and the corresponding port on the UPS. 
Note: If the USB port is used, the serial port will be disabled. They cannot 
be  used  simultaneously.  After  connecting  to  either  the  USB  port  or  the 
Serial  port  on  the  UPS,  a  computer  with  the  PowerPanel

®

  Business 

Edition  Agent  software  installed  can  control  the  operating  schedule, 
battery test, outlets, as well as obtain UPS status information. However, 
other computers with PowerPanel

®

 Business Edition Client software can 

only obtain UPS status information via LAN connection.   

3.


Connect  your  computer,  monitor,  and  any  externally-powered  data 

storage  device  (Hard  drive,  Tape  drive,  etc.)  into  the  outlets  only  when 
the UPS is off and unplugged. DO NOT plug a laser printer, copier, space 
heater, vacuum, paper shredder or other large electrical device into the 
UPS.  The  power  demands  of  these  devices  will  overload  and  possibly 
damage the unit.   

4.


To  protect  a  fax  machine,  telephone,  modem  line  or  network  cable, 

connect the telephone  or network cable from  the wall jack outlet to the 
jack marked “IN” on the UPS and connect a telephone cable or network 
cable from the jack marked “OUT” on the UPS to the modem, computer, 
telephone, fax machine, or network device. 

5.


Press the ON/OFF switch to turn the UPS on. The Power-On indicator 

light  will  display  when  activated.  If  an  overload  is  detected,  an  audible 
alarm  will  sound  and  the  UPS  will  continuously  emit  two  beeps  per 
second. For resetting the unit, unplug some equipment from the outlets. 
Make  sure  your  equipment  carries  a  load  current  within  the  unit’s  safe 
range, (refer to the technical specifications). 

6.


This UPS is equipped with an auto-charge feature. When the UPS is 

plugged  into  an  AC  outlet,  the  battery  will  automatically  charge,  even 
when the unit is switched off. 

7.


To maintain an optimal battery charge, leave the UPS plugged into an 

AC outlet at all times. 

8.


Before storing the UPS for an extended period of time, turn the unit 

OFF. Then cover it and store it with the batteries fully charged. Recharge 
the  batteries  every  three  months  to  ensure  good  battery  capacity  and 
long  battery  life.  Maintaining  a  good  battery  charge  will  help  prevent 
possible damage to the unit from battery leakage. 

9.

 The UPS has one USB port (default) and one Serial port that allows 

connection  and  communication  between  the  UPS  and  any  attached 
computer running the PowerPanel

®

 Business Edition Agent software. The 

UPS  can  control  the  computer’s  shutdown  during  a  power  outage 
through the connection while the computer can monitor the UPS and alter 
various  programmable  parameters. Note: Only  one  communication  port 
can  be  used  at  a  time.  The  port  not  in  use  will  automatically  become 
disabled or the serial port will be disabled if both ports are attached.


10.


EPO (Emergency Power Off) Port: 

EPO ports allow administrators the capability to connect the UPS unit to 
customer-supplied  EPO  switches.  These  installations  give  operators  a 
single access point to immediately power-off all equipment connected to 
the UPS during an emergency. 

11.


To avoid electric shock, turn the unit OFF and disconnect the  unit 

from  utility  power  before  hardwiring  the  UPS  (in/out  power  cord).  The 
in/out power cord MUST be grounded. 

12.

 Please note the internal  UPS temperature will increase when fans 

are  not  in  operation  or  ventilation  is  obstructed.  When  the  high 
temperature  sensor  activates  protection,  the  UPS  generates  an  alarm 
and shuts down to avoid unexpected equipment damage. When the over 
temperature occurs, please check the Trouble Shooting section on page 
24.  If  the  condition  persists,  please  contact  CyberPower  for  technical 
support. 

Summary of Contents for OL10000RT3UPDU

Page 1: ...L6000RT3UPDU OL8000RT3UPDU OL10000RT3UPDU OL6KRT3UHW OL8KRT3UHW OL10KRT3UHW CyberPower Systems USA Inc 4241 12th Avenue East Suite 400 Shakopee MN 55379 Phone 877 297 6937 Fax 952 403 0009 www CPSww com K01 0000597 00 ...

Page 2: ...N Do not unplug the unit from AC Power during operation as this will invalidate the protective ground insulation CAUTION To avoid electric shock turn off and unplug the unit before installing the input output power cord with a ground wire Connect the ground wire prior to connecting the line wires CAUTION Do not use an improper size power cord as it may cause damage to your equipment and cause fire...

Page 3: ... USB communication cable Serial Interface Cable RS 232 Battery module Rackmount ears Stands 2 2 sets Tie plate 1 1 set Flat head screws M5X7L 8 2 sets Pan head screws M5X12L 4 2 sets Pan head screws M5X6L 14 2 sets Guide screws M5X10L 2 2 sets Plastic washers 8 2 sets Screw hole dust covers 10 2 sets Power cord PowerPanel Business Edition software is available on our website Please visit www cpsww...

Page 4: ...ch the mounting brackets RACKMOUNT INSTALLATION Step 1 Remove the dust covers Remove the dust covers 7pcs from the screw holes Step 2 Rackmount ears hanging brackets installation Attach two rackmount ears to the UPS using the provided M5X7L 8pcs screws and tighten two hanging brackets with the M5X6L 6pcs screws Step 3 Rackmount rail Installation The rails adjust to mount in 48 cm 19 inch racks fro...

Page 5: ... the rear of the rack with two M5X6L screws and two plastic washers Step 5 Place and secure the UPS on the rails Slide the hanging brackets on the UPS into the rails mounted in the rack with the front of the unit facing toward you Secure the UPS to your rack with four M5X12L 4pcs screws at the front of the rack Located in position 5 position 7 How to slide the UPS out from the rack The UPS will be...

Page 6: ...ecure the tie bracket with the screws M5X7 4pcs Insert dust covers into the screw holes that are not being used Step 3 Rotate the Multifunction LCD Module Unscrew the upper panel of the UPS Separate the upper panel from the UPS Gently lift the LCD module out Rotate it to the tower orientation Reinstall it for a tower configuration ELECTRICAL INSTALLATION After completing the hardware installation ...

Page 7: ...er completing the hardware installation of the UPS you are now ready to plug in the UPS and connect your equipment SAFETY PRECAUTIONS CAUTION Installation environment should be in a temperature and humidity controlled indoor area free of conductive contaminants Do not install this UPS where excessive moisture or heat is present Please see specifications for acceptable temperature and humidity rang...

Page 8: ...arm will sound and the UPS will continuously emit two beeps per second For resetting the unit unplug some equipment from the outlets Make sure your equipment carries a load current within the unit s safe range refer to the technical specifications 6 This UPS is equipped with an auto charge feature When the UPS is plugged into an AC outlet the battery will automatically charge even when the unit is...

Page 9: ...Mains Battery L2 L1 PE L2 L1 PE Manual Bypass SAFETY PRECAUTIONS CAUTION Input and Output circuit breakers must be OFF during the building installation CAUTION An additional two pole disconnect device is necessary during the building installation CAUTION Disconnected EPO will immediately shut down the logic circuit output of the UPS Wiring the EPO signal is optional CAUTION Local safety rules may ...

Page 10: ...ut terminal block Step 4 Output configuration Insert the output cable through the appropriate cable gland not included and connect the three wires to the output terminal block Step 5 Fix the terminal block cover on the PDU s Tighten the four screws to fix the terminal block cover on the PDU s Step 6 Fix the inspection window cover on the PDU s Tighten the four screws to fix the inspection window c...

Page 11: ... Backfeed Protection Connector UPS L1 L2 PSDR AC L1 AC L2 IP L1 IP L2 Backfeed 1 2 4 5 3 L1 L2 I P EMI L1 L2 L1 L2 PE Mains PE Jumper2 Jumper1 WITH BACKFEED PROTECTION CONFIGURATION 1 Customers should provide an external isolation device Magnetic Contactor which is upstream and outside the UPS and capable of supporting the UPS input current 2 Remove the interconnection wires Jumper1 Jumper2 on Bac...

Page 12: ...erial Port Serial port provides communication between the UPS and the computer The UPS can control the computer s shutdown during a power outage through the connection while the computer can monitor the UPS and alter its various programmable parameters 7 Surge Protected Communication Ports RJ 45 RJ 11 These ports are used to protect standard RJ 45 RJ 11 based products ADSL LAN Phone Modem Lines an...

Page 13: ...Input Output Connectors Use these connectors to attach the PDU or HW PDU to the Power module 7 Connectors Cover Provides safety protection when removing the PDU or HW PDU 8 Output Circuit Breaker Provides output overload and fault protection 9 Battery Backup Surge Protected Outlets Provides battery backup and surge protection They ensure power is provided to connected equipment over a period of ti...

Page 14: ...e the connector cover for access 6 Output Cable Use this output cable to connect the Battery module to the Power module or to the next Battery module 7 DC Breaker Use the DC breaker to disconnect battery output BP240V30ART3U BP240V50ART3U CONNECTION 1 POWER MODULE WITH ONE BATTERY MODULE Step 1 Turn off the DC breaker of the Battery module Step 2 Loosen the two screws to remove the battery cable r...

Page 15: ...ep 5 Rotate the battery cable retention bracket and tighten the two screws to fix battery cable Step 6 Use a power cord to plug AC input inlet of the 2nd battery module into AC output outlet of the 1st Battery module Step 7 Turn on the DC breaker of the 2nd Battery module Step 8 Set the EBM number to the respective setting to match the number of installed units To do this via the LCD control panel...

Page 16: ...Y Red Battery will soon need to be replaced due to insufficient runtime LCD SCREEN UPS STATUS LCD Screen UPS Status Description Line Mode UPS is operating in Line Mode Battery Mode UPS is operating in Battery Mode Bypass Mode UPS is operating in Bypass Mode Manual Bypass UPS is operating in Manual Bypass ECO Mode UPS is operating in ECO Economy Mode BUTTON OPERATION Button Operation Description ON...

Page 17: ...iption O P Volt XXX XV Displays the Output Voltage O P Freq XX XHz Displays the Output Frequency I P Volt XXX XV Displays the Input Voltage I P Freq XX XHz Displays the Input Frequency O P Load XXX Displays the Output Load Percentage of Maximum load O P Amp X XA Displays the Output Current O P Watt XXXXXW Displays the Output Wattage O P VA XXXXXVA Displays the Output VA BAT Volt XXX XV Displays th...

Page 18: ...o select the Language submenu 6 Press the and buttons to scroll to the language that you want to select You may be prompted to save the selection if so press the ENTER button to save the setting 7 Press the ESC button to cancel or return to previous LCD menu LCD SETTINGS CONFIGURATION There are 24 UPS settings that can be configured by the user 1 Press the ENTER button to activate the MAIN MENU 2 ...

Page 19: ...Fail I P Power Fail Converter Mode Converter Off O P Freq 50Hz O P Freq 60Hz Converter OFF Screen Saver Disable 1 Minutes 5 Minutes 5 minutes Clear Event Log Activate None Button OFF LOCK Disable Enable Disable Charger Function SBM Constant SBM Signal Inputs Disable EPO ROO Disable Charger Check Disable Enable Disable With Transformer Disable Enable Disable Backfeed Check Disable Enable Disable Th...

Page 20: ...owing figure WALL MOUNTING INSTRUCTIONS Step 1 Remove the Multifunction LCD Module Unscrew the right panel of the Power module Separate the right panel from the UPS Gently lift the LCD module out Reinstall the right panel Step 2 Rotate the DB26 Connector of LCD Module Step 3 Connect the DB26 Cable Connect the DB26 cable from LCD module to the Remote Control Port on the front panel or rear panel as...

Page 21: ... electric shock turn off and unplug the UPS from the wall receptacle before servicing the battery CAUTION Only use tools with insulated handles Do not lay tools or metal parts on top of the UPS or battery terminals Replacement Batteries Please refer to the front side of the Battery module for the model number of the correct replacement batteries For battery procurement log onto www CPSww com or co...

Page 22: ...Switch to Bypass Step 4 Press ON OFF button to turn off UPS Step 5 Pull the PDU or HW PDU away from the Power module Loosen the four screws that hold the PDU or HW PDU to the Power module Pull the PDU or HW PDU away from the Power module and loosen the two screws that hold the cover Step 6 Fix the cover on the PDU or HW PDU Tighten the two screws and fix the cover on the PDU or HW PDU to hide the ...

Page 23: ...de the Interlock Bracket to the right Slide the Interlock Bracket to the right Tighten the one screw that fix the Interlock Bracket in the right Step 6 Check the Power module auto transfer to Line Mode After Sliding the Interlock Bracket to the right the Power module will auto transfer to Line Mode Check the LCD screen shows Line Mode SAFETY PRECAUTIONS CAUTION It must be done by qualified personn...

Page 24: ...ut off Immediately or Input Fuse Circuit Breaker Protection Battery Specifications 20 12V 7AH 20 12V 9 0AH Recharge Time 0 90 Typical 4 hours 5 hours Sealed Maintenance Free Yes Hot Swappable Yes Status Indicators LCD Screen Multi Function LCD Readout that Supports Multi Language Interface 19 Types of Read Out 24 Types of Function Setting 3 Event Logs LED Indicators Power On White Line Mode Green ...

Page 25: ...e line and neutral wires Missing ground wire Connect ground wire No ground wire Disable Wiring Fault alarm on LCD panel Line Abnormal Wrong utility power backed up during UPS auto restart Check whether voltage or frequency of utility power is out of range Output Short Output short circuit Your attached equipment may have problems please remove them and check again Over Temperature High temperature...

Page 26: ...e to us at Cyber Power Systems USA Inc 4241 12th Ave E STE 400 Shakopee MN 55379 or send us an e mail message at claims cpsww com for instructions within 10 days of the occurrence 2 When you contact CyberPower identify the Product the Purchase Date and the item s of Connected Equipment Have information on all applicable insurance or other resources of recovery payment that are available to the Ini...

Page 27: ...g 1 Loss of or damage to data records or software or the restoration of data or records or the reinstallation of software 2 Damage from causes other than AC Power Line Transients spikes or surges on properly installed grounded and code compliant 120 volt power lines in the United States and Canada transients surges or spikes on standard telephone land lines PBX telephone equipment lines or Base 10...

Page 28: ...terference in which case the user will be required to correct the interference at his own expense Shielded signal cables must be used with this product to ensure compliance with the Class A FCC limits This document is believed to be accurate but CyberPower reserves the right to change or correct the contents and does not assume any responsibility for omissions or errors Need Additional Help Feel f...

Reviews: