background image

INPUT SELECT

SLEEP

AV

VGA

SAP

EQ

ASPECT

DISP

JUMP

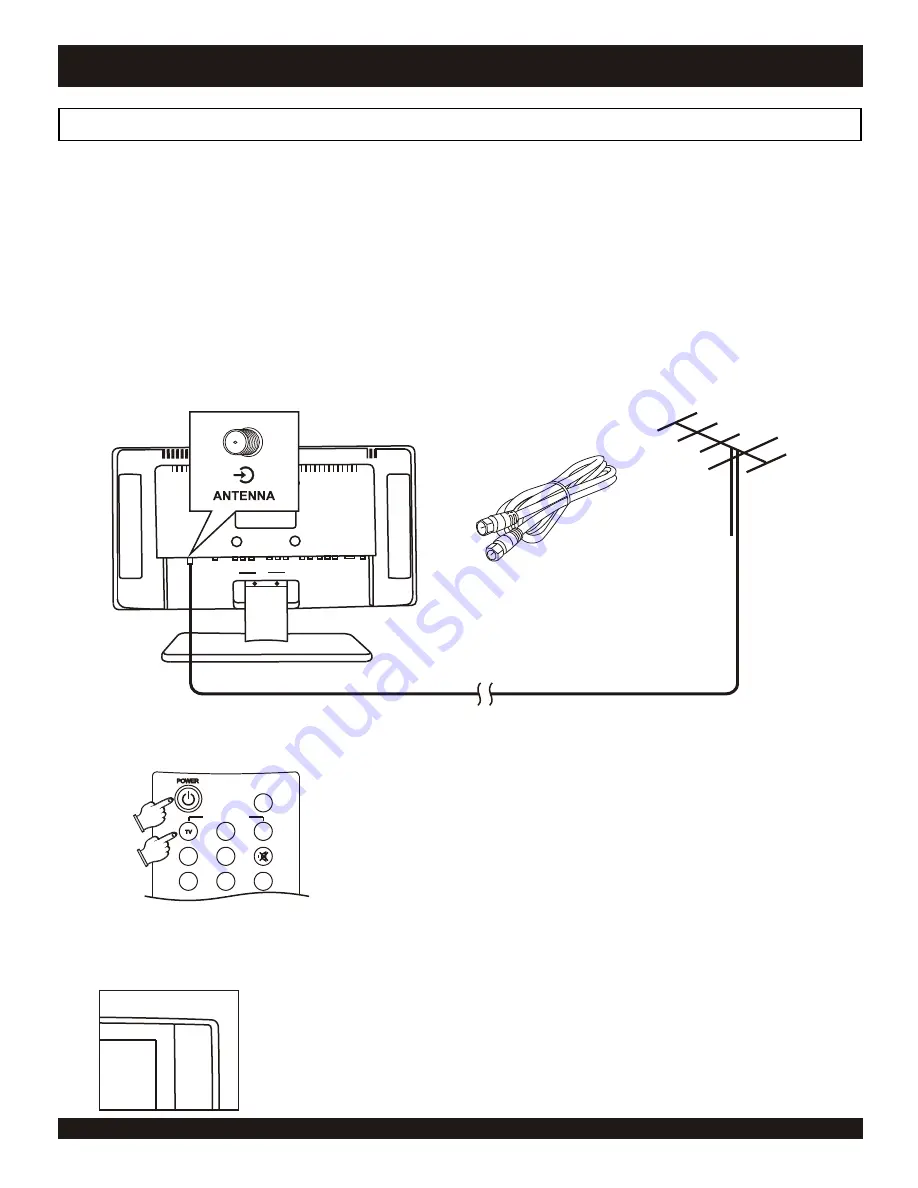
Connecting your unit to an external antenna or cable TV signal.

In order to use this unit as a television or monitor, you will need to make a video connection to your TV.  There are several 
connections supported:

Composite Video - The most widely used connection, using RCA-type cables (not supplied). 

Ÿ

S-Video - A higher quality connection that requires a special S-Video cable (not supplied).

Ÿ

Component Video - The highest quality video connection, typically used with HD receivers (not supplied). 

Ÿ

RGB (VGA) - Mostly used with a PC, though some HD receivers use this type of connection (supplied).

Ÿ

This unit ships with an RGB cable for connection to personal computers or HD receivers with a standard DB-15 VGA output socket. 

First, use a coaxial RF cable (not supplied) to connect 
your antenna input to a video source such as an aerial 
antenna or cable TV signal provided by your cable 
company.

Press the POWER key on the remote control or the TV to 
power on TV.

On your remote control, select the video input by 
pressing TV. 

The TV will now display the channel it is on.

CONNECTIONS

10

Coaxial RF Cable

(Not Supplied)

Coaxial RF Cable

Antenna, Cable or
Set-Top Box Input

3

1

2

3

1

Summary of Contents for CH-HGL 1700

Page 1: ...17 HDTV READY LCD TELEVISION With Two Component Inputs Operation Guide CH HGL 1700 HDTV R E A D Y ...

Page 2: ...ce personnel Servicing is required when the apparatus has been damaged in any way such as when the power supply cord or plug is damaged liquid has been spilled objects have fallen into the apparatus the apparatus has been exposed to rain or moisture or when the unit does not operate normally or has been dropped Power cord protection To avoid any malfunctions of the unit and to protect against elec...

Page 3: ...TO TELEVISION Connecting to Antenna Cable TV 10 Connecting power Powering up 11 Component S Video Composite LR Input 1 12 VGA Component LR Input 2 13 External audio output connections 14 GETTING STARTED Navigating the System Menu 15 Selecting between TV AV VGA mode 15 TELEVISION OPERATION Channel Setup Autoscan 15 Channel Setup Manual 15 Parental Lock 16 Password Change New 16 Closed Caption 17 Au...

Page 4: ... Television HDTV with component inputs that support scan rates of 720p and 1080i The built in tuner enables you to enjoy all of your cable TV or Off the Air OTA stations It has all the essentials to make it your centerpiece for an exciting home theater system Attach your HD capable receiver and you can start enjoying today s hottest HD movies with superb video quality Welcome to the digital revolu...

Page 5: ...carefully as some items may be located under the packing foam Remote control Remote Control Batteries This operation manual and warranty card 5 In some models the battery is pre installed in the remote control see page 6 in this manual for further instructions AC Power Converter AC Power Cable PC VGA Cable INPUT SELECT SLEEP AV RGB SAP EQ ASPECT DISP JUMP CH CH CH D CH A LCD TV ...

Page 6: ...y within a 30 degree angle of the sensor on the receiver Keep in mind that any obstructions between the remote control and the receiver will affect performance GETTING STARTED Notes on battery To replace the batteries in the remote control the battery door must first be removed Push down on the battery door release latch see step 1 then push the door in a downward direction see step 2 Place the ba...

Page 7: ...udio Program selection EQ Selects audio equalization mode ASPECT Selects between wide 16 9 or normal 4 3 viewing modes DISP Brings up the on screen display showing information for the playback session ARROWS Use to navigate disc menus on screen setup menu etc ENTER Selects options in menus MENU Accesses the system setup menu CHANNEL UP DOWN Press to change TV channel up CH or down CH NUMERIC KEYPA...

Page 8: ...evel with the UP and DOWN arrows ENTER Press to confirm selection from the Menu MENU Toggle switch to turn audio on or off INPUT Press to select Audio or Video sources POWER Press to power on the unit TOP SIDE PANEL FUNCTIONS 8 Rear Panel View 1 2 3 4 5 6 CH CH 2 3 4 5 6 1 POWER INPUT MENU ENTER VOLUME Top View ...

Page 9: ...ent video input for INPUT2 VGA VGA video input for INPUT2 SPEAKER OUTPUT L You may attach an external speaker not included to this port to extend the LEFT speaker ANTENNA IN Connect to your cable outlet or antenna source POWER INPUT Attach the power adapter to this port SPEAKER OUTPUT R You may attach an external speaker not included to this port to extend the RIGHT speaker HEADPHONES Use this to ...

Page 10: ... with HD receivers not supplied RGB VGA Mostly used with a PC though some HD receivers use this type of connection supplied This unit ships with an RGB cable for connection to personal computers or HD receivers with a standard DB 15 VGA output socket First use a coaxial RF cable not supplied to connect your antenna input to a video source such as an aerial antenna or cable TV signal provided by yo...

Page 11: ...n to power on the unit The power LED will change to green color 11 10 CONNECTIONS Plug power adapter into your household AC outlet The power LED on the front of the unit is now red When disc playback remains paused for a period of about 3 minutes the screen saver will load protecting the television from screen burn which could occur if an unusually bright image is displayed on screen for an extend...

Page 12: ... Cr signals You can only use the Progressive Scan Video Input feature with a source DVD player supporting Component 1 S VIDEO is a higher quality connection than standard composite video and requires a special S Video cable not included The S Video connector is distinguishable by its 4 pins as shown below If your VCR or other source has an S Video input it s recommended that you use this type of c...

Page 13: ...ncluded VGA cable to your source a computer and the other end to the VGA input on your TV Press the AV key repeatedly on the remote control to select the VGA input The TV will display the Video input on screen as shown below A B VGA 1 2 COMPONENT VIDEO the highest quality video connection requires a special Component P SCAN Video Cable not included with separate connectors for the Y Pb Cb and Pr C...

Page 14: ...external speakers not included Use the headphone jack to connect to a pair of headphones not included for a private listening environment Optical digital audio outputs send an encoded digital bitstream suitable for receivers with Dolby or DTS decoding capability These outputs require special cables not included CONNECTIONS Headphones SPEAKER OUTPUT R SPEAKER OUTPUT L R L 14 ...

Page 15: ...to cycle through the various inputs available VGA Press this key to select VGA mode to use as a PC monitor Some HD receivers uses this input to display HD signals TV mode Auto Scan Channels Main Setup Video Audio TV VGA OSD TIMER System Press the TV key on the remote control 1 Press the MENU key on the remote use the 6 key to select TV Press ENTER select INSTALL from the next menu and press ENTER ...

Page 16: ... TV Y Unblock TV Y7 Unblock TV G Unblock TV PG Unblock TV 14 Unblock TV MA Unblock Change Password TV mode Change Password TV PG Unblock TV 14 Unblock TV MA Unblock Change Password The password can also be changed to fit your needs Below is the steps to change your password for Parental Level A dialog box will appear input 0000 with the remote then press ENTER 2 Press the MENU key on the remote us...

Page 17: ...eive caption signals normally if poor reception is encountered an old or bad recorded tape is being played or any strong interference with the TV signal Notes on Closed Caption TV mode Audio Setup Equalizer Use the Audio menu to select different options for your listening desires The equalizer setup will allow you to select from different EQ presets from MOVIE VOCAL FLAT or MUSIC Main Setup Video ...

Page 18: ...e MENU key on the remote select VIDEO then press ENTER 1 Main Setup Video Audio TV VGA OSD TIMER System Video Setup Source Contrast Brightness Color Temp Saturation Sharpness Use the 5 6 keys to navigate the menu and select a video option to select and adjust Press ENTER to confirm your selection 2 TV mode Video Source Use the Source option to select input source or TV mode Source TV AV 1 S Video ...

Page 19: ...rrow keys to decrease increase the saturation level 2 Press the MENU key on the remote use the 6 key to select Video Press ENTER select Saturation from the next menu and press ENTER again 1 Saturation 128 TV mode Video Sharpness Use this selection to adjust the Sharpness of the TV picture A dialog box will appear use the3 4 keys to decrease increase the saturation level 2 Press the MENU key on the...

Page 20: ...increase decrease the time settings Use the ENTER key to move from the hour minute and seconds fields 2 Press the MENU key on the remote use the6 key to select TIMER Press ENTER select SET TIME from the next menu 1 Main Setup Video Audio TV VGA OSD TIMER System 20 SET TIME 02 28 18 TIMER SET TIME ON TIME OFF TIME SLEEP TIMER TIMER ON TIME Use the 5 6 keys to navigate the menu and the ENTER key to ...

Page 21: ...gate to the next selection on the menu Load Default 2 Press the MENU key on the remote use the6 key to select System Press ENTER general information is listed here 1 Main Setup Video Audio TV VGA OSD TIMER System SYSTEM Information Model HGL 1700 FW VERSION 1 0 025 INPUT INFO NTSC Load Default SYSTEM Information Load Default Yes No This TV can receive SAP Secondary Audio Programming that accompani...

Page 22: ...at its maximum size including wide screen cinema format picture 3 Press the ASPECT key on the remote repeatedly to find your desired selection TV ASPECT Wide mode will display a wide screen aspect ratio picture A full screen will be displayed 2 4 3 mode will display a 4 3 picture at its standard 4 3 size 1 Television ...

Page 23: ...ance guidelines are followed Careful and regular cleaning can extend the lifetime of your LCD TV significantly As always please unplug your unit before performing any maintenance procedure Cleaning the LCD screen cover 1 Wet a soft cloth in a mixture of warm water not hot and a little dish washing detergent 2 Wring off excess water mixture from cloth 3 Wipe screen from left to right making sure wa...

Page 24: ...nt panel Ensure there are no obstacles between the remote control and the front screen of the unit The battery for the remote control may need to be changed You may be out of range for the remote control try to move closer NO PICTURE ON THE SCREEN Ensure the connections from the input source to the TV are secure Verify the TV s channel is set to match the video input your are using Ensure you are ...

Page 25: ...ustration 1 When mounting please follow your mounting hardware s manufacturer s instructions for installation and use To remove your unit s stand follow instructions in Illustration 2 Illustration 1 Mounting holes with plugs installed Plugs can easily be removed simply by pulling them off with your fingers 1 2 1 2 3 4 5 6 7 8 Illustration 2 I Locate your unit s stand and screws 1 and 2 II Lay your...

Page 26: ...NTSC Closed Caption V Chip Parental Lock VGA 640x480 60Hz UXGA 1600x1200 60Hz YPbPr SD 480i 480P HD 720P 1080i Channel Capability VHF 12 UHF 56 Cable 125 Input Video RCA Pin Type x2 1 0 Vp p 75 Ohm S Video Mini DIN 4 pinx1 Y 1 0 Vp p 75 Ohm C 0 3Vp p 75 Ohm Audio LR RCA Pin Type x2 0 5 Vrms Component Input Y x2 1 0 Vp p Pb Pr x2 35 Vp p LCD PANEL Type TFT Active Matrix Resolution 1280 x768 Display...

Page 27: ...0 12 13 24 composite video 4 9 10 12 13 v chip parental lock 16 connections VESA 25 audio outputs 14 video inputs 12 13 video outputs 12 13 video settings 18 19 contents package 5 wall mounting 25 enter button 7 8 features 4 index 25 manual channel programming 15 16 menu button 7 8 mute button 7 number buttons 7 OSD settings 19 20 password 16 power 11 power cord 5 11 remote control preparing 5 6 b...

Reviews: