


GENERAL SPECIFICATIONS
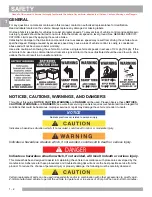
Read all of this manual to become thoroughly familiar with this vehicle. Pay particular attention to all Notices, Cautions, Warnings, and Dangers.
2 - 4
2
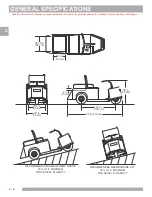
MODEL: MINUTE MISER
TYPE: 3 WHEEL ELECTRIC POWERED TRUCK
MODEL YEAR: 2013
Part No:
Speed Control:
Solid State 250 amp controller
Direction Selector:
Dash mounted (Forward-Neutral-Reverse)
Batteries:
Four, Six Volt Deep Cycle
Battery Charger:
24 Volt On-Board. Fully Automatic line compensating. Underwriters Laboratories (U.L.) Recognized, and CE Marked
Input:
100 – 240 Volt, 50/60 Hz, 12/6A
Output:
24 Volt, 25A, 20A@100V
Motor:
24 Volt DC series wound, brazed armature, solid copper armature. 8.25 hp (6.15 kW) @ 1570 rpm
Drive Train:
Direct motor shaft connected to transaxle pinion shaft
Electrical System:
24 Volt DC, four, 6 volt deep cycle batteries (115 minute minimum, 225 amp-hour @ 20 hr. discharge rate)
Transaxle:
Differential with helical gears
Brakes:
Dual rear wheel mechanical drum brakes. Integrated park brake
Convenience:
Seat back folds down to accommodate single rear facing passenger
Steering:
Steering tiller. Optional steering wheel
Performance
Overall Length
85.0 in (216 cm)
Capacity
2 Persons (Seat Back Down)
Overall Width
30.0 in (76 cm)
Dry Weight
440.0 lb (200 kg) (Without Batteries)
Overall Height (Tiller)
39.0 in (99 cm)
Curb Weight
690.0 lb (314 kg)
Overall Height (Steering Whl) 46.0 in (117 cm)
Cargo Deck Load Capacity
300 lb (140 kg)
Wheel Base
48.0 in (122 cm)
Vehicle load capacity
550 lb (250 kg)
Front Wheel Track
N/A
Outside Clearance Circle
10.8 ft (3.3 m)
Rear Wheel Track
25.5 in (65 cm)
Intersecting Aisle Clearance
54.0 in (137 cm)
Gnd Clearance @ Differential 4.0 in (10 cm)
Speed (Level Ground)
10 mph ± 0.5 mph (14 kph ± 0.8 kph)
Cargo Deck Width
23.0 in (58 cm)
Steering & Suspension
Cargo Deck Length
29.0 in (73 cm)
Steering
Direct Handlebar to Front Fork
Cargo Deck Depth
4.0 in (10 cm)
Front Suspension
Torque Block
Cargo Deck Material
Plywood
Rear Suspension
Coil Springs & Single Shock Absorber
Vehicle Power
Service Brake
Rear Wheel Mechanical Drum
Power Source
24 Volts DC
Parking Brake
Single Point Latch
Motor Type
Series Wound
Front Tire
4.80 x 8 (Load Range B)
Max. Horsepower (kW)
8.25 hp (6.15 kW) @ 1570 rpm
Rear Tires
4.80 x 8 (Load Range B)
Electrical System
24 Volt
Body & Chassis
Batteries (Qty, Type)
Four, 6 Volt Deep Cycle
Frame & Body
Welded steel with DuraShield™ powder coat
Key or Pedal Start
Pedal Start
Body & Finish
Diamond plate pattern. Polyester primer/Acrylic
Battery Charger
24 VDC, 100-240 VAC On-Board, UL & CE
Standard Color
Safety Yellow
Speed Controller
Solid State 250 Amp Rated
Noise & Vibration
Drive Train
Motor Shaft Direct Drive
Noise
Sound pressure; continued A-weighted equal to or less
Transaxle
Differential with Helical Gears
than 70 db(A)
Gear Selection
Dash Mounted Forward-Neutral-Reverse
Vibration, WBV
Highest RMS value of weighted acceleration is less than 2.5 m/s
Rear Axle Ratio
14.78:1
Vibration, HAV
Highest RMS value of weighted acceleration is less than 2.5 m/s
The uncertainty of measurement is 0.12 m/s
Approved Type E and EE vehicles are certified for 5% grade max.
Measurement methods were applied per the ISO 2631 and ISO 5349
Some items shown may be optional equipment
standards under conditions of typical vehicle surfaces.
628520
PRODUCT SPECIFICATION
CONFIGURATION HIGHLIGHTS
PRODUCT OVERVIEW
Dimensions


