background image

P - 15

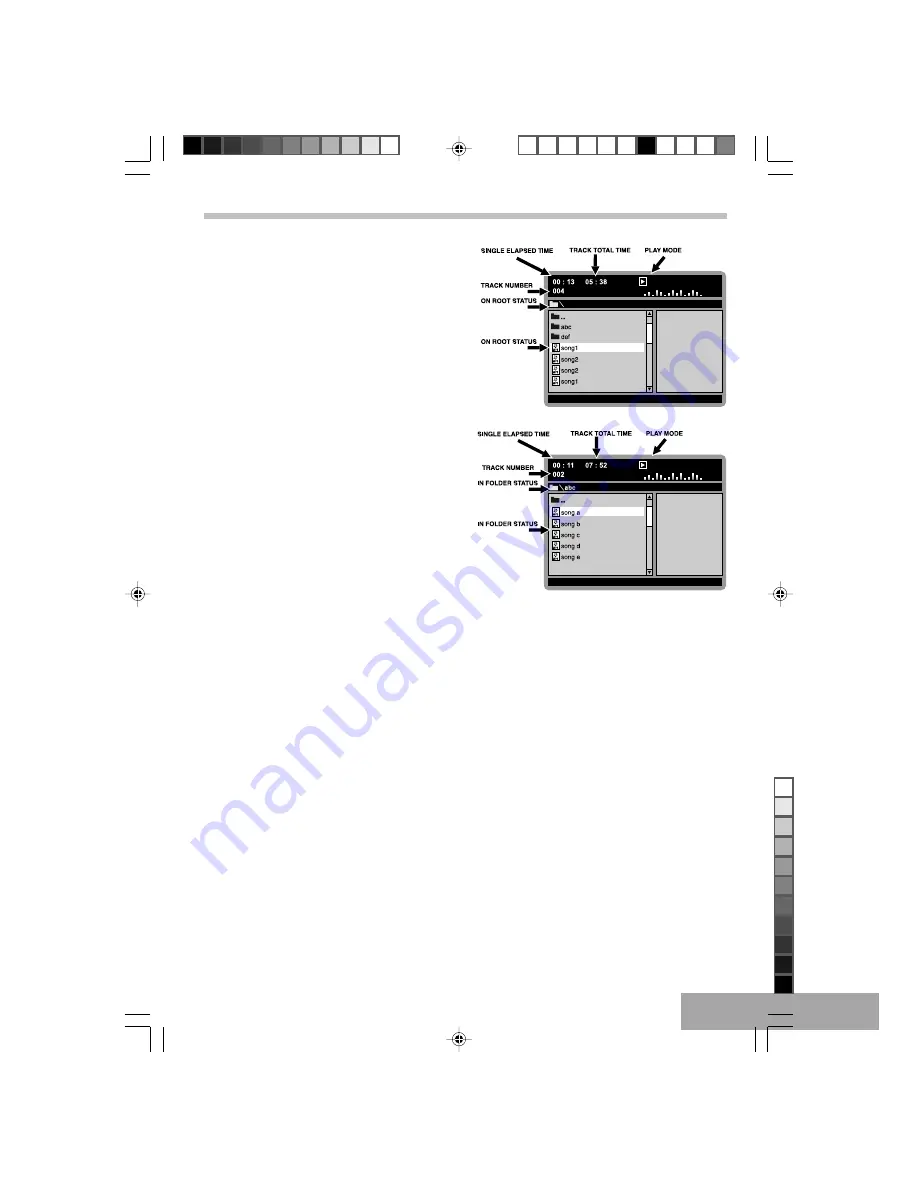
Playback track on Root.

Press the NAVIGATION ( 

,

 ) button to select your

desired track on the Root, then press PLAY (

X

) or “EN-

TER” button, to start playback, the PLAY (

X

) indicator

show on screen, and the player will continous playback all
tracks in ROOT, and stop automatically after finished all
tracks.
e.g.:

Playback track in folder.

Press the NAVIGATION (

,

) button to select the folder,

press NAVIGATION (

) button or “ENTER” button to enter

folder.
Note: If had a sub-folder, repeat above procedure to en-

ter the folder.

Press the NAVIGATION (

,

) button to select your de-

sired track, then press PLAY (

X

) or “ENTER” button to

playback, the PLAY (

X

) indicator show on screen.

The player will continous playback, until finish all tracks in
such folder, the player will stop automatically.
e.g.:

Selecting Folder/Tracks Using the Number Buttons

During playback, press the Numeric buttons corresponding to the track numbers to select your desired track. The unit will
jump to the new track and then press ENTER or PLAY (

X

) button to playback.

OTHER FUNCTIONS

When playing a MP3 disc, the unit has functions like mute, audio mode, pause / step, previous / next track, and forward
/ reverse.
You may operate as you do with a CD on Basic Operations.

 MP3 Basic Operation (continue)

T602_Curtis_A5_size_Eng_ib.p65

11/8/2005, 3:17 PM

15

Black

Summary of Contents for DVD8402

Page 1: ... cleaned using a commercially available camera lens blower etc Do not touch the lens to prevent damaging the mechanism Also do not use a lens cleaner or disc cleaner product Never play a cracked or warped disc Cleaning the Unit To prevent fire or shock hazard disconnect your unit from the AC power source when cleaning The finish on your unit may be cleaned with a dust cloth and cared for as other ...

Page 2: ...nk laundry tub in a wet basement or near a swimming pool etc 10 Vibration Avoid placing the unit on an unstable place such as a shelf or in a place subject to vibrations 11 Magnetic fields keep the unit away from sources of magnetic fields such as TV sets speaker systems radio motorized toys or magnetized objects 12 Nonuse periods The power cord of the unit should be unplugged from the outlet when...

Page 3: ...4 TITLE MENU BUTTON 5 PBC BUTTON 6 DISPLAY BUTTON 7 NAVIGATION BUTTON 8 RETURN BUTTON 9 BOOKMARK BUTTON 10 SLOW R BUTTON 11 PAUSE STEP BUTTON 12 RANDOM BUTTON 13 MUTE BUTTON 14 REPEAT REPEATA B BUTTON 15 SEARCH FORWARD BUTTON 16 SEARCH REVERSE BUTTON 17 SKIP FORWARD BUTTON 18 SKIP REVERSE BUTTON 19 SLOW F BUTTON 20 STOP BUTTON 21 PROGRAM BUTTON 22 SEARCH BUTTON 23 ENTER BUTTON 24 PLAY BUTTON 25 SE...

Page 4: ... unit Left View 1 VOLUME KNOB 2 PHONES JACK 3 PHONES JACK 4 INPUT OUTPUT LINE SELECTOR 5 AUDIO JACK 6 VIDEO JACK 7 S VIDEO JACK 8 DC IN JACK 9 FULL INDICATOR 10 CHARGE INDICATOR 11 POWER SLIDE KNOB Top View 12 PLAY BUTTON 13 PAUSE BUTTON 14 STOP BUTTON 15 SKIP REVERSE BUTTON 16 SKIP FORWARD BUTTON 17 DVD MENU BUTTON 18 TITLE MENU BUTTON 19 DISPLAY BUTTON 20 SETUP BUTTON 21 ENTER BUTTON 22 STANDBY ...

Page 5: ...r will light on GREEN Notes Disconnect the AC adapter plugs from both the battery and the AC outlet when charging is completed or not necessary Battery recharge circuit operates in OFF mode and STANDBY mode But Switch off the unit for battery recharge is recommended When battery is fully charged and released from unit the CHARGE indicator will light on RED it means the charge circuit is ON Battery...

Page 6: ...ppears on the TV screen Press the or Arrow buttons to select the desired item then press the ENTER button Playback of the selected item will start Note For more details please refer to the jacket or case of the disc If the password is set and the inserted disc is within the Parental Ratings set then the Password screen will appear prompting you to enter the password If playing MP3 disc please refe...

Page 7: ... DC plug at the end of the adapter cord or connect the Car Adapter into the DC IN jack then plug the other end into the car cigarette lighter socket SYSTEM CONNECTION Use audio cable Red White video cable Yellow to connect from player to TV set and amplifier CONNECT THE PLAYER TO TV SET BY AUDIO AV CABLE Use audio cable Red White video cable Yellow to connect the player and TV set CONNECT THE PLAY...

Page 8: ...ress x8 4th press x16 Noted Press the PLAY X button to resume normal playback Title Chapter Search Use this feature to directly go to a specific title and or chapter Press the SEARCH button once Press the buttons to select the TITLE then use the numeric buttons to select the desired title number Press the buttons to select the CHAPTER then use the numeric buttons to select the desired chapter numb...

Page 9: ...on by operating as following To press this button once to define the portion head To press this button again to define the portion toe Then the portion will be played repeatedly To press this button again to return to normal playback CD VCD disc While playing back a CD this unit can repeatedly play back a specific section While in the Playback mode press the Repeat A B button to define where you w...

Page 10: ...il all desired title chapters have been programmed up to 20 You can repeat a title chapter more than once if desired 4 Press the button to select START position 5 Press the PLAY X button to begin programmed playback Playback will begin on the first title chapter that you programmed and the player will continue to play all of the tracks that you programmed in the order in which you programmed them ...

Page 11: ...o cycle through the audio modes The audio modes vary depending on the disc inserted but include MONO LEFT MONO RIGHT MIX MONO STEREO etc DISC NOT SUPPORT will appear if the disc does not support audio mode changing 3D Sound 3D audio post processing will give a multichannel effect when using only 2 speakers This only works with discs encoded with Dolby Pro Logic Dolby Digital and DTS multi channel ...

Page 12: ...discs may not work Bookmark function Storing playing and clearing a bookmark in the memory up to 12 points can be memorized for each disc Zoom Function Note MP3 discs does not support this function Press ZOOM button Zoom x2 x3 x4 during normal slow or still playback mode This player can magnify a picture and use Navigation Arrow buttons to select desired part of the zoomed picture Viewing from a d...

Page 13: ...t Title digest Chapter digest The screen shows the starting picture of all the tracks on the screen simultaneously Input your desired track by Number buttons and press ENTER to confirm to play from that track onwards If the tracks are more than 6 choose to look at the next page Choose EXIT to leave the track digest screen Choose MENU to return to Select Digest Type Menu Playing for Disc Interval T...

Page 14: ...ic Operation Playback of MP3 Disc After disc LOADING or read memory card dialog box will appear on the screen The Root Folder menu and STOP Mode on screen button will appear on the screen e g T602_Curtis_A5_size_Eng_ib p65 11 8 2005 3 17 PM 14 Black ...

Page 15: ... your de sired track then press PLAY X or ENTER button to playback the PLAY X indicator show on screen The player will continous playback until finish all tracks in such folder the player will stop automatically e g Selecting Folder Tracks Using the Number Buttons During playback press the Numeric buttons corresponding to the track numbers to select your desired track The unit will jump to the new...

Page 16: ...e REPEAT PLAY To Repeat play a track file simply select the track file as described on the previous page then press the REPEAT button once REPEAT ONE will appear on the TV screen and the unit will repeat the selected track file continuously until the STOP button is pressed To Repeat play all tracks on an MP3 CD press the REPEAT button a second time REPEAT FOLDER will appear on the TV screen and th...

Page 17: ...e Screen images are shown on the screen but with some parts cut automatically 2 Normal LB Note LB stand for Letter Box This is selected when the unit is connected with a normal TV Wide screen images are shown on the screen with black belt on the top and bottom 3 Wide This is selected when the unit is connected with a wide screen TV TV TYPE You may select according to the color system of the TV to ...

Page 18: ...ns and press ENTER to confirm Subtitle To change the subtitle language choose the language using the buttons and press ENTER to confirm Disc menu To change the language of menu choose the language using the buttons and press ENTER to confirm Parental You can control access to the player and the type of discs your family can watch with the rating function There are eight levels of parental conrol R...

Page 19: ...dual layer 12cm double sided single layer 8 cm single sided single layer 8 cm single sided dual layer 8 cm double sided single layer 2 Compact disc 12cm disc 8 cm disc Video output level 1 Vp p Audio output level 1 Vrms 1 KHz 0dB Audio signal output characteristics Frequency responses DVD linear audio 20Hz 20KHz 48KHz sampling 20Hz 20KHz 96KHz sampling CD audio 20Hz 20KHz S N ratio 70dB Wow and fl...

Page 20: ...unit and or the remote control unit is effective Press POWER to set the player to the standby mode and then back to ON Alternatively press POWER to set the player to the standby mode disconnect the power plug and then reconnect it The player may not be operating properly due to lightning static electricity or some other external factor Play does not start even when title is selected Confirm the RA...

Page 21: ...ended periods of time Discs should be returned to their cases after use Do not apply paper or write anything on the disc surface Handle the disc by its edge Do not touch the playing surface glossy side Fingerprints and dust should be carefully wiped off the playing surface of the disc with a soft cloth Disc Cleaning Never use chemicals such as aerosol cleaners benzene anti static liquids or any ot...

Page 22: ...P 22 User s Guide 8 4 PORTABLE DVD PLAYER MODEL DVD8402 T602_Curtis_A5_size_Eng_ib p65 11 8 2005 3 17 PM 22 Black ...

Reviews: