background image

8

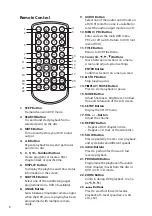
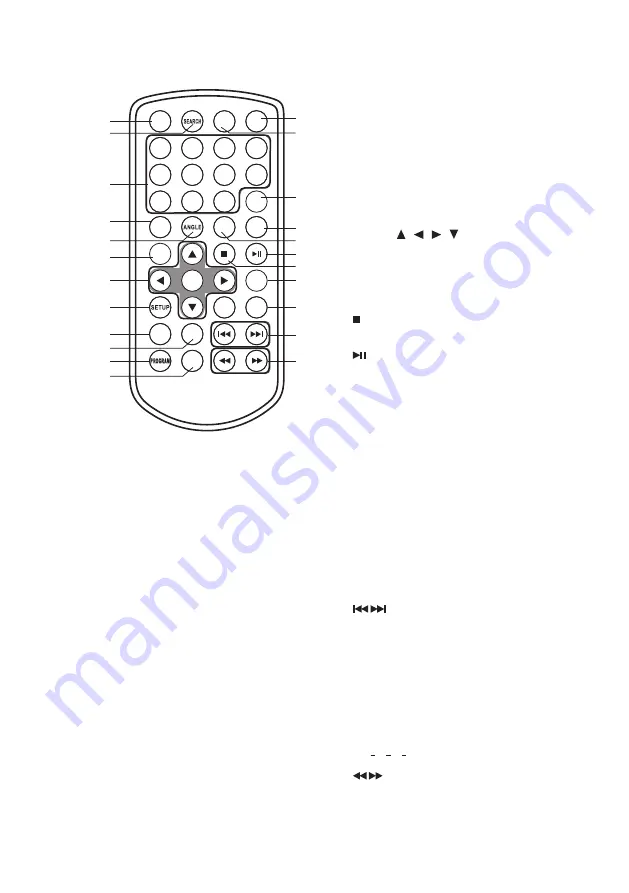
1.  STEP Button

Frame Advance in DVD mode.

2.  SEARCH Button

To search and start playback from a 

selected point on the disc.

3.  MUTE Button

To mute and restore your DVD sound 

output.

4.  A-B Button

Repeat playback between 2 particular 

points on a disc.

5.  0 - 9, 10+ Number Buttons

Create programs or locate a title/ 

chapter/track or specific time.

6.  DISPLAY Button

To display the playtime and show status 

information on the screen.

7.  SUBTITLE Button

Select one of the subtitle languages 

programmed on a DVD (if available).

8.  ANGLE Button

Switch between multiple camera angles 

when the DVD you are playing has been 

programmed with multiple camera 

angle.

Remote Control

1

2

3

4

5

6

7

8

9

0

10+

REPEAT

TITLE

ENTER

MODE

SUBTITLE

AUDIO

MUTE

STEP

DISPLAY

MENU

/PBC

VOL+

VOL-

SLOW

ZOOM

A-B

1

2

7
8

11

12

16

18

19

21

22

5

4
3

10

9

14

13

15

17

20

23

6

9.  AUDIO Button

Select one of the audio sound tracks on 

a DVD (if more than one is available) or 

select the audio output mode on a CD.

10. MENU / PBC Button

Enter and exit the main DVD menu. 

PBC on / off switch. Return to DVD root 

menu (DVD).

11. TITLE Button

Return to DVD Title Menu.

12. Cursor (  ,   ,   ,  ) Buttons

Move between selections on a menu 

screen and adjust certain settings.
ENTER Button

Confirm selections on a menu screen.

13.    STOP Button

Stop playing a disc.

14.    PLAY / PAUSE Button

Press to start playback or pause.

15. MODE Button

Adjust Sharpness, Brightness, Contrast, 

Hue and Saturation of the LCD screen.

16. SETUP Button

Display the SETUP menu.

17. VOL + / – Button

Adjust the volume.

18. REPEAT Button

•  Repeat a DVD chapter or title.

•  Repeat a CD track or the entire disc.

19. SLOW Button

Press repeatedly to enter slow playback, 

and cycle between different speeds.

20. 


Buttons

Press to perform fast forward / fast 

reverse playback.

21. PROGRAM Button

Programme the playback of favourite 

titles/chapters/tracks from the disc in 

DVD / VCD / CD mode.

22. ZOOM Button

Zoom in during DVD playback. (2x, 3x, 

4x, 

1

2

x, 

1

3

x, 

1

4

x)

23. 


Buttons

Press to start fast forward/reverse 

playback at 5-level speed (x2, x4, x8, 

x16, x32)

Summary of Contents for C7PDVD12

Page 1: ...INSTRUCTION MANUAL PORTABLE DVD PLAYER C7PDVD12 ...

Page 2: ...atching a DVD on your TV 13 Using the COAXIAL Connection 13 Using Earphones 13 Compatible Disc Types 14 Supported Formats 14 Region Code 14 Turning On the DVD Player 15 Basic Playback 15 Playing a Disc 15 Pausing Playback 15 Selecting Chapter Title time Chapter time for DVD 16 Selecting Disc GOTO Track GOTO Select Track for CD 16 Stop Playback 16 Previous and Next 16 Fast Forward and Fast Reverse ...

Page 3: ...n 18 Title 18 Menu 18 Customising the Audio Settings 20 Customising the Video Settings 21 Customising the Preference Settings 21 Customising the Password Settings 23 Maintenance 24 Hints and Tips 25 Specifications 27 ...

Page 4: ...verheating ensure that curtains and other materials do not obstruct the ventilation vents A minimum distance of 5cm around the unit should be maintained to allow for sufficient ventilation Do not install or place this unit in a bookcase built in cabinet or in another confined space Ensure the unit is well ventilated Safety Always disconnect the unit from the mains supply before connecting disconne...

Page 5: ...ot in use Failure to do so will risk severely damaging the disc and the unit Do not stack devices heat from other devices may affect the performance of the unit CLASS 1 LASER PRODUCT CAUTION RISK OF ELECTRIC SHOCK DO NOT OPEN The lightning flash with arrowhead symbol within an equilateral triangle is intended to alert the user to the presence of uninsulated dangerous voltage within the unit s encl...

Page 6: ...e included 1 2 3 4 5 6 7 8 9 0 10 REPEAT TITLE ENTER MODE SUBTITLE AUDIO MUTE STEP DISPLAY MENU PBC VOL VOL SLOW ZOOM A B Thank you for purchasing your new Currys Essentials Portable DVD Player These operating instructions will help you use it properly and safely We recommend that you spend some time reading this instruction manual in order that you fully understand all the operational features it...

Page 7: ...eginning of the current chapter tracks titles or move forward to next chapters tracks titles on a disc OK Button Confirm selections on a menu screen 1 2 3 6 5 8 9 11 12 10 17 16 15 14 13 COAXIAL 7 VOL Button Adjust the volume 8 VOL Button Adjust the volume 9 STOP Button Stop playing a disc 10 MENU PBC Button PBC on off switch Return to DVD root menu DVD 11 PLAY PAUSE Button Press to start playback...

Page 8: ...than one is available or select the audio output mode on a CD 10 MENU PBC Button Enter and exit the main DVD menu PBC on off switch Return to DVD root menu DVD 11 TITLE Button Return to DVD Title Menu 12 Cursor Buttons Move between selections on a menu screen and adjust certain settings ENTER Button Confirm selections on a menu screen 13 STOP Button Stop playing a disc 14 PLAY PAUSE Button Press t...

Page 9: ...orrect use of batteries may cause corrosion or battery leakage which could cause fire personal injury or damage to property Install the battery correctly by following the polarity and indications in the battery compartment When the battery is exhausted the remote control will not function Only use the battery type indicated in this manual Do not dispose of the used battery as domestic waste Dispos...

Page 10: ...M A B Within about 2 m 20 20 Handling the Remote Control If you are finding it difficult to remove the battery use a paperclip to slide the battery tab Do not drop or cause impact to the remote control Do not spill water or liquid on the remote control Do not place the remote control on a wet surface Do not place the remote control under direct sunlight or near sources of excessive heat Remove the...

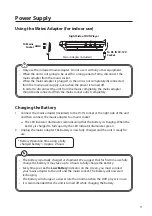
Page 11: ...the screen you must connect your mains adapter to the unit and the mains socket The battery will now start recharging The battery will charge at a slower rate than normal when the DVD player is in use It is recommended that the unit is turned off while charging the battery Power Supply Using the Mains Adapter for indoor use Only use the included mains adapter Do not use it with any other equipment...

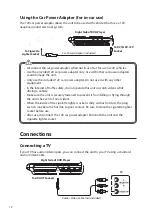
Page 12: ...e unit is securely fastened to prevent it from falling or flying through the air in the event of an accident When the inside of the cigarette lighter socket is dirty with ash or dust the plug section may become hot due to poor contact Be sure to clean the cigarette lighter socket before use After use disconnect the 12V car power adapter from both the unit and the cigarette lighter socket COAXIAL C...

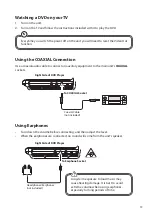
Page 13: ...yer To COAXIAL Socket Using Earphones Turn down the volume before connecting and then adjust the level When the earphones are connected no sound will come from the unit s speaker Long term exposure to loud music may cause hearing damage It is best to avoid extreme volume when using earphones especially for long periods of time COAXIAL Headphones Earphones not included Right Side of DVD Player To E...

Page 14: ...mats JPEG The file extensions has to be jpg and not jpeg Picture encoding must comply with JPEG ISO format Region Code Both the DVD player and the discs are coded by region These regional codes must match in order to play the disc If the codes do not match the disc will not play The Region Number for this DVD player is described on the rear panel of the DVD player Disc Type DVD VIDEO Region code O...

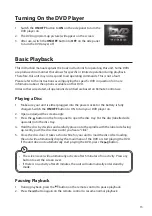
Page 15: ...Hold the disc by its sides and carefully place onto the spindle with the label side facing up Gently push the disc down until you hear a click 5 Close the disc door It takes a short while for your unit to load the disc After loading the unit will automatically display the main menu of the DVD or start playing the DVD If the unit does not automatically start playing the DVD press the button The scr...

Page 16: ...ck was stopped or from the beginning of the disc 3 Press the button on the remote control twice to stop it completely Previous and Next 1 During playback press the button on the unit or the remote control to go back to the start of the previous chapter Each press of this button will skip a chapter until the start of the disc 2 Each press of the button on the unit or the remote control during playb...

Page 17: ...ngles For these discs the same scene can be viewed from each of these different angles 1 While you are playing a DVD with different angles recorded press the ANGLE button on the remote control to view the number of current angles available 2 Press the ANGLE button repeatedly on the remote control to change the scene to the next recorded angle a After approximately two seconds playback will continu...

Page 18: ... Press the PROGRAM button repeatedly to select the slide show mode There are 16 types of slide shows Zoom Selection This function allows you to enlarge or shrink the video image or picture on the screen For DVD 1 During playback press the ZOOM button 2 Press the ZOOM button repeatedly to display the picture with different scales 2X size 3X size 4X size 1 2 size 1 3 size 1 4 size Normal size Title ...

Page 19: ...isplayed when playing a DVD that offers different angles if this is turned on OSD LANGUAGE Allows you to select the setup menu and OSD language CLOSED CAPTIONS For hearing impaired people the program can display recorded subtitles SCREEN SAVER Select ON to display the screen saver A moving DVD logo appears on a dark screen to prevent screen burn when disc playback is stopped paused or you have not...

Page 20: ...to stereo which delivers sound from only the two front speakers DIGITAL OUTPUT Select the SPDIF Output SPDIF Off Turns off the digital output SPDIF RAW If you have connected your DIGITAL AUDIO OUT to a multi channel decoder receiver SPDIF PCM Only if your receiver is not able to decode multi channel audio DOLBY DIGITAL DUAL MONO If your amplifier decoder has Dolby Digital output you may select ste...

Page 21: ...ess the SETUP button to display the setup menu 2 Press the buttons to select PREFERENCE PAGE 3 Press the buttons to select the following options and then press the buttons to change the setting TV TYPE Selects the colour system that fits to your TV when connecting to your TV s AV outputs This DVD player is compatible with both NTSC and PAL AUDIO Allows you to choose the preferred audio language of...

Page 22: ...7 8 Adult Unlock the disc by entering the 4 digit password you have set in PASSWORD setup at the PASSWORD SETUP PAGE If you change the control level you must input password Initial password 1369 In case you forget your password the master password is 1369 To disable the parental control and allow the DVD player to play all discs select ADULT Use the 0 9 buttons to enter the 4 digit password again ...

Page 23: ...bited disc If the disc is locked and the system asks you to enter the password 1 Use the 0 9 buttons to put in the current password in the OLD PASSWORD box If the password has not been set yet after you purchased this unit it is 1369 In case you forget your password the master password is 1369 2 Press the number buttons to input the new password in the NEW PASSWORD box 3 Enter the new password aga...

Page 24: ...n Wipe the disc from the centre outwards with a soft cloth Always keep the disc clean If you cannot wipe off the dust with a soft cloth wipe the disc lightly with a slightly moistened cloth and finish with a dry cloth Do not use any type of solvent such as thinner benzine commercially available cleaners or antistatic spray They may damage the disc Storing Discs Do not store discs in places subject...

Page 25: ... DVD Make sure the unit is not paused Press the button Make sure the unit is not in fast forward or fast reverse mode Press the button Make sure the AUDIO VIDEO input output connections are correct The DTS DVD cannot be decoded to have speaker output The unit has overheated Shut it off for 30 minutes to allow it to cool down The volume control is located on the side of the unit please try adjustin...

Page 26: ...DVD R RW in all cases due to the type of disc or condition of the recording If you are having trouble playing a certain disc remove the disc and try a different one Improperly formatted discs will not play on this DVD player If no key operation by the DVD Player and or the remote control is effective Turn the unit off and then back to on Or turn off the unit disconnect the car power adapter or mai...

Page 27: ...ge Time 3 4 hours Operation Time 2 hours Battery Capacity 1 000 mAh Feature LCD Screen 7 LCD display Speaker 2 Built in stereo speaker Decoding Format DVD CD CD R CD RW JPEG Picture CD Video System PAL NTSC Connectivity AV OUT Socket x 1 Digital Coaxial Output Socket x 1 Headphones Socket x 1 Dimension W x D x H 157 x 200 x 40 3 mm Net Weight 0 73 kg Features and specifications are subject to chan...

Page 28: ...symbol on the product or its packaging indicates that this product must not be disposed of with your other household waste Instead it is your responsibility to dispose of your waste equipment by handing it over to a designated collection point for the recycling of waste electrical and electronic equipment The separate collection and recycling of your waste equipment at the time of disposal will he...

Reviews: