background image

LED Area Lighting Petro 

Canopy Light (ECLP)

BEFORE YOU BEGIN

Read these instructions completely and carefully.

Save these instructions for future use.

SPECIFICATIONS

GENERAL

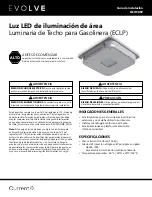
• Max Weight: 16.6 lbs. (7.53 kg)

• Ingress Protection (IP) rating:

Optical: IP65

Electrical Enclosure: UL Wet Location

• Ambient Temperature: -40°C (-40°F) to 40°C (104°F)

• This luminaire is designed for outdoor lighting

applications, and should not be used indoors.

• Install and maintain according to this guide.

• For open deck applications (open canopy).

This device complies with Part 15 of the FCC Rules. Operation is  

subject to the  following two conditions:  (1) This device may not 

cause harmful  interference, and (2) this device must accept any  

interference received,  including interference that may cause  

undesired operation.  This Class [A] Lighting Equipment complies  

with Canadian standards ICES-005[A]/NMB-005[A].

Note: This equipment has been tested and found to comply with 

the limits for a Class A digital device, pursuant to part 15 of the FCC 

Rules. These limits are  designed to provide reasonable protection 


a


n

d

e

t

a

r

e

p

o

 s

t

n

e

m

p

i

u

q

e


e

h

n

e

h

w


e

c

n

e

r

e

fr

e

t

n

i  

l

u

f

m

r

a

h

 t

s

n

i

a

g

a

 commercial  environment. This equipment  generates, uses, and  

can radiate  radio frequency energy and, if not installed and used  

in  accordance with the instruction manual, may cause harmful 

interference to radio  communications. Operation of this equipment 

in a residential area is likely to cause harmful  interference in which 

case the user will be required to correct the  interference at his own 

expense.

RISK OF ELECTRICAL SHOCK. Disconnect power before 

servicing or installing product.

WARNING

RISK OF INJURY OR DAMAGE. Unit will fall if not 

installed  properly. Follow installation instructions.

WARNING

RISK OF FIRE. Use supply wire specified on nameplate.

WARNING

RISK OF INJURY. Wear safety glasses and gloves during 

 installation and servicing.

CAUTION

Installation Guide 

GEH6069

Summary of Contents for Evolve Petro ECLP Series

Page 1: ...quipment has been tested and found to comply with the limits for a Class A digital device pursuant to part 15 of the FCC Rules These limits are designed to provide reasonable protection a n i d e t a r e p o s i t n e m p i u q e e h t n e h w e c n e r e f r e t n i l u f m r a h t s n i a g a commercial environment This equipment generates uses and can radiate radio frequency energy and if not i...

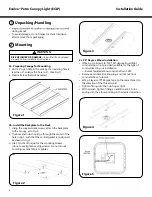
Page 2: ...n the direction of the thread spiral Tighten fitting into the hub finger tight With wrench tighten fitting an additional 2 3 turns ending with the elbow pointing in the desired direction 2b Install the Backplate to the Deck 1 Using the supplied deck screws attach the backplate to the canopy as in Fig 2 2 The boss and hub should go through the center of the hole in Fig 1 such that the central gaske...

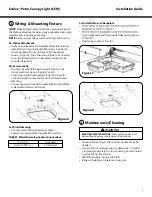
Page 3: ...min TABLE 1 Wired Dimming Control Connections 0 VDC Gray Lead Up to 10 VDC Violet Lead 3d Install fixture to backplate on the backplate and the provided hex nuts as shown Tighten hex nuts to 30 in lbs Occasional cleaning of the outer lens surface may be needed Use a mild non abrasive soap or detergent of neutral pH pH approximately 6 to 8 containing no chlorinated or aromatic hydrocarbons Wash tho...

Page 4: ...nufacturer or its service agent or a similar person in order to avoid a hazard The canopy deck needs to be able to support a load of 20 pounds or more to avoid falling Installation Guide Evolve Petro Canopy Light ECLP These instructions do not purport to cover all details or variations in equipment nor to provide for every possible contingency to be met in connection with installation operation or...

Page 5: ...s limites d un appareil digital de Classe A suivant la Section 15 des règlements de la FCC Ces limites sont établies pour assurer une protection raisonnable contre les interférences nuisibles lorsque l équipement est mis en service dans un environnement commercial Cet équipement émet utilise et peut radier une énergie de radio fréquence et s il n est pas installé et utilisé suivant les instruction...

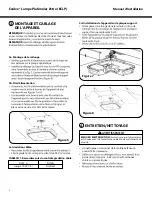
Page 6: ...tant dans la direction voulue 2b Montez la plaque support sur la terrasse plafonnier tel que représenté Fig 2 2 La portée et le moyeu doivent passer par le centre du trou Fig 1 de manière que le joint central soit positionné tel que représenté Fig 3 matériau de plafond 22ga ou moins RISQUE DE BLESSURE OU DE DÉGÂTS AVERTISSEMENT Figure 5 Manuel d Installation Evolve Lampe Plafonnier Petro ECLP 6 DÉ...

Page 7: ...ser la rallonge dans la rainure du trou de support tel que représenté Fig 5 représenté Fig 8 Un nettoyage occasionnel de la lentille extérieure pourrait être nécessaire pH neutre pH approx 6 à 8 sans hydrocarbones chlorés ou aromatiques RISQUE D ÉLECTROCUTION est coupée avant de tenter toute opération de maintenance du produit AVERTISSEMENT Manuel d Installation Evolve Lampe Plafonnier Petro ECLP ...

Page 8: ...t ou par son agent de service après vente ou par toute autre personne pour éviter tout danger Le plafond doit être capable de supporter une charge de 20 lbs 9 08kg ou plus pour éviter la chute del appareil Manuel d Installation Evolve Lampe Plafonnier Petro ECLP Ces instructions ne prétendent pas couvrir tous les détails ou variantes de l équipement ni couvrir toutes les conditions possibles à sat...

Page 9: ...positivo digital de clase A de acuerdo con la parte 15 del reglamento FCC Estos límites están diseñados para proporcionar protección razonable contra interferencias perjudiciales al operar el equipo en un entorno comercial Este equipo genera utiliza y puede irradiar energía de radiofrecuencia y si no se instala y utiliza de acuerdo con el manual de instrucciones puede causar interferencias perjudi...

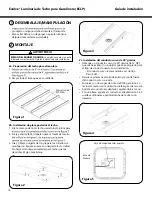
Page 10: ...ete el conducto al adaptador apretándolo a mano Con una llave apriete el conducto al adaptador de 2 a 3 vueltas adicionales apuntándolo hacia la dirección deseada 2b Instalación de placa posterior al techo 1 Fije la placa posterior al techo usando los tornillos para 2 El eje y el adaptador deberán pasar a través del centro 3 Use 30 libras pulgada de torque para los tornillos de montaje no apriete ...

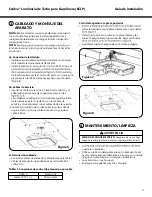
Page 11: ...lomo gris Hasta 10 VCC Plomo violet 3d Instale aparato a la placa posterior cierre la luminaria con la placa trasera como se muestra Usando los pernos con rosca en la placa trasera y las tuercas hexagonales proporcionados haga el montaje Apriete las tuercas hexagonales a 30 libras pulgada puede ser necesaria Utilice un jabón o detergente suave no abrasivo de pH neutro pH de aproximadamente 6 a 8 q...

Page 12: ...ón o el mantenimiento Debe ser deseada más información o se sugieran problemas particulares que no están cubiertos para los propósitos del comprador el asunto debe remitirse a GE Current a Daintree Company ALMACENAMIENTO 5 gecurrent com evolve 2022 Current Lighting Solutions LLC All rights reserved GE and the GE monogram are trademarks of the General Electric Company and are used under change with...

Reviews: