31
PRO-VISION rev.04
PRO-VISION
9.2. Clocks in a Breeder
Facility
When it is used in a breeder facility, the
controller can control 8 time clocks that are
each using 4 timer cycles. These outputs are
used to activate different kind of devices us-
ing the real-time clock. In the breeder facility,
the cycles can be enabled on specific days
of the week.
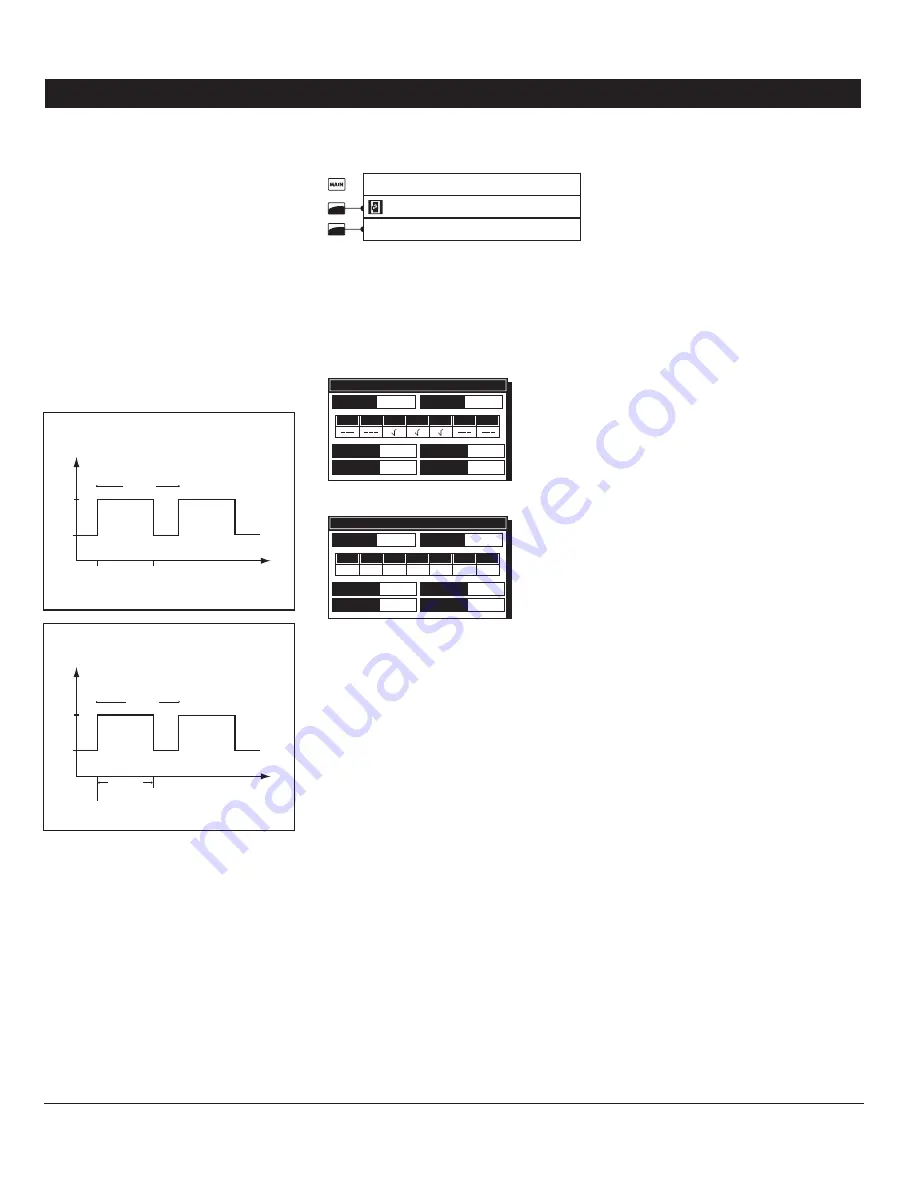
A time clock starts when the
“On Time”
of a
time clock cycle is reached; the output either
stops after a certain run time or at a certain
time of day. The following diagrams show
both possibilities:
Time
Cycle
Output
Status
On
Start Time
(e.g. 8h30AM)
Time Clock:
Start/Stop Mode
Stop Time
(e.g. 9h00AM)
Off
Time
Output
Status
Cycle
Start Time
(e.g. 8h30AM)
Time Clock:
Start/Run Mode
Run Time
(e.g. 30m:15s)
On
Off
Note that the
“Start/Run”
mode allows stop-
ping the outputs with a little more precision
since it allows stopping them by the seconds
(contrarily to the
“Start/Stop”
mode which
allows stopping them by the minutes). Refer
to the Set-up menu in section 4.4 to choose
the desired operating mode of the time clocks
(
“Start/Stop”
or
“Start/Run”
).
Select:
1.
Main menu
* On / Off Settings
* *Time clock
*A password may be required to access this menu
(see section 4.2.1).
* * This menu is accessible if at least 1 time clock is
enabled in the Set-up menu (see section 4.4).
Note that the time clock menu will appear as shown
below only if the “Breeder” facility is enabled in the
Set-up menu (see section 4.4).
Time clock
Start
Start
Run Time
Run Time
Display
6:00 am
6:00 am
0:00:00
0:00:00
Clock 1
Skip day
No
Sun Mon Tue Wed Thu Fri Sat
or
Time clock
Start
Start
Run Time
Run Time
Display
6:00 am
6:00 am
0:00:00
0:00:00
Clock 1
Skip day
2
Mon
Start
Set the following parameters:
2.
Display —
Select the desired time clock. All
parameters displayed below are related to the
chosen output.
Skip day —
Time clock outputs can either
run accroding to a weekly schedule (7 days)
or they can be stopped at regular intervals
without considering the day of the week.
Select
“No”
to use the weekly schedule or
select the number of days to be skipped after
each operating day (1-5 days).
Day of the week —
Select on what day of the
week the selected time clock is used. *
This
parameter is accessible if the “Skip Day” option is
set to “No”.
Start Day —
Select on what day of the
week the time clock schedule starts. *
This
parameter is displayed if the “Skip Day” option is
enabled above.
Start Time —
Set the time at which each
cycle starts. If 3 cycles are not required, set
the
“Start & Stop Times”
of the unused cycles
to the same value or set the
“Run Time”
to
0:00:00. NB. Use the
“AM/PM “
key to change
the time indicator (if required).
Stop or Run Time —
The cycles can either
stop at a specific time of day or after a certain
run time. Set the time at which each cycle
ends. NB. Use the
“AM/PM “
key to change the
time indicator (if required). *
Refer to section 4.4
to choose how the time clocks must stop.
Summary of Contents for PRO-VISION
Page 54: ...PRO VISION NOTES NOTAS...
Page 55: ...PRO VISION NOTES NOTAS...


