29
PRO-VISION rev.04
PRO-VISION
8. LIGHTS
8.1. Principle of Operation
The controller has two 0-10V outputs that
can be used to control the light intensity.
Additional lights can also be connected to
the On/Off relays: the on/off lights simply
turn on when the 0-10V light output is on.
Refer to section 4.4 to enable light programs
and refer to section 4.7 to assign the on/off
light relays.
Light Programs:
The controller can use 9
different light programs containing 6 daily
cycles each. The same program is performed
every day until another program replaces it
(the program selection is made according to
the animal age).
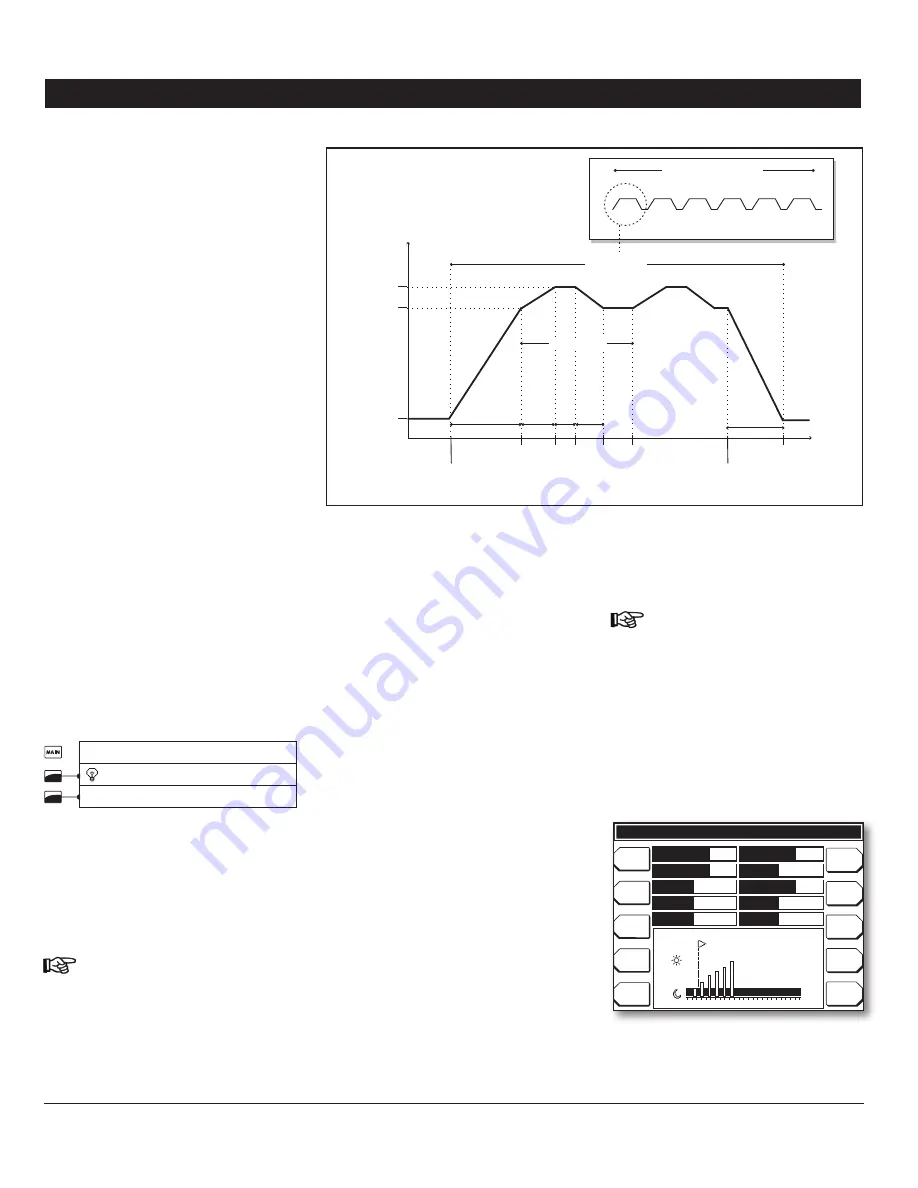
Light Cycles:
Up to 6 daily light cycles can be
performed in the course of a light program.
These cycles are used to change the light
intensity over the day (see graph below).
Light Peaks:
A light peak is a marked increase
in the light intensity. They are used to stimu-
late the animals. When light peaks are used,
they are performed right after the sunrise, at
the very beginning of a light cycle and are
then performed on a regular basis, according
to a user-defined timer.
Settings
8.2.
Light Program Settings
8.2.1.
Select:
1.
Main menu
* Light Programs
Select a Light Program
* Accessible if the light output is enabled in the Set-
up menu (see section 4.4). A password may also be
required to access it (see section 4.2.1).
A graph showing the current status of the
ongoing light cycle is displayed along with
the light parameters.
Set the following parameters:
2.
Make sure you have selected the right
light program before adjusting the fol-
lowing parameters.
Age —
Select the animal age at which the
chosen program starts. This value ranges
from -5 to 450 days (negative values are
Light
Intensity
Peak
Intensity
Intensity
0%
Start Time
Sunrise
Stop Time
Sunset
Peak Cycle
CYCLE 1
CYCLE 1
CYCLE 2 CYCLE 3 CYCLE 4 CYCLE 5 CYCLE 6
LIGHT PROGRAM
Peak
Sunrise
Peak
Sunset
Duration
Time
Light Cycles
used to prepare the house before letting the
animals in).
Lights 24hr —
Select
“Yes”
for the lights to
stay lit all day long; select
“No”
to use the
light cycles.
Use Peaks —
Select
“Yes”
to use light peaks at
regular intervals or select
“No”
to disable them.
Sunrise —
When a cycle starts, the light
intensity increases from its minimum to
its maximum intensity over this delay (see
previous graph). Set the sunrise delay to the
desired value (from 0 to 60 minutes). *
This
parameter is accessible if the “Lights 24hr” option
is disabled.
Sunset —
When the stop time of a light
cycle is reached, the light intensity gradually
decreases from its maximum to its minimum
intensity over this delay (see previous graph).
Set the sunset delay to the desired value
(from 1 to 60 minutes). *
This parameter is ac-
cessible if the “Lights 24hr” option is disabled.
Number of Cycles —
Select how many cycles
must be performed in a light program. It
ranges from 1 to 6 cycles. *
This parameter is
accessible if the “Lights 24hr” option is disabled.
Adjust —
Select the desired light cycle. The
following parameters are related to this cycle:
*
This parameter is accessible if the “Lights 24hr”
option is disabled.
Intensity —
Select the light intensity that
is reached in the chosen light cycle. *
This
parameter is accessible if the “Lights 24hr” option
is disabled.
Hint: Use the “AM/PM” key to change
the time indicator while adjusting the
start & stop time (if applicable).
Start Time —
Set the time at which the se-
lected cycle starts. Make sure the light cycles
do not overlap each other. *
This parameter is
accessible if the “Lights 24hr” option is disabled.
Stop Time—
Set the time at which the light
intensity starts decreasing at the end of the
cycle (sunset). *
This parameter is accessible if
the “Lights 24hr” option is disabled.
12:00A
1
2
3
4
5
6
8:00A
4:00A
11:59P
Prog 1
Prog 6
Prog 2
Prog 7
Prog 8
Prog 9
Peaks
Prog 3
Prog 4
Prog 5
Light Program 1
Age
Use Peaks
Sunset
Adjust
Start
Lights 24hr
Sunrise
# of cycles
Intensity
Stop
1
No
30min
Cycle 1
6:00 am
CURRENT AGE: 1 PROGRAM: 1 INTENSITY: 50
No
30 min
6
100%
6:00 am
Summary of Contents for PRO-VISION
Page 54: ...PRO VISION NOTES NOTAS...
Page 55: ...PRO VISION NOTES NOTAS...


