background image

ASSEMBLY INSTRUCTIONS                                                                 

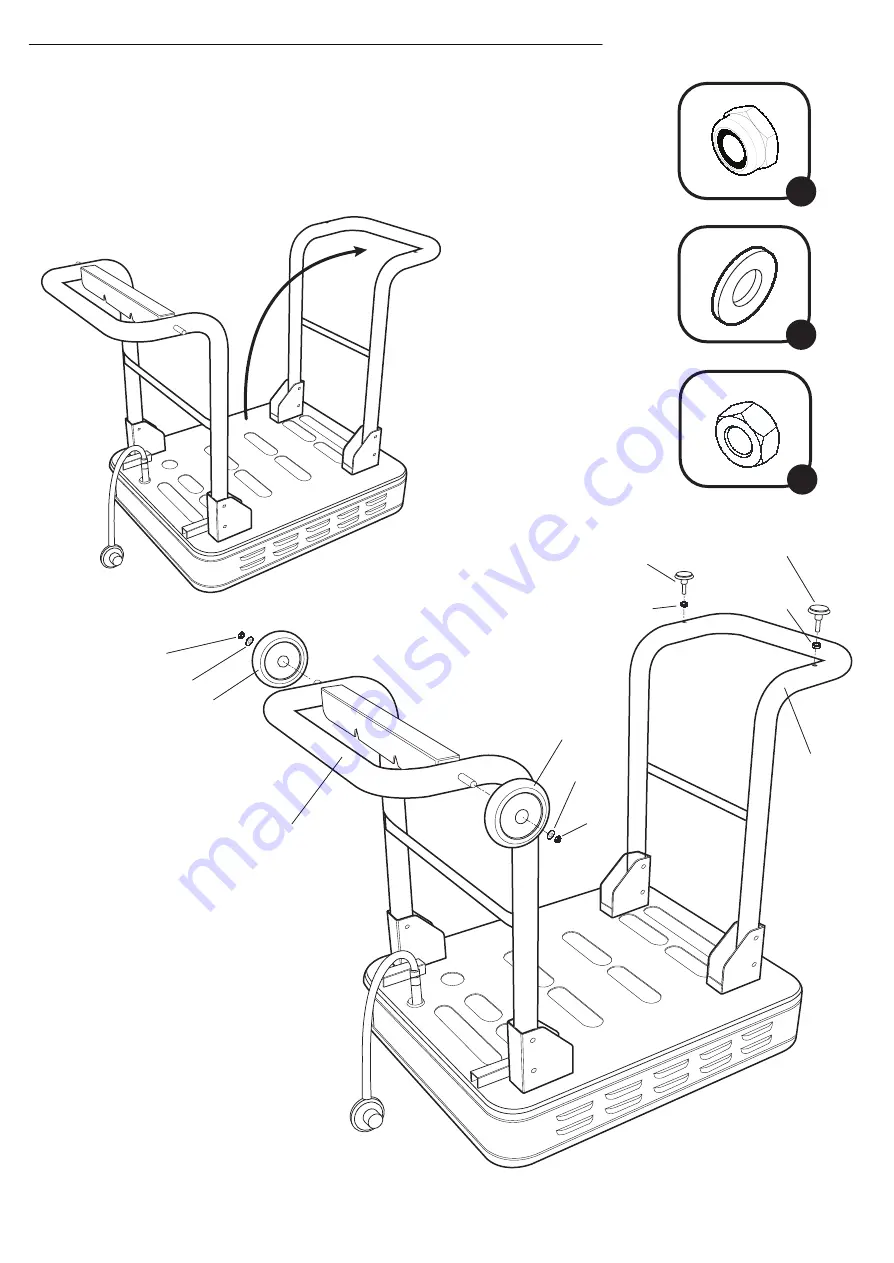
4. Rotate and stand the right leg up.

A�ach the wheels on the le� leg assembly using the flat washers and the wheel fixing nuts.

Screw on the feet fixing nuts to the sta�onary feet, then twist those into place on the right leg. 

11

x2

x2

x2

H

I

DD

EE

FF

H

DD

EE

FF

I

FF

DD

EE

G

F
Summary of Contents for CGG-0028

Page 1: ...d cause property damage personal injury or death 4 This instruc on manual contains important informa on necessary for proper assembly and safe use of this appliance 5 Always keep this manual for conve...

Page 2: ...What s in the Box 6 Exploded View 7 Parts List 8 Assembly Prepara on and Instruc ons 9 Connec ng Regulator to the Liquid Propane Tank 15 Check for Leaks 16 Liquid Propane Tank Informa on 17 Ligh ng I...

Page 3: ...nstruc ons must be maintained Keep your griddle in an area clear and free from combus ble materials gasoline and other ammable vapors and liquids This griddle is intended for use outdoors and must not...

Page 4: ...in use the gas must be turned o at the supply tank DO NOT completely cover the top surface in foil as this can lead to excessive heat and the poten al for a possible re Doing so will void your warran...

Page 5: ...e using only the gas speci ed by the manufacturer on the ra ng plate DO NOT a empt to operate your griddle on other gases Failure to follow this warning could lead to a re hazard and bodily harm and w...

Page 6: ...acket Le Leg Assembly Right Leg Assembly Wheels Sta onary Feet Cart Panel Side Table Propane Tank Bracket Griddle Knobs Grease Cups Starter Ba ery Handle 1 1 1 1 1 1 1 2 2 2 1 1 2 2 1 1 1 A B C D E G...

Page 7: ...7 EXPLODED VIEW...

Page 8: ...t Leg Pin 4 15 Le Back Cart Leg Fixing Bracket 1 16 Right Back Cart Leg Fixing Bracket 1 17 Le FrontCart Leg Fixing Bracket 1 18 Right FrontCart Leg Fixing Bracket 1 19 Right Cart Leg Assembly 1 20 Ha...

Page 9: ...ome parts may contain sharp edges Wear protec ve gloves if necessary Read and follow all safety statements warnings assembly instruc ons and use and care instruc ons before a emp ng to assemble and us...

Page 10: ...holes Insert the co er pins thought the holes at the ends of the leg pins to secure 10 3 Rotate and stand the le leg up Slide the right cart leg assembly into the two leg xing panels Align the holes a...

Page 11: ...right leg up A ach the wheels on the le leg assembly using the at washers and the wheel xing nuts Screw on the feet xing nuts to the sta onary feet then twist those into place on the right leg 11 x2...

Page 12: ...cket and mount it to the tabs on the le side of the griddle Insert the le side rst then the right 6 Install the cart panel by lining up the notches with the le side of the griddle rst and then let the...

Page 13: ...ide table accessory into the corresponding slots on the le side of the griddle Use the handle screws to secure the side table x4 8 On the right side of the griddle ghten the screws with a screwdriver...

Page 14: ...t the pegs into the slots at the back of the griddle top to secure in place Slide the grease cups into the openings on the front of the griddle lining them up under hole Hook the cups onto the loops i...

Page 15: ...se damaged or plugged equipment 4 Hold regulator by one hand in a straight line with LP tank valve and insert nipple into LP tank valve Be sure the nipple is centered in the valve outlet see Fig 1 Han...

Page 16: ...soapy solu on with cold water and towel dry DANGER WARNING WHEN TO PERFORM A LEAK TEST Every me prior to ligh ng the griddle even if purchased fully assembled Repeat every me the LP gas cylinder is r...

Page 17: ...allowed to escape rapidly it shuts o the gas supply Opening the valve rapidly may simulate a gas leak causing the safety device to ac vate and restric ng gas ow causing low ames Opening the valve slo...

Page 18: ...end of Match Holder hanging on the Right Front Leg Strike the match and place it near side of the burner see Fig 6 3 Push and turn the control knob to HIGH The burner should ignite 4 Replace cooking...

Page 19: ...llect inside of the griddle the griddle body or the grease cups if le uncovered CONTROL PANEL A er ini al usage areas of the griddle may discolor from the intense heat given o by the burners Discolora...

Page 20: ...Next you ll want to select your oil Feel free to use Extra Virgin Olive Oil Vegetable Oil or Soy Oil Now we can season In this process you ll be using high heat to bond the oil to the surface Using a...

Page 21: ...AGE Ensure the griddle is properly cooled Storage of this griddle indoors is permissible only if the gas cylinder is disconnected and removed from the griddle Store the griddle in a cool dry place Alw...

Page 22: ...the screws from the rear of the burners Detach igni on wire from the igni on pin by hand only DO NOT use tool Then Li burner slowly 4 Check all burner ports are clear of clogs Use of a pin or paper cl...

Page 23: ...the griddle to a high heat for about 20 minutes to loosen debris Turn the griddle o and let it cool down and use a metal scraper to remove the debris Scrape the griddle dry do not add any water Use o...

Page 24: ...nly to the original purchaser and may not be transferred 2 If you can not verify the purchase date of the grill the warranty period will begin on the date the grill was manufactured 3 Replacement or r...

Reviews: