16
Steering Wheel Tilt Adjustment
WARNING:
Do not adjust
the steering wheel when the
tractor is moving. Adjusting
the steering wheel while the
tractor is moving could
cause the operator to lose
control of the tractor.
To allow for the comfort of the
operator, an easy to operate
adjustable steering wheel is a feature
of this tractor. To adjust the steering
wheel forward or back, push down on
the steering wheel tilt lock lever and
either push or pull the steering wheel
to the desired position. Once you have
found a comfortable position, release
the steering wheel tilt lock lever.
Front Wheel Alignment
Note:
The left-hand ball joint is left-
hand threaded. The right-hand ball
joint is right-hand threaded.
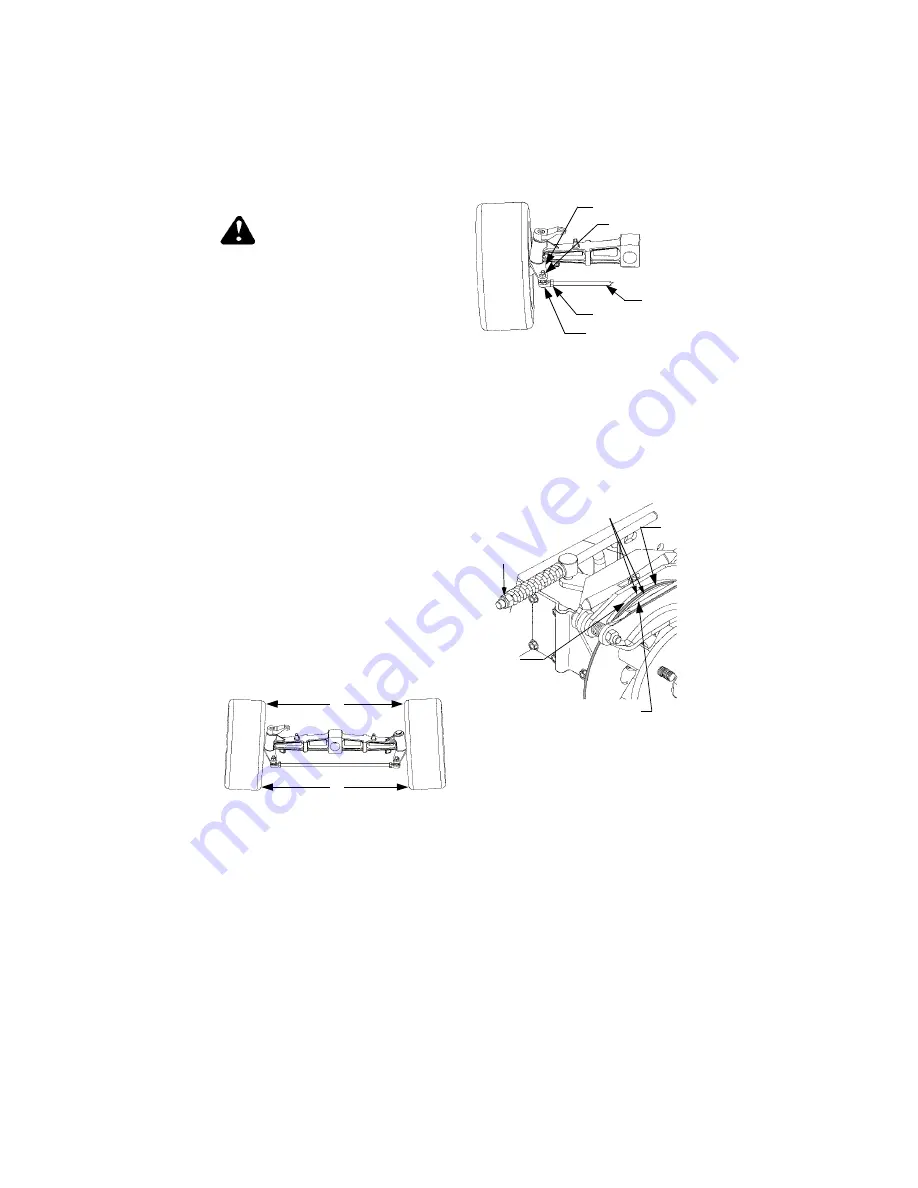
The front wheels should toe-in approx-
imately 1/8 inch. Measure distances A
and B. A should be approximately 1/8
inch less than B. See Figure 13.
Figure 13
To adjust toe-in loosen left and right
ball joint jam nuts. See Figure 14.
Turn the tie rod in or out of ball joints
as required. Tighten the jam nuts
against the ball joints.
Check for proper adjustment and
readjust as necessary.
Figure 14
Brake Inspection and Adjustment
During the normal operation of the
tractor, the brakes are subject to wear
and will require inspection and
adjustment.
Figure 15
NOTE:
Figure 15 is shown with the
right rear wheel removed for clarity.
Although not necessary for adjust-
ment , removal of the wheels will ease
the checking procedure.
Using a set of feeler gauges, complete
the following procedure to check and
adjust the brakes:
NOTE: The outer brake pad must be
pulled against the rotor when the
feeler gauge is inserted between the
inner pad and rotor.
A
B
Steering Axle
Hex Lock Nut
Ball Joint
Hex Jam Nut
Tie Rod
Brake
Adjustment
Nut
Brake
Rotor
Outer Brake Pad
Max. Total
Clearance
.030-.060
Inner
Brake
Pad


