


E
nglish
81388
♦♦♦
1 3
English
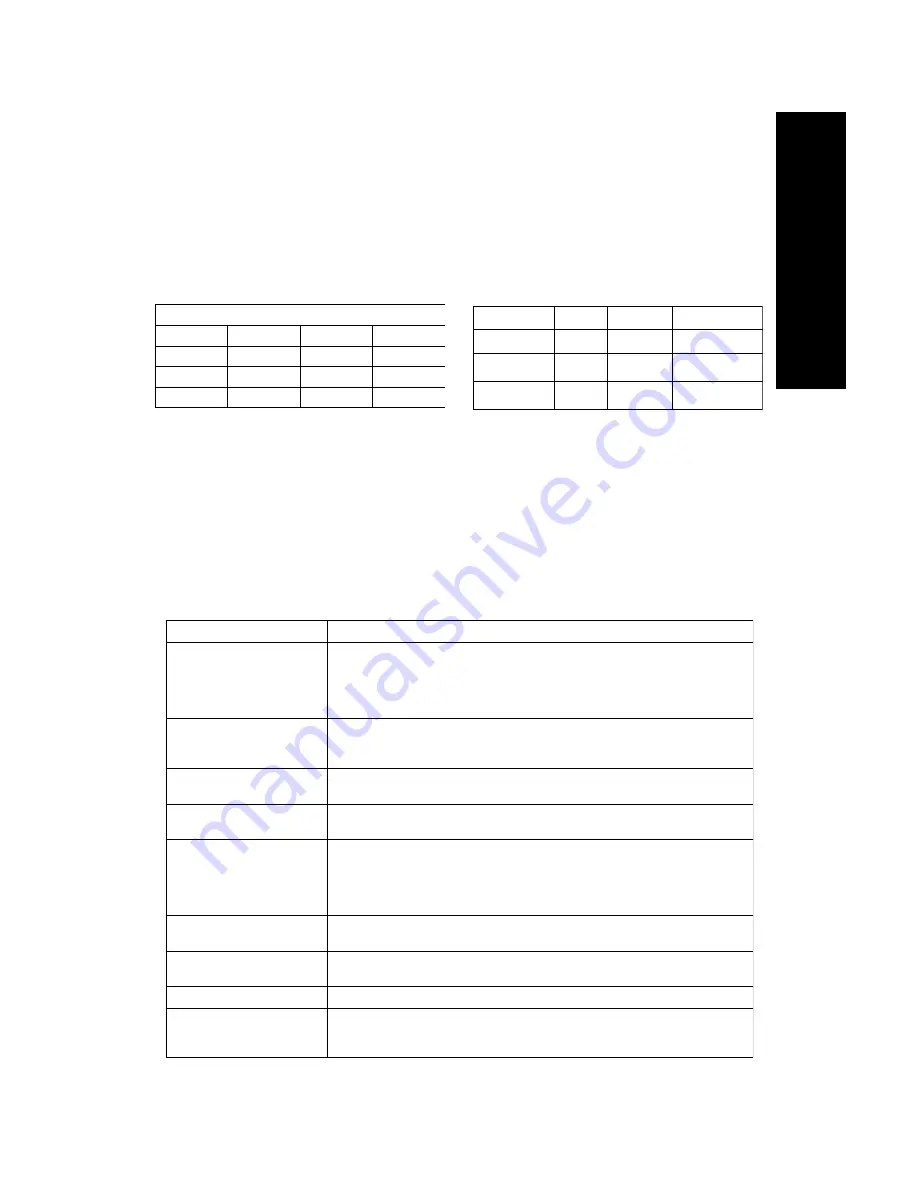
VESA DPMS Standard
H. sync
V. sync
Video
State
Off
On
Blank
Stand-by
On
Off
Blank
Suspend
Off
Off
Blank
Off
NUTEK
VESA state LED indicator Power Consumption
Normal operation
On
Green
<100W
Power Saving
Position A1
Suspend
Amber
<15W
Power Saving
Position A2
Off
Amber
<8W
3.3 Energy Declaration
This monitor is equipped with a function for saving of energy which supports the
VESA Display Power Management Signaling (DPMS) standard. This means that
the monitor must be connected to a computer which supports VESA DPMS to
fulfil the requirements in the NUTEK specification 803299/94. Time settings are
adjusted from the system unit by software. From indicated inactivity to Power
Saving Position A2 the total time must not be set to more than 70 minutes.
Section 4
Trouble-Shooting
Before calling an authorized service center, please check that the items below
are properly connected or set.
In case of using a non-standard signal, please check the pin assignments and the signal
timing of your adapter with the specifications outlined on section 2.1 and 2.2.
1. VESA Power-Management Proposal
2. Power Consumption (120/230 Vac)
According to TCO guidelines, the optimum TCO readings are measured when brightness and
contrast are adjusted to their center position.
Problem
Items to check
No picture
Power Switch should be in the ON position and the power cord should be connected.
Check the color of the power LED indicator, if it is orange, then the monitor is in
the power saving mode.
Check the horizontal/vertical frequency if out of range.
Maximize the Brightness and Contrast controls.
"No Signal Input" is displayed
on screen
The video card should be completely seated in its slot.
Computer power switch should be in the ON position.
The signal cable should be completely connected to the video card/computer.
Display image is not centered,
too small, or too large
Adjust Size and Position Controls to adjust the image.
Image is scrolling or unstable
Signal cable should be completely attached the computer.
Check the pin assignments and signal timings of the monitor and your video card.
Picture is fuzzy
Adjust the Contrast and Brightness Controls.
Push the Degauss Button once.
CAUTION: A minimum interval of 20 minutes should exist before the Degauss
Button is used a second time when not switching between modes.
Do not hold the button down continuously
Picture bounces or a wave
pattern is present in the picture
Move electrical devices that may be causing electrical interference away from the monitor
See the inside front cover of this manual for FCC information.
Edges of the display image are
curved either inward or outward
Adjust the Geometry control.
Color looks blotchy
Press the Degauss Button once.
No Plug & Play
Check if hosting system is Plug & Play compatible.
Check if VGA card is DDC 1/DDC 2B compatible.
Check if Window '95 is installed, and the software key for DDC function is enabled.
Summary of Contents for 1569UA
Page 14: ... 14 English ...


