9
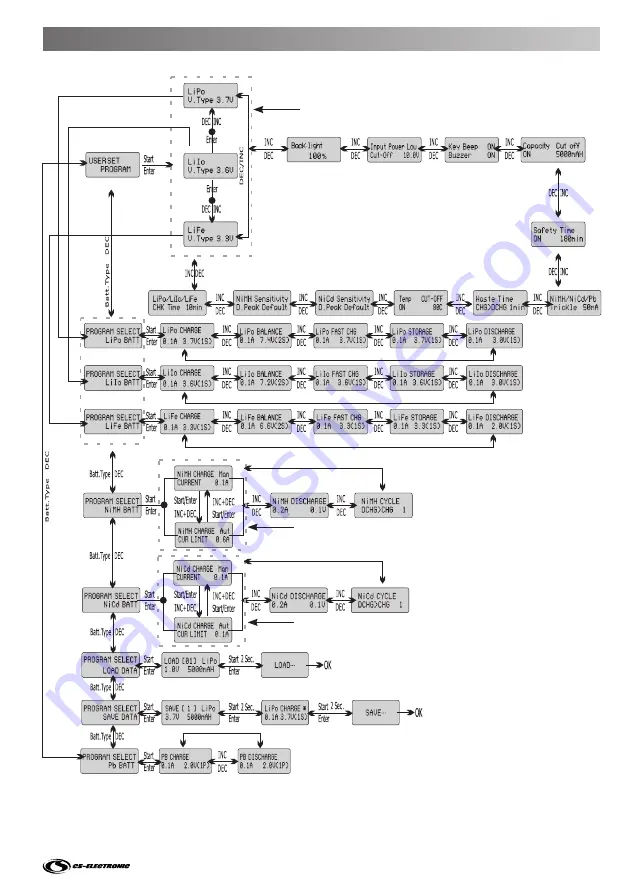
6. Programm Struktur
Einstellung ist auf Seite 5 beschrieben
Einstellung ist auf Seite 11 beschrieben
Einstellung ist auf Seite 10 beschrieben
Page 1: ...adestrom 0 1 10 A 200 W l Entladestrom 0 1 5 A 25 W l Balancer Strom 200 mA Zelle l Zellenzahl NiCd NiMH 1 18 l Zellenzahl Lithium Akkus 1 6 in Serie l Bleibatterien 2 V 24 V l Abmessung 200 x 135 x 5...
Page 2: ...l Die neueste Mikroprozessor Technology und die optimierten Lade programme sorgen f r ein 100 Vollladen der unterschiedlichsten Akkustypen Das Professional X2 Ladeger t kann an eine 12 V Stromquelle o...
Page 3: ...organg zu beschleunigen Die eingeladene Kapazit t ist in diesem Modus etwas kleiner als im normalen Lademodus da der Ladestrom gegen Ende des Ladevorganges verringert wird Die Ladezeit kann sich bis z...
Page 4: ...deinstel lung und Status einzelner Zellen im Balance Lademodus Start Taste START ENTER Starten von Programmen Speichern von Einstellung Ausgew hltes Programm Nennspannung 3S 3 Zellen in Serie Ladestro...
Page 5: ...n Ladeprogramm des Ladeger tes bereinstim men Wenn die Angabe nicht dem richtigen Wert entspricht kann es zu einer Explosion beim Ladevorgang kommen Zur Einstellung dr cken Sie dazu die Type Taste so...
Page 6: ...laden wird Bitte beachten Sie hier die Herstellerangaben zum Akku Als Werkseinstellung ist mit der Auswahl Default automatisch 7 mV gespeichert Werkseinstellung Default 7 mV ndern Enter Taste dr cken...
Page 7: ...C Tasten nach oben zu Safety Timer ON 120min Bei einem Ladevorgang startet automatisch ein interner Sicherheitsti mer mit Nach Ablauf dieser Zeit wird der Ladevorgang ohne R cksicht auf den Ladezustan...
Page 8: ...en nach oben zu Key Beep ON Buzzer ON Wenn Key Beep auf ON steht wird jeder Tastendruck durch ein Signal best tigt Werkseinstellung ON ndern Enter Taste dr cken und mit den DEC INC Tasten den blinkend...
Page 9: ...9 6 Programm Struktur Einstellung ist auf Seite 5 beschrieben Einstellung ist auf Seite 11 beschrieben Einstellung ist auf Seite 10 beschrieben...
Page 10: ...lende Ladestrom an zu blinken Stellen Sie den Ladestrom laut Herstellerangaben des Akkus mit den DEC INC Tasten ein Werden im Ladeprogramm jetzt beide Status Tasten gleichzeitig gedr ckt wird der Modu...
Page 11: ...ck auf Start Enter werden die Werte bernommen Wird nun die Start Enter Taste f r drei Sekunden gedr ckt beginnt der Ladevorgang mit dem Battery Check und wechselt dann zur Lade bersicht ndern des Lade...
Page 12: ...llenzahl an Stimmen beide Werte berein zeigt die Anzeige STOP oder ENTER Starten Sie den Ladevorgang durch erneutes Start Taste dr cken Stimmen die Werte nicht berein meldet das Ladeger t dies durch e...
Page 13: ...nung des Akkus laut Herstellers ein Normal liegt diese bei 2 5V Zelle und darf nicht unterschritten werden Als Orientierung hilft auch die zus tzliche Anzeige der Zellen in Klammern wie z B 5 0V 2S f...
Page 14: ...n der Zellenspannung von Lithium Akkus w hrend des Ladens Dazu muss der Akku zus tzlich zum reinen Ladekabel mit einem Balancer Kabel an das Ladeger t angeschlossen sein Das Laden in diesem Modus ist...
Page 15: ...n diesen mit Enter Geben Sie nun in die auf der rechten Seite blinkende Anzeige die Spannung des zu ladenden Blei Akkus ein und best tigen dies mit Enter Beim Entladen geben Sie auf der rechten Seite...
Page 16: ...f r jeden Ausgang angezeigt werden Anzeige der Endspannung bei der sich das Programm abschaltet Anzeige der Kapazit ts Abschaltung und Einstellung bei der sich das Programme abschlatet Anzeige des Sic...
Page 17: ...hlt und mit ENTER die erforderlichen Parameter einzeln eingestellt werden Tipp Wir empfehlen immer alle Programme zu dem entsprechenden Akku einzugeben um einen reibungslosen Betrieb zu sichern Am End...
Page 18: ...ELECT TEMP Cut Off 80C Der Einstellbereich geht von 20 C bis 80 C berschreitet der Akku die Temperatur wird der Ladevorgang beendet Bitte Akku Herstelleranga ben beachten Werkseinstellung 80 C ndern E...
Page 19: ...nn Sie die Option Launch Charge Monitor aktivieren Klicken Sie auf Finish um die Installation zu beenden Installation des USB Treibers Wichtig ist dass Sie diesen USB Treiber installieren bevor Sie da...
Page 20: ...nun noch feststellen auf welcher COM Schnittstelle die USB Verbindung von Win dows installiert wurde Diese finden Sie im Ger temanager von Windows ffnen Sie dazu aus dem Windows Startmen die Systemst...
Page 21: ...ese Nummer und schlie en Sie den Ger tema nager und die weiteren Fenster wieder Registrierung Um die Interface Software benutzen zu k nnen m ssen Sie diese mit einer Seriennummer registrieren Diese Se...
Page 22: ...besitzt diese muss beim Einstellen nach rechts zeigen so dass die Nase in den Ausschnitt am Geh use passt Damit ist der Space Charger f r die Interface Software betriebsbereit Grundeinstellungen der I...
Page 23: ...icken Sie auf den Button Speichern und das Programm kehrt zum Startbildschirm zur ck Wenn Sie nun den Button Start anklicken geht die Interface Software zum bersichtsfenster ber Hier werden die vom Sp...
Page 24: ...htsfenster oder in der Detailansicht klicken wird das Programm beendet und die bis dahin gemessenen Werte gespeichert Das Ende eines Vorganges wird Ihnen durch die Meldung monitor completed angezeigt...
Page 25: ...verview klicken Einlesen von gemessenen Werten Um sich eine fr here Messung ansehen zu k nnen k nnen Sie die gespeicherten Werte einle sen Im Startbildschirm klicken Sie auf den Button Open und w hlen...
Page 26: ...les Zubeh r Sonstige Hinweise Die Interface Software ist ausschlie lich f r den Betrieb mit dem Space Charger 2 0 von CS Elec tronic geeignet Zus tzlich zu dieser Anleitung gilt die Bedienungsanleitun...
Page 27: ...Ladekabel mit XH Balancer Anschluss C140207 Lipo Ladekabel 40cm mit EH Balancer Anschluss C140209 Ladekabel f r Gl hkerzenstecker C140208 Traxxas Lipo Ladekabel mit Dean Adapter C140210 Ladekabel mit...
Page 28: ...onen am Ladeger t nicht passend zum Akku eingestellt werden kann das Ladeger t oder der Akku Schaden nehmen Bei berladungen kann Feuer entstehen oder es zu Explosionen kommen Die Garantie gilt nicht b...
Page 29: ...rlaubte Ladestrom h ngt von dem Akkutyp und oder dessen Leistungsf higkeit ab und kann in den Herstellerangaben gefunden werden Nur Akkus die ausdr cklich f r eine Schnellladung zugelassen sind d rfen...
Page 30: ...n gr eren Memory Effekt aufweisen als NiMH Mit einer Entladung des Akkus wird der Memory Effekt vermieden Bei Lithium Akkus wird empfohlen diese ohne vorherige Entladung wieder voll aufzuladen H ufige...
Page 31: ...tion Betrieb Verwendung und Wartung des Ladeger tes k nnen von CS ELECTRONIC zu keiner Zeit berwacht werden Daher bernimmt CS ELECTRONIC keinerlei Haftung f r Verluste Sch den oder Kosten die sich aus...
Page 32: ...fflichen Verwertung oder anderen Formen der Verwertung von Altger ten wird ein wich tiger Beitrag zum Umweltschutz geleistet Batterien und Akkus m ssen aus dem Ger t entfernt werden und bei einer ents...
Page 33: ...urrent Range 0 1 5 A 25 W l Current Drain for Balancing Port 200 mA cell l NiCd NiMH Battery Cell Count 1 18 cells l Li Ion Polymer Cell Count 1 6 Series l Pb Battery Voltage 2 V 24 V l Dimension L220...
Page 34: ...rge Programs provide a 100 full charge of various Battery Types The Professional X2 Charger can to a 12V Power Source or to any Power Supply with connect 11 18V and 5 30A 1 Dear Customer 2 2 Range of...
Page 35: ...charged capacity is a little bit less compared with normal charging cause the current is reduced at the end of the charging process but the charge time is up to 1 3rd shorter Storage Mode for Lithium...
Page 36: ...adjusting of the basic settings Ter minates a charging process DEC INC Tasten STATUS Changes flashing values For display of the basic settings and the status of single cells in balancer mode Start Ke...
Page 37: ...ent from correct value explosion can occur during charge process For the setting you press the Batt Type key as much until the display USER SET Program is displayed Now you press the Start Enter key T...
Page 38: ...whereas setting it lower brings a possibility of premature termination Please refer to the technical specification of the battery The factory default is set to 7mV To change the factory setting of 7m...
Page 39: ...fety Timer ON 120min When the charge process starts the integrated safety timer starts to run simultaneously When this time is passed the process is stopped independent of the charging condition First...
Page 40: ...C keys Key Beep ON Buzzer ON Beep on means that every time a button is pressed you can hear a sound To change the factory setting of ON press the enter key and change the flashing value with the DEC I...
Page 41: ...9 6 Program Structure Please refer to page 5 of this manual Please refer to page 11 of this manual Please refer to page 10 of this manual...
Page 42: ...ent with the DEC INC keys keys according to the manufacturer s indication Pressing both status keys simultanously in the charging program the mode will be changed from manual to automatic Using the au...
Page 43: ...the se lected process starts with the battery check and changes after that to the survey Changing the charging current while charging Press the enter key and change the current with the DEC INC keys w...
Page 44: ...with S the number of cells you have entered If both values are the same the display shows ENTER You can now start the charging process by pressing the enter key If the values are not the same the char...
Page 45: ...ltage according to the manufacturer s indication Normally it is 2 5 V per cell and you should not underrun this voltage To give you an idea the additional in formation of the number of cells can be he...
Page 46: ...n the right side according to the voltage of the LiFe battery and confirm it with the enter key Charging of LiFe batteries with the balancer program This function allows the balancing of the voltage o...
Page 47: ...the manufacturer s indication The values are saved with another pressing of the start enter key Now you have to set the flashing information displayed on the right side according to the voltage of th...
Page 48: ...am ended Displayed capacity cut off function is turn on and the setting value of capacity Displayed safety timer is turn on and duration of time in minutes Displayed temperature cut off function is tu...
Page 49: ...can select all programs CHARGE BALANCE STORAGE FAST DISCHARGE and make you settings for each program Hint For a smooth operation we recommend to set all programs for each battery After all settings y...
Page 50: ...set the temperature from 20 C to 80 C If the temperature of the battery is over the set limit the charging process will be termina ted Please refer to the manufacturer s indication To change the facto...
Page 51: ...e program with activating Launch Charge Monitor Click on Finish to finalize the installation Installation of the USB Driver It is important to install this USB driver before you connect the USB Adapto...
Page 52: ...ut which COM port Windows has used for the USB connection You find this in the device manager of windows Right click on My Computer select Properties and then Hardware and Device Manager Or use the co...
Page 53: ...oftware Note down this number and close the device manager and all other windows Registration Before you can use the Interface Software you have to enter a serial number This serial number is noted in...
Page 54: ...Please note that the plug for the charger has a lead on one side This lead has to be on the right side when plugging into the charger matching the cut out in the charger case Now the charger is ready...
Page 55: ...k on the button Save and the program returns to the welcome window If you know click on Start the Interface Software opens the overview window All values received from the Space Charger 2 0 will be di...
Page 56: ...n in the welcome screen the overview or the detail window the program will be closed and the values measured until that time will be saved The end of an operation is displayed with the message monitor...
Page 57: ...clicking on Overview in th etop menu Open saved Values To display an measuring already saved you have to open the file In the Welcome windows click on the button Open and select the file After this yo...
Page 58: ...EH auf XH 2 4S 19 Optional Parts Additional Notes This Interface Software is only suitable for the Space Charger 2 0 from CS Electronic In Addition to this manual the user manual of the Space Charger...
Page 59: ...cable with XH Balancer Connector C140207 Lipo charging cable 40cm mit EH Balancer Connector C140208 Traxxas Lipo charging cable mit Dean Adapter C140209 Charging cable for glow plug drivers C140210 Ch...
Page 60: ...plosion due to overcharging This warranty is not valid for any damage or subsequent damage arising as a result of a misuse or failure to observe the procedures written in this manual To avoid short ci...
Page 61: ...r Only batteries that are expressly stated to be capable of quick charge are allowed to be charged at rates higher than the standard charge current Connect the battery to the terminal of the charger r...
Page 62: ...more often or use a battery of larger capacity Full capacity cannot be used until it has been subjected to 10 or more charge cycles The cyclic process of charge and discharge will optimize the capacit...
Page 63: ...make a cost estimate This is with costs in case the repair is finally not done 23 Liability Exclusion The way you install operate and maintain the radio control system components can not be che cked b...
Page 64: ...f our common environment by recycling the basic materials or re cycling redundant materials in other ways Remove batteries from your device and dispose them at your local collection point for batterie...