background image

RAX425DC-XJ User Manual

4

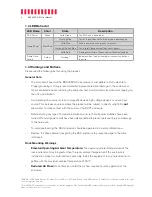
1.3 LED Behavior

LED Name

Color

State

Description

RAX Power

Green

Solid Green

The RAX unit is powered on.

Frame Power*

Blue/Red

Flashing Blue

Carrier is inserted and the drive inside is powering up.

Solid Blue

Drive is powered on and ready for access.

Flashing Red and Blue

Fan failure. Please contact Technical Support.

Solid Red

Frame power failure. Please contact Technical Support.

Frame Drive 
Activity*

Amber

Flashing**

Indicates when the host computer is accessing data on 
the drive.

1.4 Warnings and Notices

Please read the following before using the product.

General Care

• 

The main circuit board of the RAX425DC-XJ enclosure is susceptible to static electricity. 
Proper grounding is strongly recommended to prevent electrical damage to the enclosure or 
other connected devices, including the computer host. Avoid all dramatic movement, tapping on 
the unit, and vibration.

• 

Avoid placing drive carriers close to magnetic devices, high voltage devices, or near a heat 
source. This includes any place where the product will be subject to direct sunlight. Do 

not


allow water to make contact with the carrier or the RAX

®

 enclosure.

• 

Before starting any type of hardware installation, ensure that all power switches have been 
turned off and all power cords have been disconnected to prevent personal injury and damage 
to the hardware.

• 

To avoid overheating, the RAX enclosure should be operated in a well-ventilated area.

• 

Remove the drives before transporting the RAX enclosure to prevent damage to the drive 
interfaces.

Rack Mounting Warnings

• 

Elevated Operating Ambient Temperature: 

The operating ambient temperature of the 

rack environment may be greater than the room ambient temperature if the enclosure is 
installed in a closed or multi-unit rack assembly. Install the equipment in an environment com-
patible with the maximum ambient temperature of 40° C.

• 

Reduced Air Flow:

 Do not block or inhibit the air flow required for safe operation of the 

enclosure.

*Each DX115DC frame has one (1) Frame Power LED, one (1) Frame Drive Activity LED, and one (1) Frame Power Switch located to the right 
of each respective drive bay.

**Some SATA PC systems/host controllers do not provide support for the Drive Activity LED feature, in which case the Drive Activity LED may light 
up as a solid amber color or not at all.

Summary of Contents for RAX425DC-XJ

Page 1: ...s Quick ingestion or duplication of DCP Accepts up to four CRU DX115DC carriers Rugged and reliable all metal construction Auto Start feature powers up the drive carrier seconds after insertion without having to push the power button ...

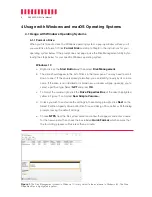
Page 2: ...allation Steps 5 2 1 RAX425DC XJ Setup 5 2 2 Drive Installation 5 3 Operating Your RAX425DC XJ 5 4 Usage with Windows and macOS Operating Systems 6 4 1 Usage with Windows Operating Systems 6 4 1 1 Format a Drive 6 4 1 2 Mount and Unmount Volumes 8 4 2 Usage with macOS 9 4 2 1 Format a Drive 9 4 2 2 Mount and Unmount Volumes 10 5 Frequently Asked Questions 10 Technical Specifications 12 ...

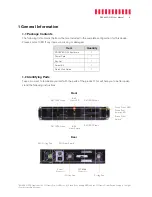
Page 3: ... Take a moment to familiarize yourself with the parts of the product This will help you to better under stand the following instructions Front DX115DC Frame DX115DC Frame DX115DC Frame DX115DC Frame RAX Power Switch RAX Power LED Frame Power LED Frame Drive Activity LED Frame Power Switch SFF 8088 Connector Power Connector PSU Power Switch Cooling Fan PSU Cooling Fan Cooling Fan Rear Each DX115DC ...

Page 4: ...o direct sunlight Do not allow water to make contact with the carrier or the RAX enclosure Before starting any type of hardware installation ensure that all power switches have been turned off and all power cords have been disconnected to prevent personal injury and damage to the hardware To avoid overheating the RAX enclosure should be operated in a well ventilated area Remove the drives before t...

Page 5: ...e to remove the carrier from the frame b Use a Phillips screwdriver to remove the two screws securing the carrier cover The screws are located on either side of the front of the carrier c Remove the cover and attach a 3 5 inch or 2 5 inch drive to the unified power and data con nector inside of the carrier d With one hand on the top of the drive turn the carrier over Then secure the drive to the c...

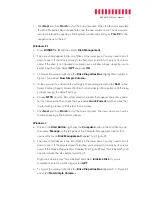
Page 6: ...ormatted you can identify it easily by its volume name If the drive is not initialized or is brand new a window will pop up asking you to select a partition type Select GPT and press OK c To format the volume right click the Drive Properties Box of the drive highlighted yellow in Figure 1 and select New Simple Volume d Unless you wish to customize the settings in these dialog prompts click Next on...

Page 7: ...r Path dialog prompts leaving the default settings e Choose NTFS from the file system selection window that appears and enter a name for the new volume Then check the box labeled Quick Format which ensures that the formatting process will take less than a minute f Click Next and then Finish to start the format process The new volume can now be found by opening a File Explorer window Windows 7 a Cl...

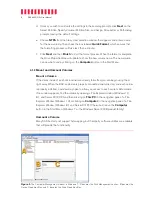
Page 8: ...ach drive carrier are already formatted you can begin using them right away When the RAX enclosure is properly connected and turned on and each carrier is properly installed a window may open to allow you access to each carrier s data volume If no window appears find the volume by opening a File Explorer window Windows 10 8 1 and Server 2012 R2 and then clicking on This PC in the navigation pane o...

Page 9: ...elect the proper volume s from the menu that pops up You may have to click on the Show Hidden Icons arrow on the task bar to find the correct icon Windows will indicate when it is safe to eject each carrier Then turn off the drive bay frame the carrier is installed in by pressing its Frame Power button Finally eject the carrier Disconnecting or powering off the RAX enclosure or ejecting a carrier ...

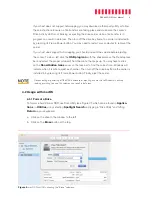
Page 10: ...y dragging the volume s icon to the Trash or by selecting the volume then pressing Command E on your keyboard Disconnecting or powering off the RAX enclosure or ejecting a carrier while macOS is actively reading or writing to the volume can result in data loss 5 Frequently Asked Questions Q Does my 4 bay RAX unit support RAID A The RAX425DC XJ only supports JBOD functionality However the drives ca...

Page 11: ...rs that may be present in your macOS installation If an operating system utility doesn t help you may need Data Rescue This is a great solution for recovering lost data from a hard drive which has suffered data loss or corruption If there is a true hardware failure of your hard drive that prevents it from communicating with your computer there is no software solution in existence that can fix this...

Page 12: ...on infringement of third party rights with respect to the documenta tion and hardware No CRU dealer agent or employee is authorized to make any modification extension or addition to this warranty In no event will CRU or its suppliers be liable for any costs of procurement of substitute products or services lost profits loss of information or data computer mal function or any other special indirect...

Reviews: