Square Flush Mount Kit
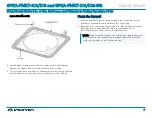
2. Use a Philips screwdriver to turn the screw inside each clamp to
tighten the clamps and secure the bracket in the ceiling.
3. To secure the flush mount kit to the drywall, use a screw gun/drill to
drive drywall screws through the mounting holes in the flange.
Finish the Drywall
1. With an applicator (not included), apply joint compound over the
bracket to seal and blend the bracket into the ceiling.
2. Apply the joint compound beginning 6-8 in. (152-203 mm) from the
flush mount kit's edge and then feather outward 16-20 in.
(406-508 mm) to achieve a smooth, flat transition.
NOTE: Make sure that enough joint compound is applied around
the flush mount kit to make a very gradual transition from the
surface to the edge of the flush mount kit.
3
SPKA-FMKT-IC6/IC8 and SPKA-FMKT-IC6/IC8-SQ
Quick Start
Flush Mount Kit for 6 in. or 8 in. Reference and Ultimate In-Ceiling Speakers, 1 Pair


