


The LED strip comes with magnet and double-sided tape on
the back
Unlock your Sound BlasterX AE-5 Plus with Sound Blaster Command software.
Download the software and its user manual at
creative.com/support/ae5plus
.
With Sound Blaster Command, you can:
- Experience professionally-tuned audio presets for gaming, movies, and music
- Personalize audio effects with Sound Blaster Acoustic Engine
- Set up speakers and headphones configuration
- Adjust playback and recording settings
Model No. / Modèle No. / 型號 / 型号:
SB1740
Remove the
computer cover
Remove the
computer
power cable
Gently but firmly slot the Sound BlasterX AE-5 Plus
sound card into the PCI-e slot
Replace the
outer casing
Reconnect
the power
cable
Remove the
existing sound card
Remove the metal
casing of a PCI-e slot
TAD
AU
X_IN
(ii) PCI-e slot
(i) PCI slot
a
b
c
d
e
f
PN: 03SB174000001 Rev B
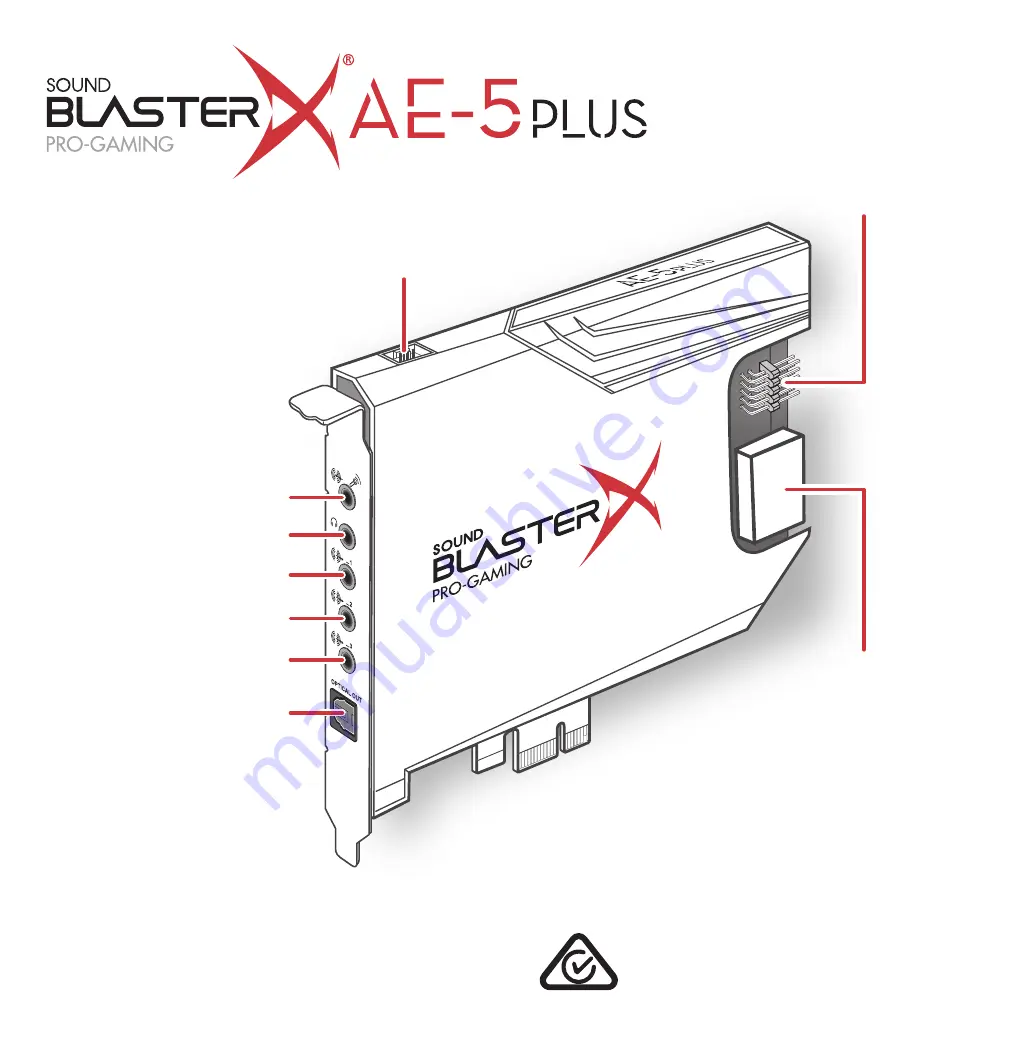
(h) Front Panel
HD Audio Header
(g) Power
Connector
(f) Optical-out
(e) Center / Subwoofer
(d) Rear (L / R)
(c) Front (L / R)
(b) Headphone Jack
(a) Line-in / Mic-in
(i) RGB Header
Technical & Customer Support Services
Other Information
Go to
creative.com/support/ae5plus
to resolve and troubleshoot technical queries at Creative’s
24-hour self-help Knowledge Base. You can also find customer support services and other helpful
information here.
Product Registration
Registering your product ensures you receive the most appropriate service and product support
available. You can register your product within Sound Blaster Command software or at
creative.com/register
.
Keep this document for future reference.
Supplementary documentation for this product includes a detailed user guide, DoC and safety
and regulatory information. These documents can be
the
creative.com/support/ae5plus
site.
Informations complémentaires
Allez sur
creative.com/support/ae5plus
pour résoudre
un problème technique et utilisez la base de
connaissances Creative (Knowledge Base), disponible
24 heures sur 24. Vous pouvez également trouver des
services d’assistance clientèle et d’autres informations
utiles à cet endroit.
Les documents supplémentaires concernant ce produit
incluent un guide de l'utilisateur détaillé, la DoC, ainsi
que des informations réglementaires et liées à la
sécurité. Ils peuvent être téléchargés sur le site
creative.com/support/ae5plus
.
Enregistrement du produit
L’enregistrement de votre produit garantit que vous
recevrez les services et le support produit les plus
appropriés qui soient. Vous pouvez enregistrer votre
produit avec le logiciel Sound Blaster Command ou sur
creative.com/register
.
© 2020 Creative Labs Pte. Ltd. All rights reserved. Creative, the Creative logo, Sound Blaster and the BlasterX logo are
trademarks or registered trademarks of Creative Technology Ltd in the United States and/or other countries. Manufactured under
license from Dolby Laboratories. Dolby, Dolby Audio, and the double-D symbol are trademarks of Dolby Laboratories. DTS is a
registered trademark and the DTS logos and symbol are trademarks of DTS, Inc. All other trademarks are the property of their
respective owners and are hereby recognized as such. All specifications are subject to change without prior notice. Actual product
may differ slightly from images shown. Use of this product is subject to a limited warranty.
Connect power connector
for RGB lighting
Place the strip directly on
the inner steel frame
Connect front panel
HD audio connector
Connect extension cable
Connect LED strip
1
1
1
1
Use the double-sided tape to
paste the strip on plastic /
aluminum surfaces
2
2
1
2
2
2
4
3
HD AUDIO
OR
使用产品前请阅读使用说明
Pin
1
2
3
4
Definition
Ground (G)
Clock (C)
Data (D)
+5V (V)
Pin
1
2
3
4
Definition
NC
COM
COM
+5V DC
Pin
1
2
3
4
5
Pin
6
7
8
9
10
Definition
MIC2_L
GND
MIC2_R
+AC2_DET
LINE2_R
Definition
NC
GND
No Pin
LINE2_L
FAUDIO_JD
1
4
1
4
1
2
9
10
You need to provide this serial number if you require technical support for this product.
Vous devez fournir ce numéro de série si vous avez besoin d’assistance technique pour ce produit.
Diese Seriennummer wird im Bedarfsfall vom technischen Kundendienst für das Produkt abgefragt.
Si necesita asistencia técnica para este producto, tendrá que proporcionar este número de serie.
W razie korzystania z pomocy technicznej odnośnie tego produktu, muszą Państwo podać ten numer.
Toto výrobní číslo musíte uvést, budete-li požadovat k výrobku technickou podporu.
V prípade potreby získať technickú podporu ohľadne tohto výrobku budete toto sériové číslo potrebovať.
Если вам потребуется техническая поддержка по изделию, необходимо будет указать серийный номер.
テクニカルサポートを受ける際に、シリアル番号が必要となりますので、シリアル番号ラベルを上部のシリアル番号欄に貼り付け(貼り付けた
状態で出荷されている場合もあります)、本書を大切に保管してください。
제품의 기술 지원이 필요할 경우 이 일련 번호를 제공해야 합니다.
今后若需要技术支持服务,您还需提供此序列号。
今後若需要技術支持服務,您還需提供此序列號。
ES
EN
DE
CZ
PL
RU
SK
KO
JP
CS
CT
Serial No / Numéro de série / Seriennummer / Número de serie /
Numer seryjny / Výrobní číslo / Sériové císlo / Серийный номер /
シリアル番号
/
일련 번호
/
序列号
/
序列號
FR
Warranty
Warranty information is supplied with your product in a separate document.
Please keep your Proof of Purchase for the duration of the Warranty period.
Conservez ce document pour pouvoir vous y référer
ultérieurement.
Garantie
a
b
c
1
2
Broche
1
2
3
4
Définition
Ground (G)
Clock (C)
Data (D)
+5V (V)
Broche
1
2
3
4
Définition
NC
COM
COM
+5V DC
Broche
1
2
3
4
5
Broche
6
7
8
9
10
Définition
MIC2_L
GND
MIC2_R
+AC2_DET
LINE2_R
Définition
NC
GND
No Pin
LINE2_L
FAUDIO_JD
1
4
1
2
9
10
Patilla
1
2
3
4
Definición
Ground (G)
Clock (C)
Data (D)
+5V (V)
Patilla
1
2
3
4
Definición
NC
COM
COM
+5V DC
Patilla
1
2
3
4
5
Patilla
6
7
8
9
10
Definición
MIC2_L
GND
MIC2_R
+AC2_DET
LINE2_R
Definición
NC
GND
No Pin
LINE2_L
FAUDIO_JD
1
4
1
2
9
10
4
1
4
1
Styk
1
2
3
4
Definicja
Ground (G)
Clock (C)
Data (D)
+5V (V)
Styk
1
2
3
4
Definicja
NC
COM
COM
+5V DC
Styk
1
2
3
4
5
Styk
6
7
8
9
10
Definicja
MIC2_L
GND
MIC2_R
+AC2_DET
LINE2_R
Definicja
NC
GND
No Pin
LINE2_L
FAUDIO_JD
1
4
4
1
1
2
9
10
Pin
1
2
3
4
Bestimmung
Ground (G)
Clock (C)
Data (D)
+5V (V)
Pin
1
2
3
4
Bestimmung
NC
COM
COM
+5V DC
Pin
1
2
3
4
5
Pin
6
7
8
9
10
Bestimmung
MIC2_L
GND
MIC2_R
+AC2_DET
LINE2_R
Bestimmung
NC
GND
No Pin
LINE2_L
FAUDIO_JD
1
4
1
4
1
2
9
10
FR
1
2
i) Emplacement PCI
ii) Emplacement PCI-e
1. Installation
2. Télécharger
3. Connexion
Déverrouillez votre Sound BlasterX AE-5 Plus avec le
logiciel Sound Blaster Command. Téléchargez le logiciel
et son manuel d’utilisation sur
creative.com/support/ae5plus
Le Sound Blaster Command vous permet de :
- Bénéficier de préréglages audio réglés par des
professionnels pour les jeux, les films et les musique
- Personnaliser des effets audio grâce à l’Acoustic Engine
du Sound Blaster
- Configurer les enceintes et le casque
- Modifier les paramètres de lecture et d’enregistrement
Retirez le câble d'alimentation de
l’ordinateur
Insérez délicatement mais fermement la
carte son Sound BlasterX AE-5 Plus dans
l'emplacement PCI-e
f
1
2
Remettez le capot de l'ordinateur
Rebranchez le câble d'alimentation
e
1
2
La bande LED est livrée avec un aimant et un
ruban adhésif double face sur le dos
Placez la bande directement sur le cadre
en acier intérieur
OU
Utilisez le ruban double face pour coller la
bande sur les surfaces en
plastique / aluminium
Retirez la carte son existante
Retirez la protection en métal de
l'emplacement PCI-e
Retirez le boîtier de l'ordinateur
(a) Entrée ligne / Entrée Micro
(b) Casque
(c) Avant (G / D)
(d) Arrière (G / D)
(e) Central / Subwoofer
(f) Sortie optique
(g) Connecteur d’alimentation
(h) Connecteur audio HD du panneau avant
(i) Fiche RGB
(a) Line-In / Mic-In
(b) Kopfhörer
(c) Vorne (L / R)
(d) Hinten (L / R)
(e) Center / Subwoofer
(f) Optische Out-Buchse
(g) Stromanschluss
(h) HD Front Panel Audio-Anschluss
(i) RGB-Anschluss
(a) Entrada de línea / entrada de micrófono
(b) Cascos
(c) Delantero (izdo. / dcho.)
(d) Trasero (izdo. / dcho.)
(e) Central / subwoofer
(f) Salida Óptica
(g) Conector de alimentación
(h) Cabezal de sonido HD del panel Frontal
(i) Cabezal RGB
(a) Wejście liniowe / wejście mikrofonowe
(b) Słuchawki nauszne
(c) Przód (L / P)
(d) Tył (L / P)
(e) Centralny/subwoofer
(f) Wyjście optyczne
(g) Złącze zasilania
(h) Panel przedni HD Audio
(i) Panel RGB
d
1
2
3
4
Connecter le câble d'extension
Connecter la bande LED
Connecter le connecteur audio HD du
panneau avant
Connecter le connecteur d'alimentation
pour l'éclairage RGB
1. Installation
2. Download
3. Connection
Services d’assistance
technique et clientèle
Les informations sur la garantie sont fournies
avec votre produit dans un document séparé.
Conservez votre preuve d'achat pendant toute la
période de garantie.
Bewahren Sie dieses Dokument für die spätere
Verwendung auf.
Garantie
Die mit Ihrem Produkt gelieferten Garantieinfor-
mationen befinden sich in einem separaten
Dokument.
Bitte bewahren Sie Ihren Kaufbeleg während der
gesamten Garantiezeit auf.
Guarde este documento para futuras referencias.
Garantía
La información de la garantía se proporciona
con su producto en un documento por
separado.
No pierda la prueba de compra mientras esté
vigente el período de garantía.
Należy zachować ten dokument do użytku w
przyszłości.
Gwarancja
Informacja dotycząca gwarancji jest
dostarczana wraz z produktem w osobnym
dokumencie.
Dowód zakupu należy przechowywać przez cały
okres ważności gwarancji.
Weitere Informationen
Gehen Sie auf
creative.com/support/ae5plus
um
technische Anfragen zu beantworten und Fehler zu
beheben über die 24-Stunden Selbst-Hilfe der Creative
Knowledge Base. Dort finden Sie auch den Kundend-
ienst und weitere hilfreiche Themen.
Die Zusatzinformationen zu diesem Produkt bestehen
aus einem detaillierten Benutzerhandbuch, DoC sowie
Sicherheits- und Bestimmungsangaben. Diese
Dokumente sind auf der Website
creative.com/support/ae5plus
als Download
verfügbar.
Produktregistrierung
Registrieren Sie das erworbene Produkt um
sicherzustellen, dass Sie optimalen Service und
Produktunterstützung erhalten. Sie können Ihr Produkt
in der Sound Blaster Command-Software oder unter
creative.com/register
registrieren.
a
b
c
1
2
DE
f
1
2
i) PCI-Steckplatz
ii) PCI-e-Steckplatz
1. Installation
2. Download
3. Verbindung
Entsperren Sie Ihren Sound BlasterX AE-5 Plus mit der
Sound Blaster Command-Software. Laden Sie die
Software und das Benutzerhandbuch unter
creative.com/support/ae5plus
herunter
Mit Sound Blaster Command können Sie:
- Genießen Sie die professionell abgestimmte
Audio-Voreinstellungen für Spiele, Filme und Musik
- Personalisieren Sie die Audio-Effekte mit der
Sound Blaster Acoustic Engine
- Richten Sie die Konfiguration der Lautsprecher und
Kopfhörer ein
- Passen Sie die Wiedergabe- und Aufnahmeeinstel
lungen an
Computer Netzkabel entfernen
Sound BlasterX AE-5 Plus Soundkarte vorsichtig
aber fest in den PCI-e-Steckplatz einstecken
1
2
Computer-Gehäuse wieder befestigen
Netzkabel wieder anschließen
e
1
2
Der LED-Streifen kommt mit einem Magneten und
doppelseitigem Klebeband auf der Rückseite
Platzieren Sie den Streifen direkt auf dem
inneren Stahlrahmen
ODER
Verwenden Sie das doppelseitige
Klebeband, um den Streifen auf Kunststoff- /
Aluminium-Oberflächen aufzukleben
Vorhandene Soundkarte entfernen
Metallabdeckung eines PCI-e-Steckplatzes
entfernen
Nehmen Sie das Gehäuse vom Computer ab
d
1
2
3
4
Schließen Sie das Erweiterungskabel an
Verbinden Sie den LED-Streifen
Schließen Sie den HD Front Panel
Header-Audioanschluss an
Schließen Sie den Stromstecker für die
RGB-Beleuchtung an
Technischer Support und
Kundendienst
Otra información
Vaya hasta
creative.com/support/ae5plus
para
resolver cualesquiera dudas técnicas en la Base de
Conocimientos de Creative (Knowledge Base),
disponible las 24 horas. Allí también encontrará servicios
de atención al cliente y demás información útil.
La documentación complementaria para este producto
incluye una guía del usuario detallada, así como una
“declaración de conformidad” (DoC) e información
sobre normativa y seguridad. Estos documentos se
pueden descargar en el sitio
creative.com/support/ae5plus
.
Registro del producto
Al registrar su producto, usted se asegura de que
recibirá el servicio y la asistencia disponible más
adecuada. Puede registrar su producto en el software
Sound Blaster Command o en
creative.com/register
.
a
b
c
1
2
ES
f
1
2
i) Ranura PCI
ii) Ranura PCI-e
1. Instalación
2. Descarga
3. Conexión
Desbloquee su Sound BlasterX AE-5 Plus con el
software Sound Blaster Command. Descargue el
software y el manual de usario en
creative.com/support/ae5plus
Con Sound Blaster Command, puede:
- Experimentar presintonías de audio ajustadas
profesionalmente para juegos, películas y música
- Personalice efectos de sonido con Sound Blaster
Acoustic Engine
- Configuración de auriculares y altavoces
- Ajuste la configuración de reproducción y grabación
Desconecte el cable de alimentación del
ordenador
Introduzca de forma suave, pero firme, la
tarjeta de sonido Sound BlasterX AE-5 Plus en
la ranura PCI-e
1
2
Vuelva a colocar la carcasa exterior
Vuelva a conectar el cable de
alimentación
e
1
2
La tira LED viene imantada y cinta de doble
cara en la parte trasera
Coloque la tira directamente en el marco
interior de acero
O
Use la cinta de doble cara para
adherer la tira en las superficies
plásticas/de aluminio
Retire la tarjeta de sonido existente
Retire la carcasa metálica de la
ranura PCI-e
Retire la cubierta del equipo
d
1
2
3
4
Conecte el cable de extensión
Conecte la tira LED
Conecte el conector de sonido HD del
panel frontal
Conecte el conector de alimentación para
la iluminación RGB
Servicios de atención al
cliente y asistencia técnica
Inne informacje
Przejdź do
creative.com/support/ae5plus
, aby
rozwiązywać i sprawdzać odpowiedzi odnośnie zapytań
technicznych na 24-godzinnym serwisie samopomocy
Creative Knowledge Base. Na tej stronie można także
skorzystać z usług pomocy technicznej i znaleźć inne
przydatne informacje.
Dokumentacja uzupełniająca dla tego produktu zawiera
szczegółową instrukcję dla użytkownika, certyfikat
zgodności (DoC) oraz informacje na temat bezpieczeństwa
i przepisów prawnych. Dokumentację można pobrać z
witryny pod adresem
creative.com/support/ae5plus
.
Rejestracja produktu
Zarejestrowanie produktu zapewnia dostęp do obsługi i
pomocy technicznej na najwyższym poziomie. Możesz
zarejestrować swój produkt w oprogramowaniu Sound
Blaster Command lub na stronie
creative.com/register
.
a
b
c
1
2
PL
e
1
2
f
1
2
i) Gniazdo PCI
ii) Gniazdo PCI-e
1. Instalacja
2. Pobierz
3. Złącza
Uwolnij potencjał karty Sound BlasterX AE-5 Plus za
pomocą oprogramowania Sound Blaster Command.
Pobierz oprogramowanie i instrukcję obsługi na stronie
creative.com/support/ae5plus
Z oprogramowaniem Sound Blaster Command możesz:
- Doświadczyć profesjonalnych sygnatur dźwiękowych
dostrojonych specjalnie dla gier, filmów i muzyki
- Wybrać własne zaawansowane efekty dźwiękowe
dzięki aplikacji Sound Blaster Acoustic Engine
- Ustawienia konfiguracji głośników i słuchawek
- Dostosuj ustawienia odtwarzania i nagrywania
Odłącz przewód komputera zasilający
Ostrożnie, lecz stanowczo wciśnij kartę
dźwiękową Sound BlasterX AE-5 Plus w gniazdo
PCI-e
Pasek LED jest wyposażony w magnes oraz
dwustronną taśmę klejącą z tyłu
1
2
Załóż obudowę zewnętrzną
Przyłącz przewód zasilający
Umieść pasek dokładnie na wewnętrznej
stronie stalowej ramy
LUB
Użyj dwustronnej taśmy klejącej, aby
przykleić pasek na plastikowej /
aluminiowej powierzchni
Wymontuj obecną kartę dźwiękową
Zdejmij metalową osłonę gniazda PCI-e
Zdejmij obudowę komputera
d
1
2
3
4
Podłącz kabel przedłużający
Podłącz pasek LED
Połącz Złącze HD Audio na panelu
przednim
Podłącz złącze zasilania dla oświetlenia
RGB
Pomoc techniczna i
obsługa klienta


