Assembly
MODEL PS10LIN
19764-100 Rev D (05-10)
© Copyright 2010, Creative Playthings
Page 17
ASSEMBLY INSTRUCTIONS
67(3²:LQGRZ6XSSRUW
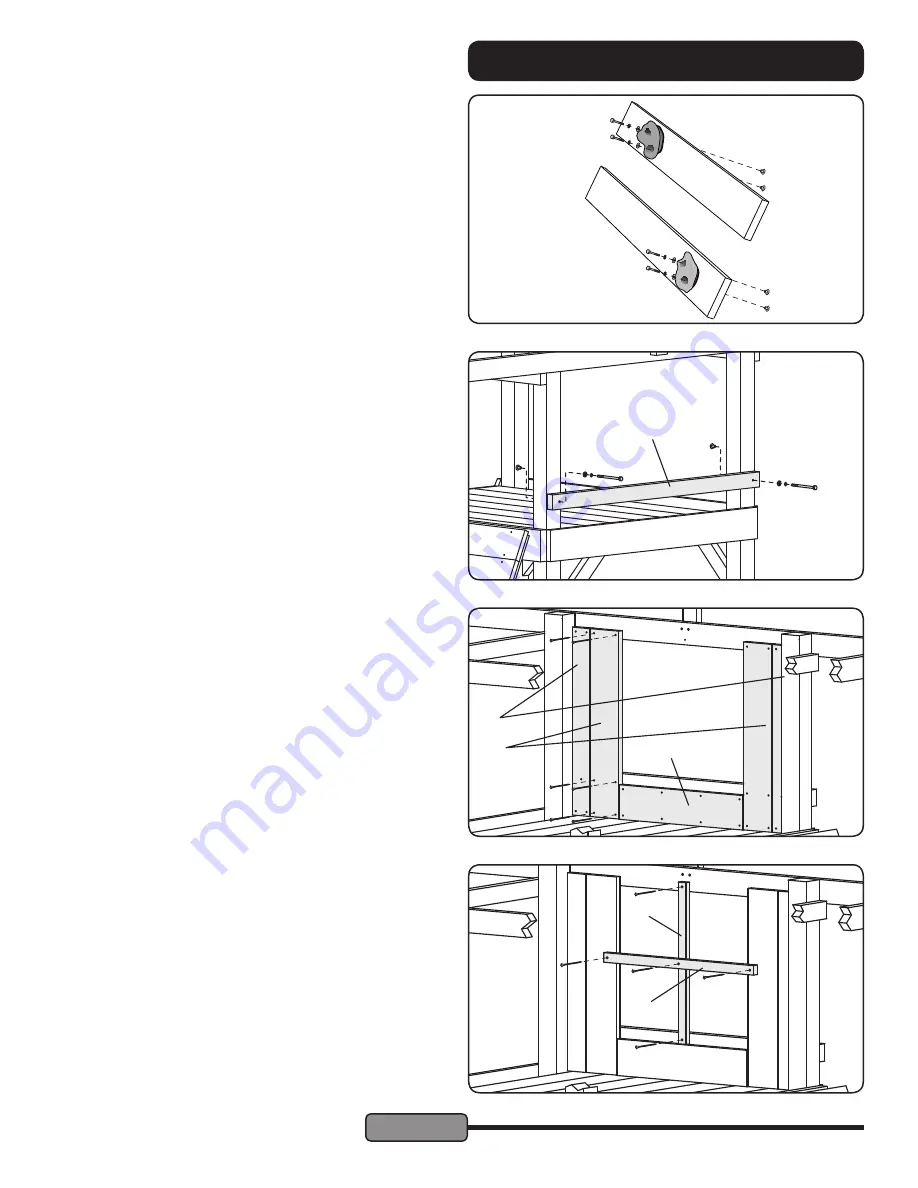
Fasten the Window Support (A) to the Back Corner Posts,
as shown, using two 1/4 x 4-1/2" Hex Bolt Assemblies.
STEP 28 – Mullion & Transom:
Fasten the Mullion (AA) to the Long Tent Support and Win-
dow Support using two #10 x 1-1/2" Screw. Use the small
pilot hole in the Long Tent Support as a guide. If the small
pilot hole is not present, center the Mullion in the opening.
Use a level to assure that it is plumb.
Fasten the center hole of the Transom (AG) to the center
hole of the Mullion with one #10 x -1/2" Screw. Make sure
that the Transom is level and fasten it to the Wall Slats using
two # 10 x 1-1/2" Screws.
67(3²5RFNV
Fasten the Climbing Rocks to all the holes in the Rock Boards
using two 1/4 x 1" (or 1-1/2") Hex Bolts, 1/4" Lock Washers,
8 MM Flat Washers and 1/4" Weld Nuts for each Rock. The
bolt must seat completely into the Climbing Rocks, and not
protrude more than a 1/8" past the end of the Weld Nut. Pro-
truding bolts can be a hazard to users, replace any protrud-
ing Bolts or pad them with additional Flat Washers.
STEP 27 – Window Slats:
Arrange two Narrow Window Slats (AV), two Window Slats
(AY), and one Bottom Window Slat (AU) as shown. The
Slats should be evenly spaced between the Back Corner
Posts. Fasten them using #10 x 1-1/2" Screws through the
holes in each slat.
1RWH PDNH VXUH WKDW VODWV DUH SRVLWLRQHG VR WKDW KROHV LQ
each slat land squarely over supports.
AU
A
AA
AG
AY
AV


