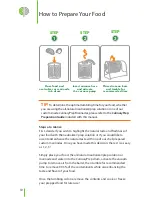
Steps in Detail
Place empty drum upright on work counter with top lid removed.
(Make certain that the Grovac Rib™ insert is properly installed in drum.
The Ribs must be inserted with the curved ends at the top of the drum.)
Place neutralizer/prep solution or marinade, water and food into the
drum. (Follow instructions on package, adding 64 oz of water.)
Place lid back onto the drum. (Rotate top a quarter turn to engage the
threads and secure the lid. Use lateral pressure when tightening the lid
versus pressing down on the lid to tighten. This may take a second try
to ensure the lid has locked properly.)
Insert the vacuum hose into the opening in the finger valve on the lid
of the upright drum. (Make certain that the finger valve is in the fully up
and open position.)
With drum upright, turn the vacuum pump on and allow vacuum to run
until the indicator on the gauge is in the green zone.
(Do not tip drum
while drawing vacuum as marinade will be drawn into the pump,
compromise the pump and void your warranty.)
When the desired vacuum has been achieved, rotate the valve down to
seal the vacuum, turn off the vacuum pump, and detach the hose from
the finger valve. Place the vacuum hose back into the base unit.
Place the drum horizontally back onto the base with the drum lid facing
away from the base unit.
Set timer to recommended tumbling time as specified in the CulinaryPrep
Preparation Guide. Press the rotate button to begin tumbling.
After tumbling ends, remove drum from base unit and place drum
upright on counter with lid up.
Open finger valve to release vacuum pressure. After the vacuum has
been fully released, rotate and remove the lid.
Remove meat, fish or produce from drum and cook, or place in
container and refrigerate or freeze for later use. Discard used
solution/marinade.
11
1
2
3
4
5
6
7
8
9
10
11
IMPORTANT – PLEASE NOTE:
Do not tip drum while drawing vacuum as the neutralizer/prep
solution or marinade will be drawn into the pump, compromise the
pump and void your warranty.


