Side 2
Base
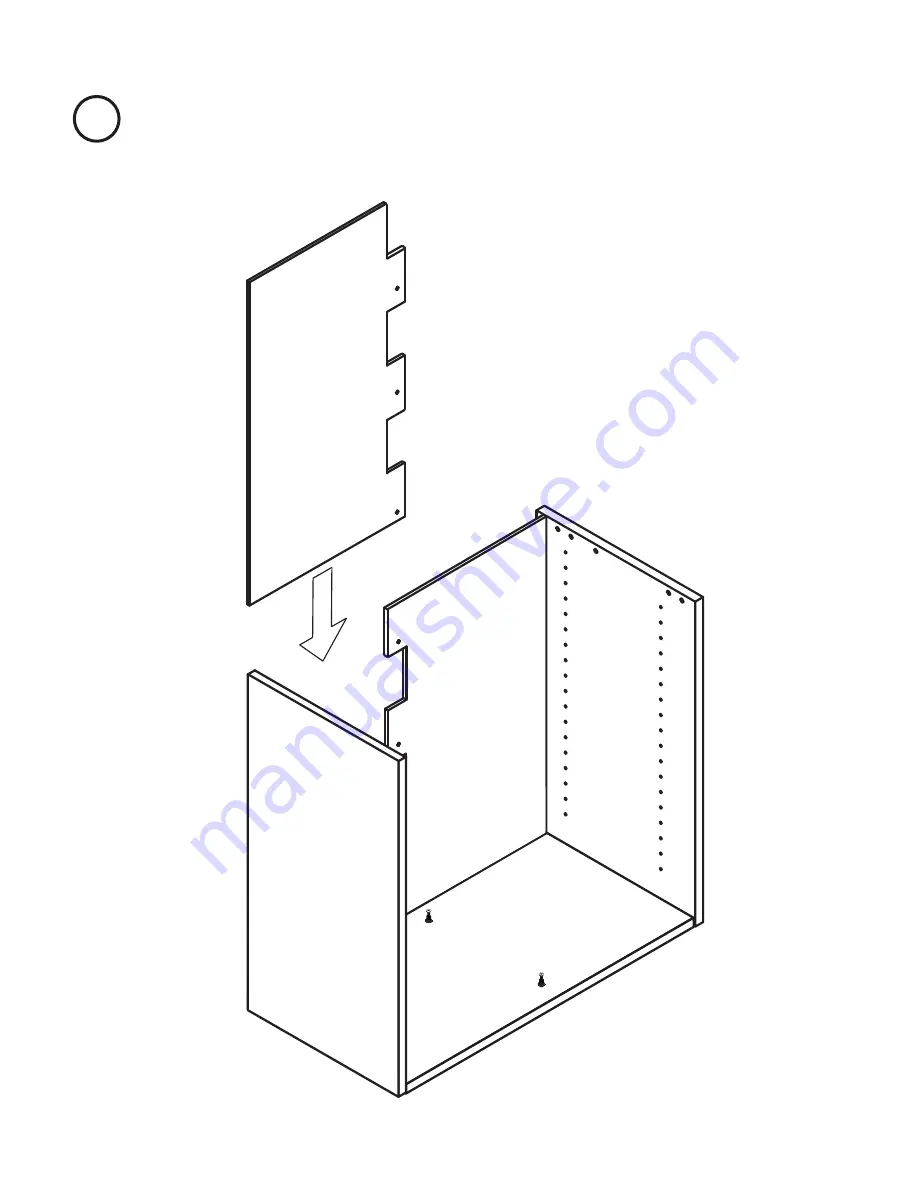
4
Turn your Cubby upright and insert one back panel at a time into the channels.
Back Panel
Side 1
Page 1: ...wayfromhomeorganization Justafewsimplestepsandyou ll be ready to move in Should you need any assistance our customer service team is the friendliest bunch and would be delighted to help you Remember to document your assembly experience with photos or video and let us know how it goes Take a before and after shot of your space to share with us We never get tired of seeing a good transformation U082...
Page 2: ...y to build alone A Friend not included Connecting Plate x1 x16 5 8 self tapping screws Hardware you ll need Tools you ll need x12 x8 x12 x4 Phillips Screw Driver Posts Cams Connecting Bolts x2 Anchors Dowels x6 25mm Euro Screws Electric Drill with Phillips screw driver extension not included ...
Page 3: ...c sleeve is touching wood 2 Insert Cam with arrow facing post 3 4 3 Insert Cam onto post 4 Gently turn Cam 220 degrees clockwise to lock into position The Create Room Cubby utilizes a cam and post locking system Please review these general instructions before you begin ...
Page 4: ...Side 1 Base x12 x2 Posts Connecting Bolts x8 Dowels 1 Start by assembling your hardware in the Side 1 Side 2 and Base panels Locate your posts and dowels and insert them into place by hand as indicat ed below ...
Page 5: ...ime by lining up the posts and dowels with the corresponding holes and tapping firmly into place Side 2 Base Side 1 Once connected use your screw driver to gently turn cam 220 degrees clockwise to lock into position Check that you are installing the sides panels correctly by ensuring that there is a smaller gap between the peg holes and the bottom edge than the peg holes and the top edge ...
Page 6: ...Side 2 Base 4 Turn your Cubby upright and insert one back panel at a time into the channels Back Panel Side 1 Back Panel ...
Page 7: ...ght panel by lining up the posts and dowels with the corre sponding holes and tapping firmly into place 5 Locate your Lid With bottom side up push posts and cams into place as indicated below Once connected use your screw driver to gently turn cams on Lid 220 degrees clockwise to lock into position ...
Page 8: ...r RAW EDGE FINISHED EDGE 6 Slide the divider into the Cubby beside the connector bolts then gently push it into place Use your screwdriver to tighten and lock the connector bolts in place by turning clockwise ...
Page 9: ...Back Panel 25mm x6 7 Use 25mm euro screws to fasten back panels 8 Anchor Cubby to the wall x2 Anchors self tapping screws ...
Page 10: ...Drywall Anchor Instructions 1 Drill a pilot hole through the drywall 2 Screw a drywall anchor into the pilot hole ...
Page 11: ...Open barrel lock and thread metal wire through connector hardware Fasten barrel lock to secure ...
Page 12: ...9 Insert tracks and shelves See next page for our recommended DiviDrawer layout It can also be used as an organizational planogram ...
Page 13: ......
Page 14: ...Self tapping x8 10 Optional If you have multiple Cubbies and want to stack them on top of each other use the connecting plate to fasten them together ...
Page 15: ...r distribute yipee YOU VE DONE IT Now comes the fun part moving in For ideas and inspiration join thousands of creators in the Create Room Family Facebook Group CreateRoomFamily Be sure to share a picture of your new setup We can t wait to see how it turns out ...