background image

Use a strainer on suction line to prevent the entrance of
oversize solids. This strainer should be submerged deep
enough to prevent air from being drawn into the suction line,
thus reducing the pump’s capacity and pressure.

CAUTION!

THIS PUMP SHOULD NOT BE OPERATED WITHOUT

A STRAINER ON THE END OF THE SUCTION LINE

TO PREVENT STICKS, STONES, RAGS AND OTHER
FOREIGN MATTER FROM BEING DRAWN INTO THE

IMPELLER. THE STRAINER SHOULD BE CLEANED

REGULARLY TO INSURE FULL FLOW.

B-3) Discharge:

Connect discharge hose or pipe to discharge on pump.
If Discharge hose is used, protect it from being driven over.
Do not use quick closing check valves.

SECTION C: OPERATION RECOMMENDATIONS:

1. Fill the pump case with liquid prior to starting the pump.
A self priming pump does require the case to be at least
2/3 full of liquid in order to self prime. Operate at sufficient
speed to prime pump. Generally speaking, the pump will
prime faster if it is operated at a fast speed.

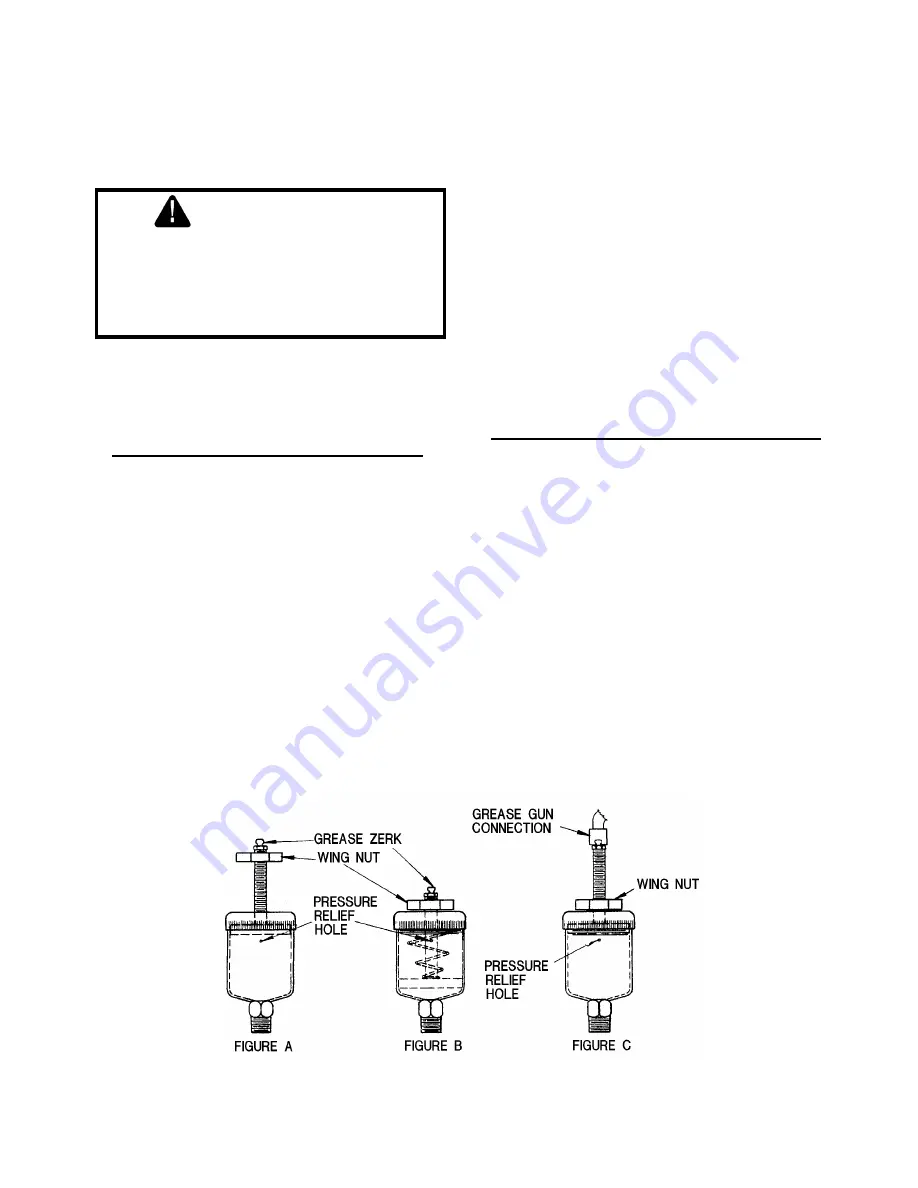
2. Place the self-feeding grease lubricator in operation by
turning the wing nut on the threaded plunger shaft counter
clockwise as far as it will go. 

Do not force the plunger

into the grease cup as this can cause a seal failure

.

See Maintenance Recommedations, Paragraphs 1 and 2
for instructions on filling the grease cup.

3. In cold weather operation, the pump will not freeze as
long as it is running. However, it may freeze if it is not
drained while standing idle. To drain the pump, remove
the drain plug at the bottom of the pump case and rotate
the impeller at least once to assure removal of all the
water.

4. The discharge of a self priming centrifugal pump may be
closed briefly without damaging the pump. However, the
water will soon heat up and this can damage the pump
seal.

5. It is not desirable to run the pump without liquid in the
pump case. If the pump must be run in order to check the
operation of the engine or motor, fill the case with
sufficient water to keep the rotating seal wet. This will
eliminate damage to the seal and other pump parts.

6. If the pump has been idle for some time, the impeller
may appear to be stuck or locked in place. This is usually
caused by a film of rust or dirt between the impeller and
volute. A little extra force on the crank may break it loose.
If not, the pump must be dismantled.

SECTION D: MAINTENANCE RECOMMENDATIONS:

D-1) Seal Lubrication:

A self-feeding lubricator is provided to supply grease to the
shaft seal of the pump. The grease cup is empty when the
wing nut, positioned at the outer end of the threaded plunger
shaft, recedes to the cap of the grease cup. To refill the
grease cup, rotate the wing nut clockwise as far as it will go,
attach a zerk gun to the zerk fitting, then fill until grease oozes
from the relief hole on the side of the cup. For operation,
return the wing nut to the end of the plunger. 

Never force

the plunger into the grease cup as this can cause seal
failures.

 (See Fig. 1)

A #1 grease is normally recommended. However, where
high ambient temperatures are encountered, such as in
direct sunlight, a #2 grease can be used. Use a water
resistant, nonfiberous grease. Lithium base greases are
excellent and molydisulphide is acceptable. Normally, the
sodium soap base greases are the only non-water resistant
types that are not acceptable for mechanical seal lubrication.

FIGURE 1

6

Summary of Contents for burks pumps WB12

Page 1: ...ua Ohio 45356 0603 Phone 937 778 8947 Fax 937 773 7157 www burkspumps com IMPORTANT Read all instructions in this manual before operating pump As a result of Burks Pumps constant product improvement program product changes may occur As such Burks Pumps reserves the right to change product without prior written notification PUMPS SYSTEMS A Crane Co Company DISCONTINUED Parts may NOT be available Ma...

Page 2: ...IONS 6 D MAINTENANCE RECOMMENDATIONS 6 8 TROUBLE SHOOTING 9 E REPLACEMENT PARTS 10 RETURNED GOODS POLICY 12 Other brand and product names are trademarks or registered trademarks of their respective holders Burks Pumps is a registered trademark of Crane Pumps Systems Inc Burks Pumps Inc 1997 2001 2003 Alteration Rights Reserved Printed in U S A 2 ...

Page 3: ...tion and discharge openings DO NOT insert fingers in pump with power connected Always wear eye protection when working on pumps Make sure lifting handles are securely fastened each time before lifting DO NOT operate pump without safety devices in place Always replace safety devices that have been removed during service or repair Secure the pump in its operating position so it can not tip over fall...

Page 4: ...t to laboratory tests corrected for field performance Any additional guarantees in the nature of performance specifications must be in writing and such writing must be signed by our authorized representative Due to inaccuracies in field testing if a conflict arises between the results of field testing conducted by or for user and laboratory tests corrected for field performance the latter shall co...

Page 5: ...e closer the pump can be located to the source of supply the faster the pump will prime and a greater capacity can be pumped All pump units rotate clockwise when looking from the motor end driven end of the pump Also rotation arrows are located on the pump On three phase units with threaded suction discharge connections the impellers are threaded on the shaft and it is necessary to slide one half ...

Page 6: ...of all the water 4 The discharge of a self priming centrifugal pump may be closed briefly without damaging the pump However the water will soon heat up and this can damage the pump seal 5 It is not desirable to run the pump without liquid in the pump case If the pump must be run in order to check the operation of the engine or motor fill the case with sufficient water to keep the rotating seal wet...

Page 7: ...sembly 1 and 2 or 1A and 2A see Figure 2 in pump side adapter 12 using SAE 10 oil on the rubber parts They may install easier by first inserting the rubber part and then sliding the seat part into the rubber All of this must be done with the fingers only Now assemble the spring and rotating portion of the seal onto the impeller shaft 19 Lubricate the impeller shaft 19 and the inside of the bellows...

Page 8: ...FIGURE 3 8 ...

Page 9: ...logged foot valve strainer or pump 6 Defective wearplate s 1 Repair or replace suction line 2 Refill reprime pump casing before restarting 3 Lower suction head install foot valve and primer 4 Increase inlet pressure by adding more water to tank or increasing back pressure by turning gate valve on discharge line to partially closed position 5 Unclog clear or replace as necessary 6 Replace Pump over...

Page 10: ...1 Pump serial number and date code 2 Pump model number 3 Pump part number 4 Part description 5 Item part number 6 Quantity required 7 Shipping instructions 8 Billing Instructions IMPORTANT When Ordering Parts ALWAYS Provide The Complete Part Number Serial Number and Model Number INFORMATION SUBJECT TO CHANGE WITHOUT NOTICE 1 2 3 10 ...

Page 11: ... Crane Pumps Systems Inc 1994 2001 NOTES 11 ...

Page 12: ...TACT YOUR LOCAL CRANE PUMPS SYSTEMS INC DISTRIBUTOR Products Returned Must Be Cleaned Sanitized Or Decontaminated As Necessary Prior To Shipment To Insure That Employees Will Not Be Exposed To Health Hazards In Handling Said Material All Applicable Laws And Regulations Shall Apply ...

Reviews: