7
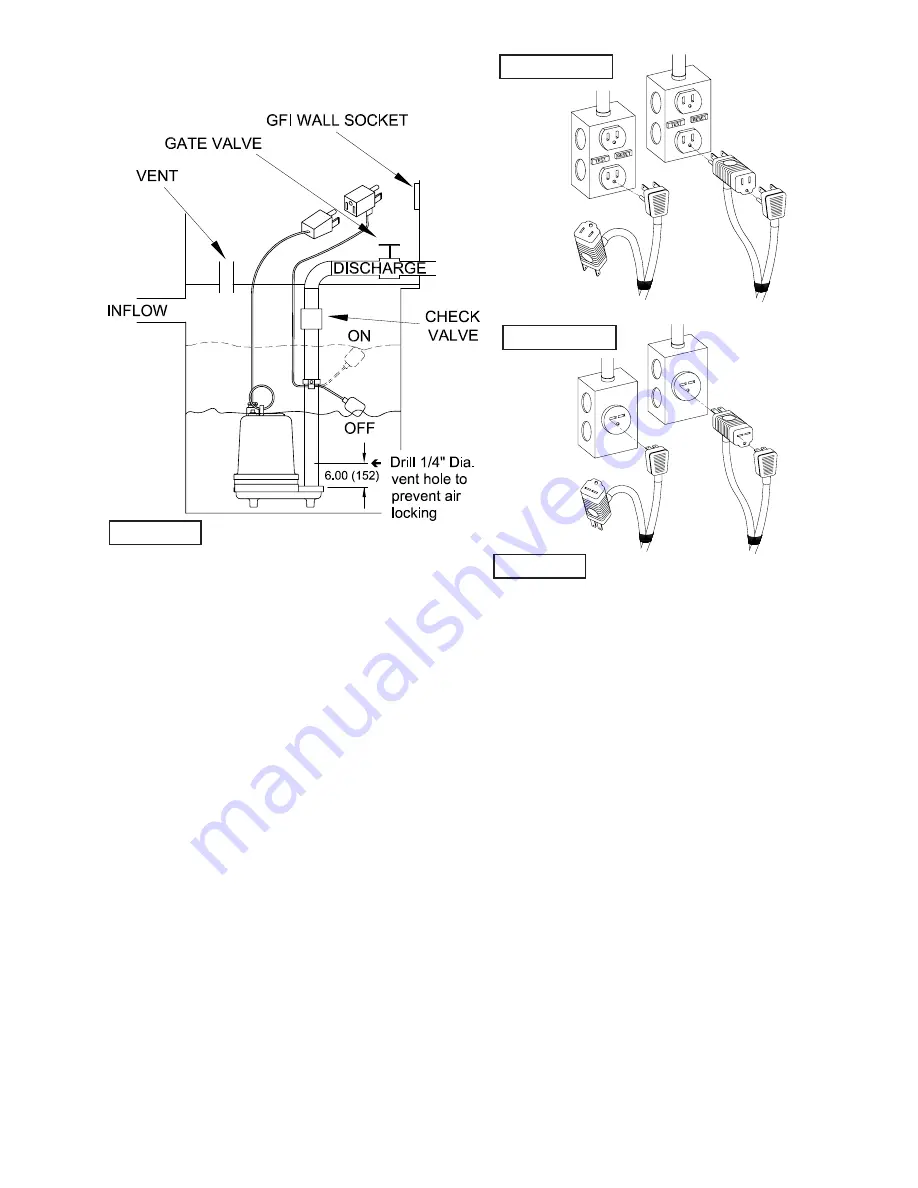
Figure 2 shows a typical installation for 1 phase 120 and 240
volt pump with piggy-back plug for manual and automatic
operation.
General Comments:
1) Never work in the sump with the power on.
2) Level controls are factory set for a pumping differential of 9
inches. If that is the cycle desired, simply circle the discharge
pipe with the pipe mounting strap, feed the end through the
worm drive, and tighten with a screwdriver. Be certain that the
level control cannot hang up or foul in it’s swing. Also, make
certain the top of the pump is still submerged when the level
control is in the ‘off’ mode.
3) If a higher pump differential is needed, grip the cord near
the neck of the float, then using the other hand, exert a
steady force on the lower edge of the cable clamp. The cable
clamp should slide up to the new pivot point. Attach the level
control to the discharge hose in the manner described above.
4) Plug the level control plug into the receptacle, then plug
the pump into the piggyback plug. One cycle of operation
should be observed, so that any potential problems can be
corrected.
5) It is recommended that the float should be set to insure
that the sump well liquid level never drops below the top of
the motor housing.
6.) Figure 3 shows a typical connection for pumps with
the wide angle float and piggy-back plug. For manual and
automatic operations.
Automatic -
Plug float cord into outlet, then plug pump
cord into float cord.
Manual -
Plug pump cord directly int outlet.
C-4) Electrical Connections:
An acceptable motor control switch shall be provided at the
time of installation.
C-4.1) Power and Control Cords:
The cord assembly mounted to the pump must not be modified
in any way except for shortening to a specific application.
Any splice between the pump and the control panel must be
made in accordance with all applicord electric codes. It is
recommended that a junction box, if used, be mounted outside
the sump or be of at least Nema 4 (EEMAC-4) construction
if located within the wet well.
DO NOT USE THE POWER
OR CONTROL CORD TO LIFT PUMP.
NOTE:
THE WHITE
WIRE IS NOT A NEUTRAL OR GROUND LEAD, BUT A
POWER CARRYING CONDUCTOR.
C-4.2) Overload Protection:
C-4.2-1) Three Phase (Optional) -
The normally closed (N/C)
thermal sensor is embedded in the motor windings and will
detect excessive heat in the event an overload condition
occurs. The thermal sensor will trip when the windings become
too hot and will automatically reset itself when the pump motor
cools to a safe temperature. It is recommended that the thermal
sensor be connected in series to an alarm device to alert the
operator of an overload condition, and/or the motor starter coil
to stop the pump. In the event of an overload, the source of this
condition should be determined and rectified immediately.
DO
NOT LET THE PUMP CYCLE OR RUN IF AN OVERLOAD
CONDITION OCCURS !
120 Volt 1 Phase
Manual
Automatic
240 Volt 1 Phase
Manual
Automatic
FIGURE 3
TYPICAL INSTALLATION WITH WIDE ANGLE
LEVEL CONTROL
FIGURE 2
Summary of Contents for BARNES STEP-DS Series
Page 15: ...15 FIGURE 16 CONTIUED ...
Page 17: ...17 FIGURE 17 STEP SS Single Seal ...
Page 18: ...18 FIGURE 18 STEP SS Single Seal ...
Page 19: ...19 FIGURE 19 STEP DS Double Seal ...
Page 20: ...20 FIGURE 20 STEP DS Double Seal ...
Page 23: ...23 Notes ...
Page 24: ...24 Notes ...


