background image

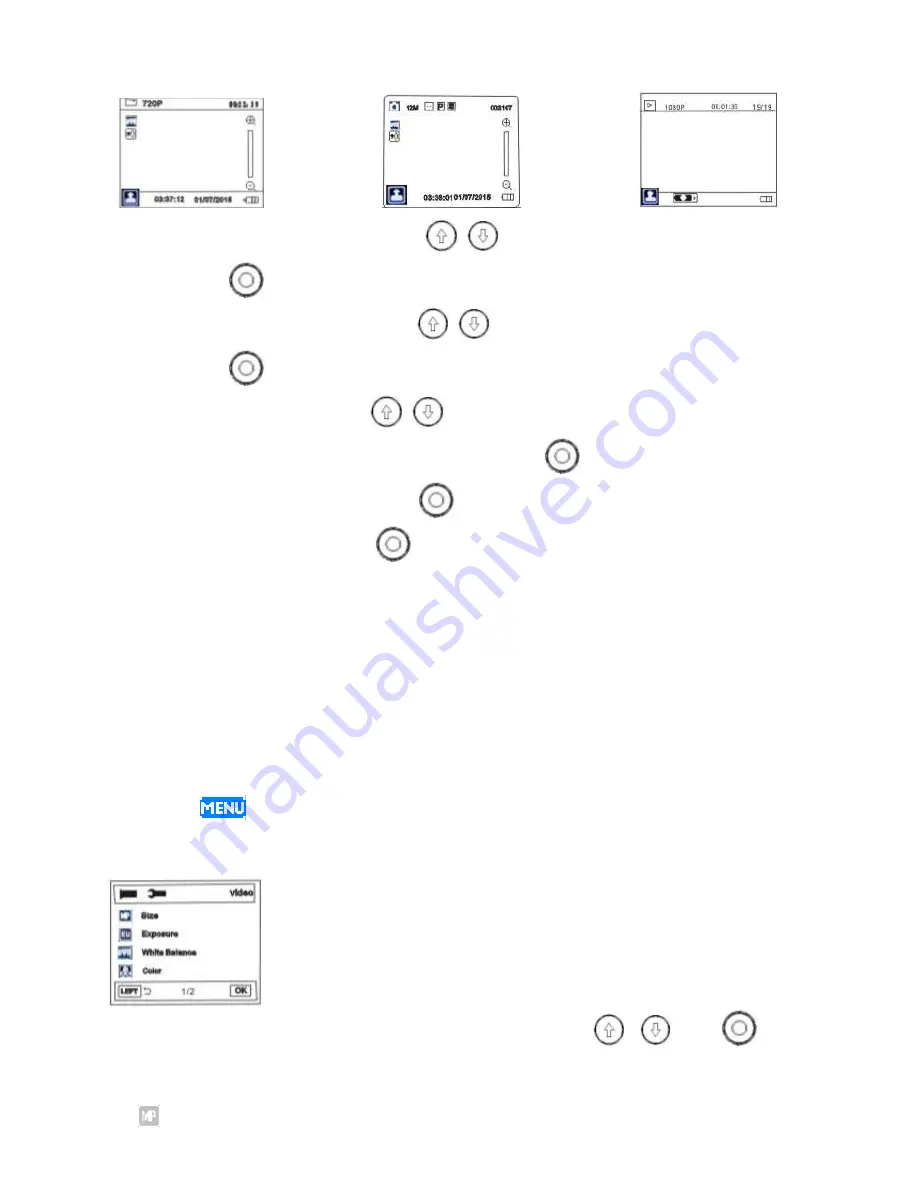
Video Recording mode  

          Picture Capture Mode    

            Playback Mode 


In Video recording mode, press the 


  (Up or Down) Button to zoom in or out. 

Press the 

  Button to start recording. Press again to stop. 


In Picture capture mode, press the 


  (Up or Down) Button to zoom in or out. 

Press the 

  Button to capture. 


In Playback mode, press the 


  (Up or Down) Button to select the taken 

picture/video file forward or backward. Press the 

  Button to start playback. 

During video playback, press the 

  Button to pause. Press again to resume. 

3.


To power off, press and hold the 

  Button approximate 3 seconds until “Bye=Bye” 

appear on the display then release the button. The display and Blud Indicator will not light. 


Setting Menu: 

Video: 

1.


Power on the unit and enter to Video recording mode as previous procedures. 

2.


Touch the “

” Button on the screen, the setting menu will appear on the screen as 

follows: 


3.


Touch the correspondence button on the display or press the 

  and 

buttons 

on the unit to set or reset the settings as the on screen instructions as below: 


  Size: 

Summary of Contents for CCR9029

Page 1: ... WITH CAMERA HD 1080P Action Camera Video Recorder DIGITAL CAMCORDER WITH CAMERA HD 1080P Action Camera Video Recorder Model CCR9029 PLEASE READ BEFORE OPERATING THIS EQUIPMENT Owner s Manual Size 148 5 W x 210 H mm A5 ...

Page 2: ...nd to comply with the limits for a class B digital device pursuant to Part 15 of the FCC Rules These limits are designed to provide reasonable protection against harmful interference in a residential installation This equipment generates uses and can radiate radio frequency energy and if not installed and used in accordance with the instructions may cause harmful interference to radio communicatio...

Page 3: ...lectrostatic discharge the user may have to reset the unit Do not leave the camcorder in places subject to extremely high temperatures such as a sealed vehicle or in direct sunlight Do not touch or press the display or lens Copyright Information All rights reserved No part of this publication may be reproduced transmitted stored in a retrieval system or translated into any language in any form by ...

Page 4: ...he unit To power off press and hold the button approximate 3 seconds until Bye Bye appear on the display then release the button In video taking mode press to start recording Press again to stop In photo capture mode press to capture the photo In menu press to confirm the settings Mode Button Press repeatedly to change the capture modes After pressed the menu will appear on the display Touch the c...

Page 5: ...to zoom in or out In setting menu press to move the cursor on it up or down In playback mode press to skip file forward or backward Preparation 1 Battery installation Take out the unit from the water proof case Unlock by slide the switch to the direction as the arrow marking on it as the figure below Lift up the lock then take out the unit as the figures below ...

Page 6: ...on the display as below Connect the small plug from the supplied USB connection cable to the Mini USB Port on the unit Connect the other end to the USB Port on the Personal Computer or USB Charger having DC 5V 1A output During charging the Red Indicator on the front of unit will illuminate When finished it will not light Notes Your battery will last longer if you following these simple guidelines ...

Page 7: ... out the card press the card until Click sound is heard then slide it out Notes Before insert or replacing the Micro SD Card make sure the unit has been powered off When inserting the Micro SD Card make sure the direction you selected is correct Never insert violently to avoid damaging the card or the unit If it doesn t work please check if the direction is correct When the card is used for the fi...

Page 8: ...ocked 5 Mountings Mounting the camera on the top of the helmet with the supplied assembly s kit as the figures below Select the Mount with the nut to mounted on the skateboard or surfboard which equipped assemble screw Then assemble stuck the unit on it as follows figures Select the Mount without the nut to mounted on the helmet Then assemble stuck the unit on it as follows figures Fig 1 Fig 2 Fig...

Page 9: ...ocedures before assemble Fig 1 Fig 2 Fig 3 Fig 4 OPERATION General 1 Press the Button on the top of unit to power on The display and the Blue Indicator on front of unit will illuminate 2 Press the Mode Button on the front of the unit repeatedly to select the desire mode as desire as below Or touch the display The selection window will pop up Touch the desired button to enter ...

Page 10: ...n to start playback During video playback press the Button to pause Press again to resume 3 To power off press and hold the Button approximate 3 seconds until Bye Bye appear on the display then release the button The display and Blud Indicator will not light Setting Menu Video 1 Power on the unit and enter to Video recording mode as previous procedures 2 Touch the Button on the screen the setting ...

Page 11: ...set it to auto Daylight Cloudy or Fluorescent as the back ground of video taking Color To set or reset the preset color effect as desire Loop recording Set it to 1 3 5 Minutes or turn it Off as desired If set to 1 3 5 Minutes When press the Button the unit will auto record the video and record in 1 3 5 minute as the set circularly If the memory is full the new video file will auto cover the oldest...

Page 12: ...on the screen as follows 3 Touch the correspondence button on the display or press the and buttons on the unit to set or reset the settings as the on screen instructions as below Capture Mode To turn off Single the timer or set reset it to 2S 5S or 10S Resolution To set or reset the resolution of the picture to 12M 4000 X 3000 pixels 10M 3648 X 2736 pixels 9M 3456 X 2592 pixels 8M 3264 X 2448 pixe...

Page 13: ...ack ground of picture taking Color To set or reset the preset color effect as desire ISO To turn to auto or set reset it to 100 200 or 400 as the brightness of background Set it to 400 in very bright background and set it to 100 if indoor Scene Mode To turn to auto or set reset it to Scenery Portrait Night Scenery Night Portrait High Sensitivity or Beach to match the place brightness you take pict...

Page 14: ...etting menu will appear on the screen as follows 4 Touch the correspondence button on the display or press the and buttons on the unit to set or reset the settings as on screen instructions as below Delete Enter to delete the video file s as the on screen instructions Protect To lock the desired file s to avoid it is erased accidentally Playback Picture files 1 Power on the unit and enter to playb...

Page 15: ...ce button on the display or press the and buttons on the unit to set or reset the settings as on screen instructions as below Delete Enter to delete the picture video file s as the on screen instructions Rotate Turn the direction of picture to read Protect To lock the desired file s to avoid it is erased accidentally Playback General settings 1 Power on the unit and enter to playback mode as previ...

Page 16: ... the Button on the screen the setting menu will appear on the screen as follows 5 Touch the correspondence button on the display or press the and buttons on the unit to set or reset the settings as on screen instructions as below Date Set to On or Off as desire If set to on the time information will appear in the bottom of the screen Set to Set Date the setting interface will appear on screen as f...

Page 17: ...TANT If formatted the card all files in it will be erased Upload the desired files to PC before start format Default Setting Reset all settings to factory preset Version To read the version number of firmware Upload the taken picture video files to Personal Computer 1 Connect the small plug from the supplier USB Connection Cable to Mini USB Port on the unit 2 Connect the other plug to the USB Port...

Page 18: ...e driver to hook up the unit Then operation the unit as the on screen instructions on the Computer If your computer have not installed correct divers pre install the supplied webcam driver to your computer before connected the unit as Insert the supplied disc to the CD DVD Driver in your computer Wait a few seconds the small window of the disc will appear on the computer s screen Double click Open...

Page 19: ...o USB Port on the unit 3 Connect the full size HDMI plug to the HDMI Port on your TV 4 Plays the photo or video in your unit as usual 5 Touch the correspondence buttons on the screen to pause play or skip Specifications and System Requirements Product specifications Sensor 1 3 Mega pixel CMOS Capture mode Video 1920 x 1080 pixels 25 fps 1280 x 720 pixels 30fps VGA 640 x 480 pixels 30fps QVGA 320 x...

Page 20: ...ough Mini USB Port I O Port Mini USB 2 0 Micro HDMI Micro SD Card Slot Screen 2 0 inch touch screen 176 x 220 pixels Audio Built in Microphone Speaker Computer system Requirements Operation System Microsoft Windows XP Vista 7 8 CPU Above Intel PIII667 or CPU of equal performance Memory Above 128 MB Sound card and display Support Direct X8 or above CD ROM 4X speed or above Hard Disk 500 MB space ab...

Page 21: ...ms 1 x Bicycle Handlebar Mount 1 x Helmet Flat Mount 1 x Helmet Curved Mount 1 x Waterproof Case 1 x PC Camera Software CD Suitable for Windows 8 Windows 7 Windows Vista Windows XP SPECIFICATIONS ARE SUBJECT TO CHANGE WITHOUT NOTICE ...

Page 22: ... by anyone other than an authorized Craig service center d Damaged because it is improperly connected to any other equipment Note This warranty does not cover a Ordinary adjustments as outlined in the Owner s Manual which can be performed by the customer b Damage to equipment not properly connected to the product c Any cost incurred in shipping the product for repair d Damage to the product not us...

Reviews: