


26
CraftBot 3
APPENDIX
GET IN TOUCH!
CraftUnique Ltd.
Address
Bem str. 28, Budapest 1047, Hungary
Phone
+36 1 700 8060
CraftBot is made in the EU.
USA Sales Office: CraftUnique LLC
Address
1414 S Sangre Road Stillwater, OK 74075, United States
Phone
+1 817 733 5187
PRINTING
Printing technology:
Fused Filament Fabrication (FFF)
Build height:
25 cm
Total printing area:
37,4 x 25 cm
Printing area
- dual printer head:
27 x 25 cm
Printing area
- single printer head:
32,2 x 25 cm
Multi-part printing:
18,7 x 25 cm
Layer resolution:
50 micron (with 0.25 mm nozzle)
Position precision:
X,Y: 4 micron; Z: 2 micron
Filament types:
PVA, PLA, ABS, HIPS, PET, Nylon, etc.
Filament diameter:
1.75 mm
Nozzle diameter:
0.25-0.8 mm
Print speed:
50-200 mm/s
Wireless connection:
802.11b/g/n
Power consumption:
cca. 350W
PHYSICAL DIMENSIONS
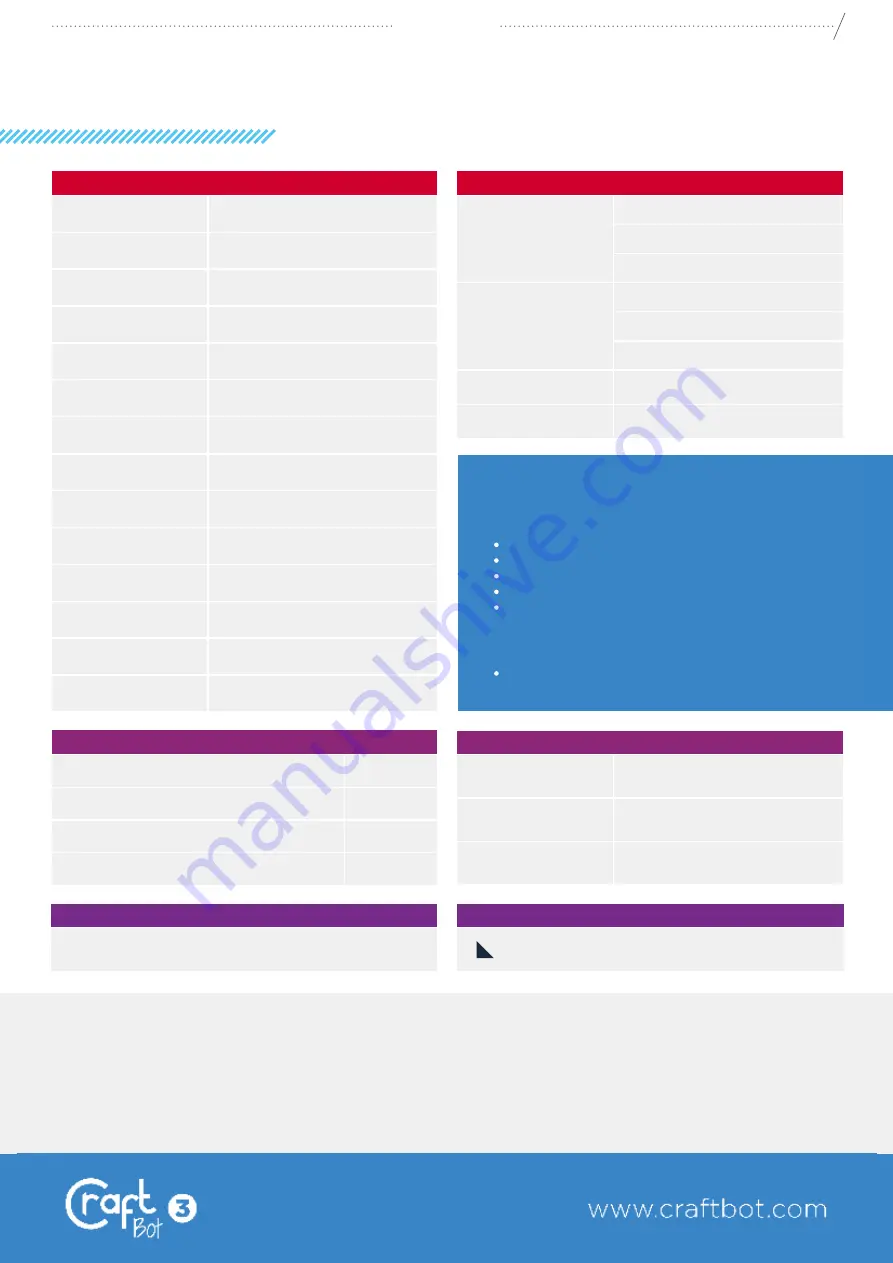
USEFUL ACCESSORIES AVAILABLE IN OUR WEBSHOP:
PLEXIGLASS DOOR + PETG DOME COVER
prevent kids from reaching inside
keeps the heat and fumes inside
can be locked
shock-resistant plastic dome
dome comes equipped with an activated carbon
and HEPA filter
PERFORATED BUILD PLATFORM
ensures better adhesion
Frame dimensions:
x: 55,4 cm
y: 43,1 cm
z: 48,8 cm
Shipping box:
x: 69 cm
y: 56 cm
z: 67 cm
Weight:
24 kg
Shipping weight:
29 kg
SOFTWARE
Software package:
CraftWare
File types:
OBJ/STL/CWPRJ
Supports:
Windows 7 and above,
OS X and Linux
TEMPERATURE
Ambient temperature:
15-32 °C
Storage temperature:
0-32 °C
Operating nozzle temperature:
180-300 °C
Operating heated build plate temperature:
50-110°C
PRODUCT NAME
COLOR
CRAFTBOT3
Gray
SPECIFICATION
C
M
Y
CM
MY
CY
CMY
K
GET IN TOUCH!
CraftUnique Ltd.
Address
Bem str. 28, Budapest 1047, Hungary
Phone
+36 1 700 8060
CraftBot is made in the EU.
USA Sales Office: CraftUnique LLC
Address
1414 S Sangre Road Stillwater, OK 74075, United States
Phone
+1 817 733 5187
PRINTING
Printing technology:
Build height:
Total printing area:
Printing area
- dual printer head:
Printing area
- single printer head:
Multi-part printing:
Layer resolution:
Position precision:
Filament types:
Filament diameter:
Nozzle diameter:
Print speed:
Fused Filament Fabrication (FFF)
25 cm
37,4 x 25 x 25 cm
27 x 25 x 25 cm
32,2 x 25 x 25 cm
18,7 x 25 x 25 cm
50 micron (with 0.25 mm nozzle)
X,Y: 4 micron; Z: 2 micron
PVA, PLA, ABS, HIPS, PET, Nylon, etc.
1.75 mm
0.25-0.8 mm
50-200 mm/s
Wireless connection:
802.11b/g/n
Power consumption:
cca. 350W
PHYSICAL DIMENSIONS
USEFUL ACCESSORIES AVAILABLE IN OUR WEBSHOP:
PLEXIGLASS DOOR + PETG DOME COVER
prevent kids from reaching inside
keeps the heat and fumes inside
can be locked
shock-resistant plastic dome
dome comes equipped with an activated carbon
and HEPA filter
PERFORATED BUILD PLATFORM
ensures better adhesion
Frame dimensions:
Shipping box:
Weight:
Shipping weight:
x: 57 cm
y: 44 cm
z: 48,8 cm
x: 69 cm
y: 56 cm
z: 67 cm
24 kg
29 kg
SOFTWARE
Software package:
CraftWare
File types:
OBJ/STL/CWPRJ
Supports:
Windows 7 and above,
OS X and Linux
TEMPERATURE
Ambient temperature:
15-32 °C
Storage temperature:
0-32 °C
Operating nozzle temperature:
180-300 °C
Operating heated build plate temperature:
50-110°C
PRODUCT NAME
COLOR
CRAFTBOT3
Gray
SPECIFICATION
Summary of Contents for CraftBot 3 Supervisor
Page 1: ......


