background image

19

CraftBot 3

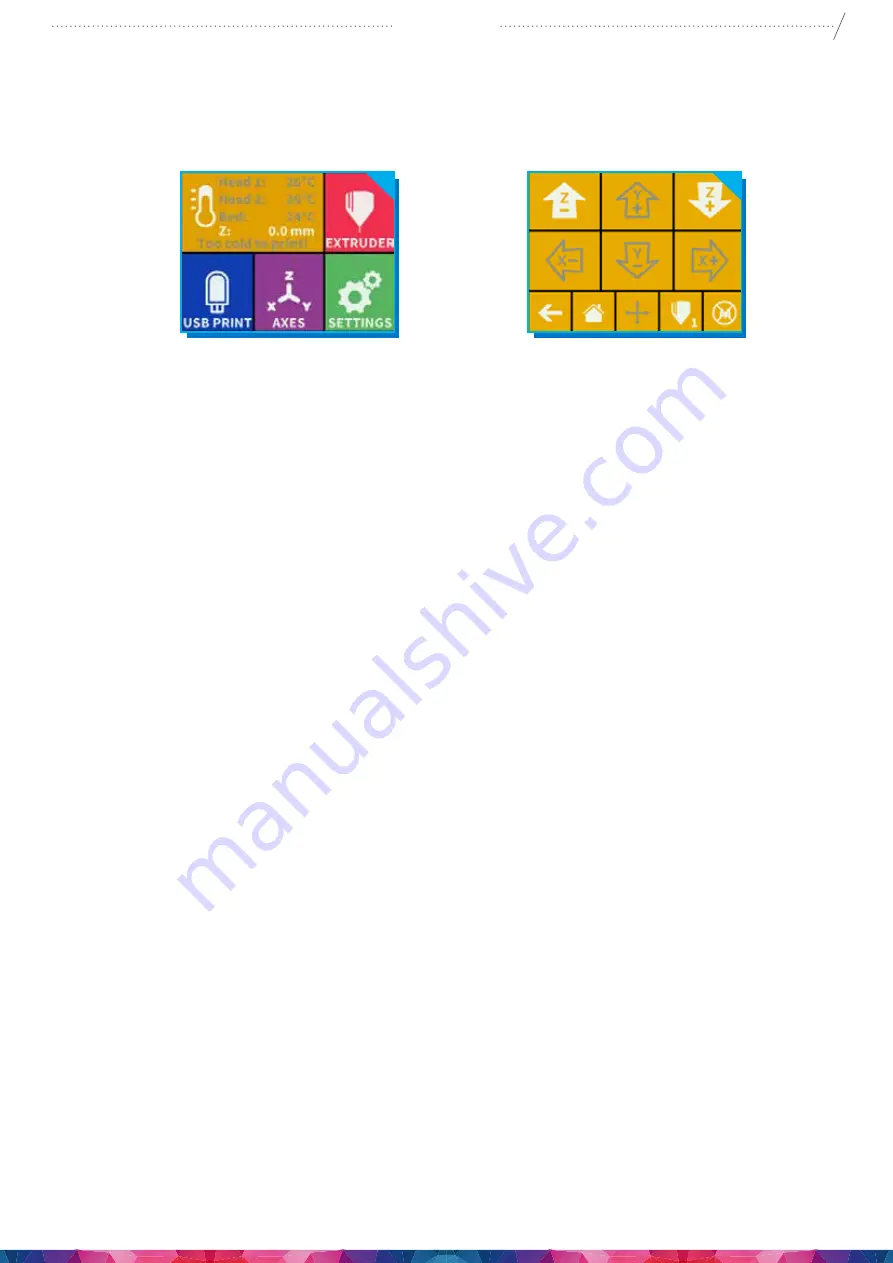
Select the AXES on the menu. 

The first “grey” button will, of course, return you to the main menu.

1.  The small house icon indicates the „home” position of the extruders which is this location the front 

corners of the build plate. You can reset the extruders and the build plate to the “home” or “zero” 
position. You can either set each axis one at a time (X, Y or Z), or do all three of them at once by 
touching the appropriate button. If the individual house icons are white, then this means that the 
motors of each highlighted icon are engaged. To disengage the motors, click on the icon in the far right 
bottom corner (M with an X through it), and you will see all of the house icons turn grey. The motors 
have now been disengaged and you can freely move the extruders by hand if you wish to do so. 

2.  The directional button to the right of the “home” button can be used to move along the X, Y or 

Z axis using the motors. After clicking on this button you will be redirected to another display 
in which you will see six diffrent arrow buttons. Note that this option can only be used if all of 
the motors are already activated and the house icons are all white. If the house icons are grey, 
then nothing will happen. In this case, after clicking on the direction button, you will see all of 
the arrows in the color grey. To activate the motors, return to the “home” icon and home in; 
the house icons will now turn white and you can go on to the direction display and move the 
extruders and bed as you see fit.

If the individual house icons are white, then this means that the motors of each highlighted icon are 
engaged. To disengage the motors, click on the icon in the far right bottom corner (M with an X through 
it), and you will see all of the house icons turn black. The motors have now been disengaged and you 
can freely move the extruder by hand if you wish to do so.
The directional button to the right of the “home” button can be used to move along the X, Y or Z axis 
using the motors.  After clicking on this button you will be redirected to another display in which you will 
see six different arrow buttons.  

Note that this option can only be used if all of the motors are already activated and the house icons 
are all white. If the house icons are grey, then nothing will happen. In this case, after clicking on the 
direction button, you will see all of the arrows in the color grey. To activate the motors, return to the 
“home” icon and home in; the house icons will now turn white and you can go on to the direction display 
and move the extruder and bed as you see fit.

Summary of Contents for CraftBot 3 Supervisor

Page 1: ......

Page 2: ...eveling the build plate 10 7 Heating up the printer 11 8 Loading the filament 12 9 Removing the filament from the extruder 13 10 FMS operation 13 11 Dual head calibration X Y 14 12 Dual head calibration Z 15 13 Printing objects from a pendrive 15 14 Configuration of colored led strip 16 15 Printing modes 16 16 In print adjustments 17 17 Mobile application 18 18 Navigating the build plate and the e...

Page 3: ...k The CraftBot 3D printer makes solid three dimensional objects out of melted plastic filament Design Your objects with the help of a 3D design program Then use the CraftWare program downloadable from www craftunique com craftware to transform Your 3D design files into printing instructions for the CraftBot 3D printer Transfer this to Your CraftBot 3D printer via USB drive or USB cable The CraftBo...

Page 4: ...mains cord hang over the edge of the table or worktop on which the appliance stands Keep the appliance and its cord out of the reach of children This appliance can be used by children aged from 8 years and above and by persons with reduced physical sensory or mental capabilities or lack of experience and knowledge only under supervision and adequate instruction concerning the use of the appliance ...

Page 5: ... should also get 2 spools of PLA filament along with the box containing your CraftBot 1 6 2 4 7 3 5 8 CAUTION Make sure to level the build plate properly before use Make sure not to force anything whether it be during unpacking setup operation or service Service and oil the suggested parts as often as recommended Use only substances recommended by CraftUnique The CraftBot 3D printer melts plastic ...

Page 6: ...ay 2 Filament guide tube 3 Separated dual heads 4 Removable build plate 5 Leveling knobs 6 Filament spool holder 7 Filament spool 8 FMS encoder 9 Separated dual heads 10 USB for flash drive 11 USB for PC connection 12 AC power socket and ON OFF switch 13 Encoder 1 connection 14 Encoder 2 connection 1 4 12 ...

Page 7: ... the CraftBot Make sure not to touch the extruder or the electronic panel inside the device 8 Consider its weight Request physical help if needed Lift the printer from inside the plastic cover and remove out of the cardboard packaging 9 Place the CraftBot 3D printer on a stable and even surface with sufficient space around 10 Remove the cardboard panel fixing the two heads inside the printer ASSEM...

Page 8: ... wrench install the filament spool holder next to the FMS encoder 4 MOUNTING THE FILAMENT SPOOLS Fit both of the filament spools onto the filament spool holder so that the lead end keeps its course when the filament is fed into the guide tube holder 5 ATTACHING THE POWER CORD Ensure that the power switch on the CraftBot is set to the OFF position Find and then insert the AC power cord into the pow...

Page 9: ...gate to the right with the arrow Press the C F button By touching the button the scale will change from Fahrenheit to Celsius and vice versa Use the left arrow to get back to the main menu 4 SETTING THE CLOCK You can set the time and reset the operating hour counter This function helps to track printing time between maintenance sessions Select Settings on the LCD menu Navigate to the right with th...

Page 10: ...ing the build plate all the way to the right until the springs in between have been compressed fully and the knobs begin to feel tight There is one knob at the front in the middle and two in the back left and right corners of the build plate Do not force them Locate the 0 3mm spacer card in the top foam among the other accessories This card will ensure the optimal distance between the build plate ...

Page 11: ...Bed temp You can select the extruder icon and the bed icon line with 3 wavy lines above to commence heating Once the extruder reaches the target temperature of your filament keeping in mind that different materials such PLA ABS and PET have different temperature characteristics you can start printing If the extruder heads is not hot enough yet a warning message pops up Select the thermometer icon ...

Page 12: ...l feeds toward the FMS encoder from the bottom up so that the filament keeps its course This way you avoid any unnecessary bending of the filament To have a clean edge cut the end of the filament with scissors if needed 4 Enter into the extruder menu Push the filament into the extruder hole against the drive gear and press the extrude or load filament button on the screen The load button will extr...

Page 13: ...ION The filament monitoring system observes the filament flow during printing If the printer detects a jam during printing it will try to resolve it on its own If it is unable to resolve the jam then an error message will appear on the display the message will appear in the application and the printer will also send an email message Please note the wifi should be set up correctly first Calibration...

Page 14: ...rint will be misaligned for example if there is a gap between two materials or if the two materials are printed onto each other Calibration can be performed on the X and Y axes individually or on both axes at once Calibration process 1 The XY calibration menu option must be selected in the Settings menu 2 offset coordinate systems 2 Head temperature must be entered what material is threaded into t...

Page 15: ... heat up the extruder and the build plate to the desired heat 7 Printing will start if the required operational temperature is reached until then you will see the in print screen with the status message Heating 8 During printing the status of the print is displayed on the LCD screen indicating progress based upon a percentage of the job completed For functions available during printing see chapter...

Page 16: ...DES 1 Default mode Gcode will determine whether the printer operates with one or two printheads If an object was sliced for a single head printer but contains a support struction the CtaftBot 3 is able to print the object with normal filament while printing the support with PVA filament The advantage to this is that you don t have to re slice the existing gcodes if you also wants to print with PVA...

Page 17: ...and bed temperature can be changed Flow modification Print speed and extrusion volume can be modified in percentage ratio to the original Use the reset button to change back the values of the gcode Light settings Lighting within the appliance and the display backlighting can be changed Object fan control set the speed of the object fan By default it is unlocked If locked gcode can t overwrite sett...

Page 18: ... CraftBot 3 you would like to connect to Select the printer to connect and you will be directed to the main screen 2 Uploading a gcode to the USB placed in the CraftBot 3 Select one of the gcodes on the main screen Select the gcode file saved on your mobile device Confirm the file selection upload Once 100 of the files is transferred close 3 Initiating printing via the CraftBot app Select Print on...

Page 19: ...then nothing will happen In this case after clicking on the direction button you will see all of the arrows in the color grey To activate the motors return to the home icon and home in the house icons will now turn white and you can go on to the direction display and move the extruders and bed as you see fit If the individual house icons are white then this means that the motors of each highlighte...

Page 20: ...t CraftBot needs toolpath information generated from 3D object files like obj or stl Toolpath information is simply called gcode CraftWare software converts 3D designs into printing commands for the CraftBot 3D printer CraftWare has been developed by CraftUnique with the aim of easing and perfecting the printing process 20 SOUND SETTINGS By using the arrows in the top right corner you can choose b...

Page 21: ... of them Dual Extruder Mode you can assign an extruder for each object in the project Support Mode lets you select one of the extruders to create the support bars Parallel Mode duplicates the objects and print them simultaneously Mirror Mode duplicates and mirror the objects and print them simultaneously 4 Importing your design objects Click on the Add button located in the top row of icons Select...

Page 22: ...L 6 Spray the threaded Z axis rod at a relatively close distance to reduce overspray Make sure the lubricant reaches the inside of every thread if using grease spread with hand wearing gloves 7 Make sure not to overlubricate spray only the minimum required amount 8 Do not spray the other two rods directly Spray the towels and wipe it onto the rods 9 Remove the rag from the CraftBot interior 10 Plu...

Page 23: ...cteristics of the filaments properties even printing the same material in a different color can cause clogs from inconsistencies For example you must heat up to 250 C to clear out any extra ABS before using PLA Clogging is the most common problem in every 3D printer and cannot be prevented 100 but if you follow these simple steps you will prevent 95 of occurrences If you still cannot clear the pas...

Page 24: ...ome window cleaning liquid onto the plate and the sticky side of the sheet to help you to correctly position the sheet Align the Kapton to the front side of the plate the side where screws stick out on the corner Once the positioning is correct squeeze out the liquid from between the plate and the sheet with a thin but solid object like an unused credit card Place the protective sheet which was re...

Page 25: ...d s legal liability for intentional serious negligence and or default Certain jurisdictions does not allow the exclusion or limitation of accidental or consecutive damage therefore if such jurisdiction regulates the guarantee the restrictions above does not refer to You ...

Page 26: ... 300 C Operating heated build plate temperature 50 110 C PRODUCT NAME COLOR CRAFTBOT3 Gray SPECIFICATION GET IN TOUCH CraftUnique Ltd Address Bem str 28 Budapest 1047 Hungary Phone 36 1 700 8060 Email info craftunique com CraftBot is made in the EU USA Sales Office CraftUnique LLC Address 1414 S Sangre Road Stillwater OK 74075 United States Phone 1 817 733 5187 Email andrew zambrowski craftunique ...

Reviews: