background image

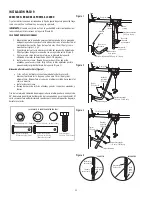
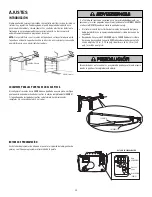
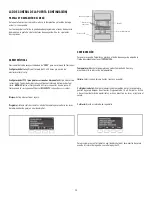
AJUSTES PASO 1

PROGRAMACIÓN DEL RECORRIDO

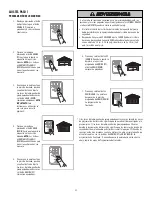
1. Mantenga presionado el botón

de Ajuste hasta que el botón
ARRIBA (UP) empiece a
parpadear y/o se escuche una
señal sonora.

2. Presione y mantenga

presionado el botón ARRIBA
(UP) hasta que la puerta se
encuentre en la posición
deseada.

NOTA:

Los botones

de ARRIBA (UP) y ABAJO
(DOWN) pueden utilizarse para
mover la puerta cuando sea
necesario.

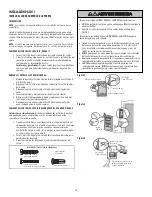
3. Una vez que la puerta esté en

la posición deseada, presione
y suelte el botón de Ajuste.
Las luces del abre-puertas de
garaje parpadearán dos veces
y el botón ABAJO (DOWN)
comenzará a parpadear.

NOTA

IMPORTANTE:

Para

instalaciones de puertas de
una sola pieza consulte
pagina 30
.

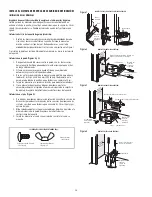
4. Presione y mantenga

presionado el botón ABAJO
(DOWN) hasta que la puerta se
encuentre en la posición
deseada.

NOTA:

Los botones

de ARRIBA (UP) y ABAJO
(DOWN) pueden utilizarse para
mover la puerta cuando sea
necesario.

5. Una vez que la puerta esté en

la posición deseada, presione
y suelte el botón de Ajuste.
Las luces del abre-puertas de
garaje parpadearán dos veces
y el botón ARRIBA (UP)
comenzará a parpadear.

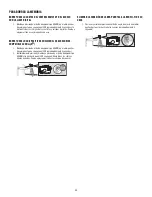
Si el sistema de reversa de seguridad no se ha instalado debidamente, las
personas (y los niños pequeños en particular) podrían sufrir LESIONES GRAVES
o incluso la MUERTE cuando se cierre la puerta del garaje.

l

El ajuste incorrecto de los límites del recorrido de la puerta del garaje
habrá de interferir con la operación adecuada del sistema de reversa de
seguridad.

l

Después de llevar a cabo CUALQUIER ajuste, SE DEBE probar el sistema
de reversa de seguridad. La puerta DEBE retroceder al entrar en contacto
con un objeto de 3.8 cm (1 1/2 de pulg.) de altura (o de 5 x 10 cm [2 x 4
pulg.] acostado en el piso).

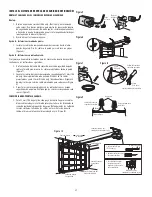
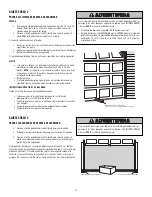
6. Presione y suelte el botón UP

(ARRIBA). Cuando la puerta se
desplace a la posición
programada de ARRIBA (UP),
el botón ABAJO (DOWN)
empezará a parpadear.

7. Presione y suelte el botón

DOWN (ABAJO). La puerta se
desplazará a la posición
programada de ABAJO (DOWN).
La programación ha
finalizado.

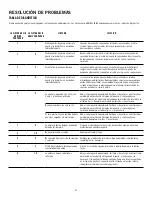
* Si las luces del abre-puertas de garaje parpadean cinco veces durante los pasos

de programación del recorrido, significa que ha pasado el tiempo asignado a la
programación. Si las luces del abre-puertas de garaje parpadean 10 veces
durante la programación del recorrido, significa que los sensores de reversa de
seguridad están mal alineados u obstruidos (consulte la página 29). Cuando los
sensores estén bien alineados y no haya obstrucción, abra y cierre la puerta con
el control remoto o con los botones de ARRIBA (UP) y ABAJO (DOWN). La
programación ha finalizado. Si no puede operar la puerta hacia arriba o hacia
abajo, repita los pasos de Programación del recorrido.

31

Summary of Contents for CMXEOCG781

Page 1: ...THE MANUAL NEAR THE GARAGE DOOR AFTER INSTALLATION PERIODIC CHECKS OF THE OPENER ARE REQUIRED TO ENSURE SAFE OPERATION DO NOT INSTALL ON A ONE PIECE DOOR IF USING DEVICES OR FEATURES PROVIDING UNATTENDED CLOSE UNATTENDED DEVICES AND FEATURES ARE TO BE USED ONLY WITH SECTIONAL DOORS SEE PAGE 3 WRITE DOWN THE CRAFTSMAN SERIAL NUMBER LOCATED ON THE GARAGE DOOR OPENER WWW CRAFTSMAN COM ...

Page 2: ... the Door Bracket 20 21 Connect Door Arm to Trolley 22 23 Attach the Warning Labels 23 Install the LCD Door Control 24 Install the Safety Reversal System 25 27 Electrical Requirements 28 Aligning the Safety Reversing Sensors 29 ADJUSTMENT 30 32 Introduction 30 Program the Travel 31 Test the Safety Reversal System 32 Test the Safety Reversing Sensors 32 BATTERY BACKUP 33 Install the Battery 33 Test...

Page 3: ...is Signal Word on the following pages it will alert you to the possibility of damage to your garage door and or the garage door opener if you do not comply with the cautionary statements that accompany it Read them carefully WARNING This product can expose you to chemicals including lead which are known to the State of California to cause cancer or birth defects or other reproductive harm For more...

Page 4: ...eet 1 2 m to the left or right of the door center See page 14 Sectional Door One Piece Door To prevent possible SERIOUS INJURY or DEATH l ALWAYS call a trained door systems technician if garage door binds sticks or is out of balance An unbalanced garage door may NOT reverse when required l NEVER try to loosen move or adjust garage door door springs cables pulleys brackets or their hardware ALL of ...

Page 5: ...age door opener to minimize interference from walls and other objects Buy a Wi Fi range extender Check Signal Strength If you see Wi Fi signal is strong You re all set Install your new garage door opener Visit support chamberlaingroup com for more details See myQ App Control page 34 to connect your garage door opener to your Wi Fi network Do NOT connect prior to installation Wi Fi is a registered ...

Page 6: ... the bottom of the door must not exceed 1 4 6 mm Otherwise the safety reversal system may not work properly See Adjustment Step 2 Floor or door should be repaired SECTIONAL DOOR INSTALLATION l Do you have a steel aluminum fiberglass or glass panel door If so horizontal and vertical reinforcement is required Installation Step 8 l The opener should be installed above the center of the door If there ...

Page 7: ...roperly l The floor or the garage door MUST be repaired to eliminate the gap Safety Reversing Sensor Access Door FINISHED CEILING Support bracket fastening hardware is required See page 16 Safety Reversing Sensor Header Wall Gap between floor and bottom of door must not exceed 1 4 6 mm Wall Mounted Door Control Rail Motor Unit Header Wall Header Bracket Trolley Straight Door Arm Emergency Release ...

Page 8: ...ht Door Arm Section packaged inside the front rail Curved Door Arm Section Safety Labels and Literature 2 Conductor Bell Wire White White Red Idler Pulley In Hardware Bag Motor Unit with 2 Light Lenses Hanging Brackets 2 Safety Reversing Sensors 1 Sending Sensor and 1 Receiving Sensor with 2 Conductor White and White Black Bell Wire attached Door Bracket 3 Button Remote Control 2 Trolley Safety Re...

Page 9: ...0x1 2 2 Handle Nut 5 16 18 4 Ring Fastener 3 Insulated Staples Not shown Drywall Anchors 2 Clevis Pin 5 16 x1 Rope Lock Washer 5 16 4 Lag Screw 5 16 9x1 5 8 4 Hex Bolt 5 16 18x7 8 4 Clevis Pin 5 16 x1 1 4 Screw 6 32x1 2 Clevis Pin 5 16 x1 1 2 Bolt 1 4 20x1 3 4 Self Threading Screw 1 4 14x5 8 2 Screw 6ABx1 2 Master Link Threaded Shaft with Spring Trolley Nut ASSEMBLY HARDWARE INSTALLATION HARDWARE ...

Page 10: ...ley assembly along the rail from the back end to the screwdriver 7 Slide the rail onto the U bracket until it reaches all the stops on the top and sides of the U bracket To prevent INJURY from pinching keep hands and fingers away from the joints while assembling the rail To garage door opener TO MOTOR UNIT U Bracket SLIDE TO STOPS ON TOP AND SIDES OF U BRACKET Outer Trolley Inner Trolley Wear Pads...

Page 11: ... into the window as shown 4 Insert the idler bolt from the top through the rail and pulley Tighten with a 3 8 lock washer and nut underneath the rail until the lock washer is compressed 5 Rotate the pulley to be sure it spins freely 6 Locate the rail tab The rail tab is between the idler bolt and the trolley in the front rail section Use a flathead screwdriver and lift the rail tab until the tab i...

Page 12: ...ove the spring trolley nut from the threaded shaft 6 Insert the trolley threaded shaft through the hole in the trolley Threaded Shaft with Spring Trolley Nut Master Link Trolley Threaded Shaft Pin Notch Sprocket Master Link Clip On Spring Master Link Cap Master Link Bar Figure 2 Figure 3 HARDWARE SHOWN ACTUAL SIZE Trolley Connector Figure 1 Retaining Slot ASSEMBLY STEP 5 TIGHTEN THE BELT 1 By hand...

Page 13: ...L ropes connected to garage door BEFORE installing opener to avoid entanglement 5 Where possible install the door opener 7 feet 2 13 m or more above the floor 6 Mount the emergency release within reach but at least 6 feet 1 83 m above the floor and avoiding contact with vehicles to avoid accidental release 7 NEVER connect garage door opener to power source until instructed to do so 8 NEVER wear wa...

Page 14: ...nce is minimal It may be mounted on the wall upside down if necessary to gain approximately 1 2 1 cm If you need to install the header bracket on a 2x4 on wall or ceiling use lag screws not provided to securely fasten the 2x4 to structural supports as shown here and on page 15 3 Open your door to the highest point of travel as shown Draw an intersecting horizontal line on the header wall above the...

Page 15: ...he vertical centerline onto the ceiling as shown 2 Center the bracket on the vertical mark no more than 6 15 cm from the wall Make sure the arrow is pointing away from the wall The bracket can be mounted flush against the ceiling when clearance is minimal 3 Mark the side holes Drill 3 16 pilot holes and fasten bracket securely to a structural support with the hardware provided Lag Screw 5 16 9x1 5...

Page 16: ...old the opener securely on a temporary support to allow the rail to clear the spring 2 Position the rail bracket against the header bracket 3 Align the bracket holes and join with a clevis pin as shown 4 Insert a ring fastener to secure Temporary Support Mounting Hole Clevis Pin 5 16 x1 1 2 Header Ring Fastener Bracket Header Bracket Idler Pulley Header Wall Garage Door HARDWARE SHOWN ACTUAL SIZE ...

Page 17: ...emain disconnected until Installation Step 12 is completed ENGAGED RELEASED Trolley Release Arm ONE PIECE DOOR WITHOUT TRACK A 2x4 on its side is convenient for setting an ideal door to rail distance 1 Raise the opener onto a stepladder You will need help at this point if the ladder is not tall enough 2 Open the door all the way and place a 2x4 on its side on the top section of the door beneath th...

Page 18: ... with 5 16 9x1 5 8 lag screws 5 Fasten the opener to the hanging brackets with 5 16 18x7 8 hex bolts lock washers and nuts 6 Check to make sure the rail is centered over the door or in line with the header bracket if the bracket is not centered above the door 7 Remove the 2x4 Operate the door manually If the door hits the rail raise the header bracket NOTE DO NOT connect power to opener at this ti...

Page 19: ... Standard Light Bulb 100 Watt Max Standard Light Bulb Compact Fluorescent Light Bulb Compact Fluorescent Light Bulb Lens Hinge or or INSTALLATION STEP 7 ATTACH THE EMERGENCY RELEASE ROPE AND HANDLE 1 Insert one end of the emergency release rope through the handle Make sure that NOTICE is right side up Secure with an overhand knot at least 1 2 5 cm from the end of the rope to prevent slipping 2 Ins...

Page 20: ...wo 1 4 14x5 8 self threading screws Figure 2A l Alternately use two 5 16 18x2 bolts lock washers and nuts not provided Figure 2B Metal insulated or light weight factory reinforced doors l Drill 3 16 fastening holes Secure the door bracket using the self threading screws Figure 3 Wood doors l Use top and bottom or side to side door bracket holes Drill 5 16 holes through the door and secure bracket ...

Page 21: ... the top edge of the door if required for your installation Refer to the dotted line optional placement drawing Header Wall Vertical Centerline of Garage Door Optional Placement of Door Bracket Header Bracket Door Bracket 2x4 Support For a door with no exposed framing or for the optional installation use lag screws 5 16 x1 1 2 Not Provided to fasten door bracket Top of Door Inside Garage Door Brac...

Page 22: ...f holes in curved arm are above holes in straight arm disconnect straight arm Cut about 6 15 cm from the solid end Reconnect to trolley with cut end down as shown l Bring arm sections together l Find two pairs of holes that line up and join with bolts lock washers and nuts Pull the emergency release handle toward the opener at a 45 angle so that the trolley release arm is horizontal Trolley will r...

Page 23: ... Nut 5 16 18 Ring Fastener Hex Bolt 5 16 18x7 8 Clevis Pin 5 16 x1 Trolley Clevis Pin 5 16 x1 1 4 Door Bracket HARDWARE SHOWN ACTUAL SIZE Figure 5 CORRECT INCORRECT Straight Door Arm Straight Door Arm Curved Door Arm Curved Door Arm Groove facing out Curved Door Arm Rail Tab Ring Fastener Door Bracket Outer Trolley Inner Trolley Emergency Release Handle Straight Door Arm Pulley Clevis Pin 5 16 x1 ...

Page 24: ... sure you use the same wires that are connected to the door control 1 Run the white and red white wire from the door control to the garage door opener Attach the wire to the wall and ceiling with the staples not applicable for gang box or pre wired installations Do not pierce the wire with the staple as this may cause a short or an open circuit 2 Strip 7 16 11 mm of insulation from the other end o...

Page 25: ...er lights turn on the sensor LEDs will light The garage door opener will not go into the sleep mode until the garage door opener has completed 5 cycles upon power up When installing the safety reversing sensors check the following l Sensors are installed inside the garage one on either side of the door l Sensors are facing each other with the lenses aligned and the receiving sensor lens does not r...

Page 26: ...ackets to wall with lag screws not provided 5 If using extension brackets or wood blocks adjust right and left assemblies to the same distance out from the mounting surface Make sure all door hardware obstructions are cleared Floor installation Figure 4 1 Use wood blocks or extension brackets see Accessories to elevate sensor brackets so the lenses will be no higher than 6 15 cm above the floor 2 ...

Page 27: ...nd strip 7 16 11 mm of insulation from each end Make sure that you choose the same color pre installed wires for each sensor Figure 8 3 Connect the pre installed wires to the sensor wires with wire nuts making sure the colors correspond for each sensor Figure 9 CONNECT TO GARAGE DOOR OPENER 1 Strip 7 16 11 mm of insulation from each set of wires Separate white and white black wires sufficiently to...

Page 28: ...rews and set the cover aside 2 Remove the attached 3 prong cord 3 Connect the black line wire to the screw on the brass terminal the white neutral wire to the screw on the silver terminal and the ground wire to the green ground screw The opener must be grounded 4 Reinstall the cover To prevent possible SERIOUS INJURY or DEATH from electrocution or fire l Be sure power is NOT connected to the opene...

Page 29: ...d by loosening the wing nuts aligning the sensors and tightening the wing nuts IF THE AMBER LED ON THE SENDING SENSOR IS NOT GLOWING 1 Make sure there is power to the garage door opener 2 Make sure the sensor wire is not shorted broken 3 Make sure the sensor has been wired correctly white wires to white terminal and white black wires to grey terminal IF THE GREEN LED ON THE RECEIVING SENSOR IS NOT...

Page 30: ...y open UP If the door is slanted backwards this will cause unnecessary bucking and or jerking when the door is opening or closing PROGRAMMING BUTTONS The programming buttons are located on the left side panel of the garage door opener and are used to program the travel Without a properly installed safety reversal system persons particularly small children could be SERIOUSLY INJURED or KILLED by a ...

Page 31: ...hildren could be SERIOUSLY INJURED or KILLED by a closing garage door l Incorrect adjustment of garage door travel limits will interfere with proper operation of safety reversal system l After ANY adjustments are made the safety reversal system MUST be tested Door MUST reverse on contact with 1 1 2 3 8 cm high object or 2x4 laid flat on floor 6 Press and release the UP Button When the door travels...

Page 32: ...ir to or buckling of the garage floor l Any repair to or adjustment of the opener Without a properly installed safety reversal system persons particularly small children could be SERIOUSLY INJURED or KILLED by a closing garage door l Safety reversal system MUST be tested every month l After ANY adjustments are made the safety reversal system MUST be tested Door MUST reverse on contact with 1 1 2 3...

Page 33: ...ging CHARGE THE BATTERY The battery charges when the garage door opener is plugged into a 110Vac electrical outlet that has power and requires 24 hours to fully charge A fully charged battery supplies 12Vdc to the garage door opener for one to two days of normal operation during an electrical power outage After the electrical power has been restored the battery will recharge within 24 hours The ba...

Page 34: ...onnecting your garage door opener visit support chamberlaingroup com Navigation Buttons An LED on the garage door opener will indicate Wi Fi status See table below LED Learn Button To stop the LCD Door Control Panel LCD from displaying CONNECT myQ APP On the LCD Door Control press MENU select PROGRAM and press press BACK then press EXIT to return to the main screen WI FI STATUS LED Definition Blue...

Page 35: ...structions 8 NEVER use handle to pull garage door open or closed If rope knot becomes untied you could fall 9 After ANY adjustments are made the safety reversal system MUST be tested 10 Safety reversal system MUST be tested every month Garage door MUST reverse on contact with 1 1 2 3 8 cm high object or a 2x4 laid flat on the floor Failure to adjust the garage door opener properly increases the ri...

Page 36: ...ep mode is sequenced with the garage door opener light bulb as the light bulb turns off the sensor LEDs will turn off and whenever the garage door opener lights turn on the sensor LEDs will light The garage door opener will not go into the sleep mode until the garage door opener has completed 5 cycles upon power up LIGHTS The garage door opener light bulbs will turn on when the opener is initially...

Page 37: ...ote controls while still allowing activation from the door control and keyless entry This feature is useful for added peace of mind when the home is empty i e vacation TIMER TO CLOSE TTC DO NOT enable TTC if operating a one piece door TTC is to be used ONLY with sectional doors Factory default is set to off TTC can be set to automatically close your garage door from the fully open position after a...

Page 38: ...d ONLY with sectional doors Lock Enable disable lock Program Add remote controls an extra remote button to control your garage door opener lights or a keyless entry Push Bar LIGHT Button Screen Motion Sensor Navigation Buttons SETTINGS Press the navigation button below the down arrow till you see TEMPERATURE to view the Settings menu Temperature Display the temperature in Fahrenheit or Celsius and...

Page 39: ...conds 2 Within 30 seconds press and hold the button on the remote control 3 Release the button when the garage door opener light blinks It has learned the code If light bulbs are not installed two clicks will be heard When replacing the light lens cover ensure the antenna wires are hanging straight down TO ADD REPROGRAM OR CHANGE A REMOTE CONTROL KEYLESS ENTRY PIN USING THE LCD DOOR CONTROL PIN OR...

Page 40: ...DEVICES INCLUDING myQ ENABLED ACCESSORIES 1 Press and hold the LEARN button on garage door opener until the learn LED goes out approximately 6 seconds 2 Immediately press and hold the LEARN button again until the learn LED goes out All codes are now erased Reprogram any accessory you wish to use ERASE THE CONNECTION FROM GARAGE DOOR OPENER TO HOME WI FI NETWORK 1 Press and hold the black adjustmen...

Page 41: ... trained door systems technician l Check to be sure door opens and closes fully Adjust if necessary see page 30 l Test the safety reversal system Adjust if necessary see page 32 Every year l Oil door rollers bearings and hinges The garage door opener does not require additional lubrication Do not grease the door tracks l Test the battery backup and consider replacing the battery to ensure the gara...

Page 42: ...1 5 Door moves 6 8 15 20 cm stops or reverses Manually open and close the door Check for binding or obstructions such as a broken spring or door lock correct as needed Check wiring connections at travel module and at the logic board Replace travel module if necessary No movement only a single click Manually open and close the door Check for binding or obstructions such as a broken spring or door l...

Page 43: ...ot activate the garage door l Verify the lock feature is not activated on the door control l Reprogram the remote control l If the remote control will still not activate the door check the diagnostic codes to ensure the garage door opener is working properly l Ensure both antenna wires are hanging down from the garage door opener My garage door opener light s will not turn off when the door is ope...

Page 44: ...0137 Visor clip 4 041A2828 Emergency release rope and handle assembly 5 041B4494 1 2 Conductor bell wire white and white red 6 041A5047 2 Header bracket with clevis pin and fastener 7 041A5047 Door bracket with clevis pin and fastener 8 041B0035B Curved door arm section 9 4178B0034B Straight door arm section 10 012B0776 Hanging bracket 11 041A5034 Safety reversing sensor kit receiving and sending ...

Page 45: ...r 2 041B4245 1 Line Cord 9 108D0077M Light Lens 3 041D8006 1 Motor with Travel Module 10 041C0279 Light Socket 4 041D8071 4 Travel Module 11 041A3150 Terminal Block 5 050DCTWF Receiver Logic Board 12 041D9491 Receiver Logic Board End Panel 6 041D8385 1 End Panel with Light Socket 7 041D0277 1 Transformer REPAIR PARTS MOTOR UNIT ASSEMBLY PARTS ...

Page 46: ...paired or replaced at Seller s sole option at no cost to you and returned pre paid Defective parts will be repaired or replaced with new or factory rebuilt parts at Seller s sole option You are responsible for any costs incurred in removing and or reinstalling the product or any component ALL IMPLIED WARRANTIES FOR THE PRODUCT INCLUDING BUT NOT LIMITED TO ANY IMPLIED WARRANTIES OF MERCHANTABILITY ...

Page 47: ...carefully and keep it for reference Check the operation of your garage door and opener to ensure they function in a safe and trouble free manner Be sure to read all Important Safety Information found in your garage door opener s manual as it provides more details and safety considerations than can be supplied with this guide GARAGE DOOR OPENERS ARE NOT TOYS Discuss garage door and opener safety wi...

Page 48: ...ained door systems technician for assistance l Verify the photoeye height is no higher than 6 from the garage floor Test the door for proper operation l Open and close the door manually using handles or suitable gripping points l The door should move freely and without difficulty l The door should balance and stay partially open 3 4 feet above the floor l If you detect any signs of improper operat...

Page 49: ...49 ...

Page 50: ...estions troubleshoot problems or order parts Para respuestas a preguntas o problemas y ordenar piezas Be sure to register your product at https www craftsman com registration Asegúrese de registrar su producto en https www craftsman com registration CRAFTSMAN is a registered trademark of Stanley Black Decker Inc used under license 2019 CRAFTSMAN 2019 The Chamberlain Group Inc ...

Page 51: ...TALACIÓN DEJE EL MANUAL A MANO CERCA DE LA PUERTA DEL GARAJE SE DEBEN REALIZAR REVISIONES PERIÓDICAS DEL OPERADOR PARA ASEGURAR SU FUNCIONAMIENTO SEGURO NO USARLO PARA PUERTAS DE UNA SOLA PIEZA SI UTILIZA DISPOSITIVOS DE CIERRE AUTOMÁTICO LOS DISPOSITIVOS Y LAS FUNCIONES EN ESTADO PASIVO DEBEN USARSE ÚNICAMENTE CON PUERTAS SECCIONALES VEA LA PÁGINA 3 ANOTE EL NÚMERO DE SERIE CRAFTSMAN UBICADO EN E...

Page 52: ...2 23 Coloque las etiquetas de advertencia 23 Instale el LCD de control de la puerta 24 Instale el sistema de reversa de seguridad 25 27 Requisitos para la instalación eléctrica 28 Alinee los sensores de reversa de seguridad 29 AJUSTES 30 32 Introducción 30 Programación del recorrido 31 Pruebe el sistema de reversa de seguridad 32 Pruebe los sensores de reversa de seguridad 32 RESERVA DE LA BATERÍA...

Page 53: ...e le alertará sobre la posibilidad de dañar la puerta del garaje o el abre puertas de garaje si no se siguen las precauciones correspondientes Lea las instrucciones con mucho cuidado ADVERTENCIA Este producto puede exponer le a productos químicos incluido el plomo que a consideración del estado de California causan cáncer defectos congénitos u otros daños reproductivos Para obtener más información...

Page 54: ...ro de la puerta Vea la página 14 Puertas seccionadas Puerta de una pieza Para evitar una posible LESIÓN GRAVE o LA MUERTE l SIEMPRE llame a un técnico especializado en sistemas de puertas si la puerta del garaje se atasca atora o si está desequilibrada Es posible que una puerta de garaje que no esté bien equilibrado NO retroceda cuando se requiera l NUNCA intente aflojar mover ni ajustar la puerta...

Page 55: ...ciones Coloque el router más cerca del abre puertas de garaje para minimizar la interferencia de las paredes y otros objetos Compre un amplificador de alcance de Wi Fi La señal de Wi Fi es fuerte Todo listo Instale su nuevo abre puertas de garaje Consulte la página 34 de control a aplicación myQ para conectar el abre puertas de garaje a su red de Wi Fi NO conectar antes de la instalación Wi Fi es ...

Page 56: ... sistema de reversa de seguridad podría no funcionar debidamente Vea Ajustes paso 2 Será necesario reparar ya sea el piso o la puerta INSTALACIÓN DE PUERTAS SECCIONADAS l Tiene una puerta de acero fino aluminio fibra de vidrio o con paneles de vidrio En ese caso necesitará refuerzos horizontales y verticales Paso 8 de la Instalación l El abre puertas se debe instalar por encima del centro de la pu...

Page 57: ... para eliminar este espacio Puerta de acceso Pared del frente Control de puerta montado en pared Riel Unidad del motor Carro Ménsula de la puerta Puerta de garaje Puerta de garaje Lengüeta del riel Correa Carro Lengüeta del riel Correa Riel Riel POSICIÓN CERRADA Puerta de acceso POSICIÓN CERRADA PUERTA DE UNA SOLA PIEZA SIN RIEL PUERTA DE UNA PIEZA CON RIEL CIELO RASO CON ACABADO Se requiere una m...

Page 58: ... En la bolsa de accesorios Unidad del motor con dos lente Ménsulas colgantes Ménsula de la puerta Control remoto de 3 botones 2 Carro Ménsula del sensor de seguridad 2 Secciones central y posterior del riel Ménsula en U LCD de control de la puerta Ménsula del cabezal Bolsa de herrajes Teclado inalámbrico Batería Correa Sección delantera del riel cabezal Sección de brazo recto de la puerta embalada...

Page 59: ... de chaveta 5 16 pulg x1 pulg Cuerda Arandela de presión 5 16 pulg 4 Tornillo para madera 5 16 pulg 9x1 5 8 pulg 4 Perno hexagonal 5 16 pulg 18x7 8 pulg 4 Pasador de chaveta 5 16 pulg x1 1 4 pulg Tornillo de 6 32x1 pulg 2 Pasador de chaveta 5 16 pulg x1 1 2 pulg Perno 1 4 pulg 20x1 3 4 pulg Tornillo autorroscante 1 4 pulg 14x5 8 pulg 2 Tornillo de 6ABx1 pulg 2 Eslabón maestro HERRAJES DE INSTALACI...

Page 60: ...desde el extremo posterior hasta el desarmador 7 Deslice el riel en la ménsula en U hasta los topes que sobresalen en la parte superior y a los lados de la ménsula en U Para prevenir LESIONES por presión mantenga las manos y los dedos alejados de las uniones mientras se ensambla el riel Al abre puertas de garaje A LA UNIDAD DEL MOTOR La ménsula en U Deslice hasta los topes en la parte superior y l...

Page 61: ...co desde la parte superior y a través del riel y la polea Apriete con una arandela y una tuerca de 3 8 de pulg por debajo del riel hasta que la arandela quede comprimida 5 Gire la polea para asegurarse de que rote libremente 6 Ubicar la pestaña del riel La pestaña del riel se encuentra entre el perno de la polea loca y el carro en la parte delantera del riel Utilizar un destornillador de punta pla...

Page 62: ...o del eje roscado 6 Introduzca el eje roscado del trole por el orificio del carro Eje roscado con tuerca del carro con resorte Eslabón maestro Eje roscado del carro Muesca del perno Portacadena Resorte de sujeción del enlace maestro Tapa del eslabón principal Barra del eslabón principal Figura 2 Figura 3 Conector del carro Figura 1 Ranura de retención LOS HERRAJES SE MUESTRAN EN TAMAÑO REAL ENSAMB...

Page 63: ...uerta de garaje ANTES de instalar el abre puertas para evitar que estas se enreden 5 Si es posible instale el abre puertas a una distancia de 2 13 m 7 pies o más por encima del piso 6 Monte la manija de desenganche de emergencia de modo que esté al alcance pero con una altura mínima de 1 83 m 6 pies del piso para evitar contacto con los vehículos y que se suelte accidentalmente 7 No conecte NUNCA ...

Page 64: ...e la pared si fuese necesario Esto le dará aproximadamente 1 cm 1 2 pulg de espacio Si necesita instalar la ménsula del cabezal sobre una tabla de 5 x 10 cm 2 x 4 pulg ya sea en la pared o en el cielo raso utilice tornillos de cabeza cuadrada no se incluyen para sujetar bien la tabla de madera a los soportes estructurales tal como se muestra aquí y en 15 3 Abra la puerta hasta el punto más alto de...

Page 65: ...el centro de la línea a no más de 15 cm 6 pulg de la pared Asegúrese de que la flecha de la ménsula apunte en dirección opuesta a la pared La ménsula se puede instalar pegada al cielo raso cuando el espacio es muy reducido 3 Marque dónde taladrará los orificios laterales Taladre los orificios con una broca de 3 16 de pulg y sujete la ménsula firmemente al soporte de la estructura con la pernería q...

Page 66: ...ermitir que el riel pueda librar el resorte 2 Coloque la ménsula del riel contra la ménsula del cabezal 3 Alinee los orificios de las ménsulas y júnte las con un pasador de chaveta como se muestra en la ilustración 4 Introduzca un anillo de seguro para terminar la unión Soporte temporal Orificio de montaje Pasador de horquilla 5 16 pulg x1 1 2 pulg Ménsula del cabezal Anillo de seguro Ménsula del ...

Page 67: ...ADO Brazo de liberación del carro LIBERADO PUERTA DE UNA SOLA PIEZA SIN RIEL Un pedazo de madera de 5 x 10 cm 2 x 4 pulg le será de ayuda para determinar la distancia ideal entre la puerta y el riel 1 Ponga el abre puertas sobre una escalera Si la escalera no es lo suficientemente alta va a necesitar ayuda 2 Abra la puerta completamente y coloque un pedazo de madera de 5 x 10 cm 2 x 4 pulg en la s...

Page 68: ...pulg 18x7 8 de pulg rondanas de presión y tuercas 6 Verifique que el riel esté centrado sobre la puerta o alineado con la ménsula de cabecera si la ménsula no está centrada sobre la puerta 7 Quite el pedazo de madera de 2x4 Opere la puerta manualmente Si la puerta golpea el riel suba la ménsula del cabezal NOTA Por el momento NO conecte la energía al abre puertas de garaje Tornillo para madera 5 1...

Page 69: ...0 vatios máx Bombilla fluorescente compacta Bombilla fluorescente compacta Bisagra de la lente o o INSTALACIÓN PASO 7 INSTALE LA MANIJA Y LA CUERDA DE EMERGENCIA 1 Inserte un extremo de la cuerda de liberación de emergencia a través de la manija Verifique que la palabra NOTICE aviso esté hacia arriba Asegúrelo con un nudo simple por lo menos a 2 5 cm 1 pulg del extremo de la cuerda para evitar que...

Page 70: ... 5 8 de pulg Figura 2A l Como alternativa puede usar dos pernos de 5 16 de pulg 18x2 pulg rondanas de presión y tuercas no incluidos Figura 2B Puertas metálicas con aislamiento o livianas reforzadas de fábrica l Taladre los orificios de sujeción de 3 16 de pulg Fije la ménsula de la puerta con tornillos autorroscantes Figura 3 Puertas de madera l Use los orificios laterales o superior e inferior d...

Page 71: ...erior de la puerta si es necesario para su instalación Vea la ilustración de colocación opcional señalada con la línea punteada Pared del frente Línea central vertical de la puerta de garaje Colocación opcional de la ménsula de la puerta Ménsula del cabezal Ménsula de la puerta Ménsula de la puerta Ménsula de la puerta Soporte de 2 x 4 Para una puerta sin marcos expuestos o para la instalación opc...

Page 72: ...nos 15 cm 6 pulg del extremo firme Reconéctelo al carro con el extremo cortado hacia abajo tal como se muestra l Junte las dos secciones l Busque dos pares de orificios alineados y únalos con pernos arandelas y tuercas Tire de la manija de liberación de emergencia hacia el abre puertas a un ángulo de 45 de manera que el brazo de liberación del carro quede en posición horizontal El carro se reconec...

Page 73: ...ulg Carro Pasador de horquilla 5 16 pulg x1 1 4 pulg Ménsula de la puerta LOS HERRAJES SE MUESTRAN EN TAMAÑO REAL Figura 5 CORRECTO INCORRECTO Brazo recto de la puerta Brazo recto de la puerta Lengüeta del riel Anillo de seguro Ménsula de la puerta Carro externo Carro interno Manija de liberación de emergencia Polea Pasador de horquilla 5 16 x1 1 4 Pernos hexagonales 5 16 pulg 18x7 8 pulg Arandela...

Page 74: ...co entre el control de la puerta y el abre puertas de garaje Fije el cable a la pared y al cielo raso con grapas a menos que se utilicen cajas de conexión o sea una instalación existente No perfore el cable con los broches ya que esto podría causar un cortocircuito o un circuito abierto 2 Pele 11 mm 7 16 de pulg de aislante del otro extremo del cable cerca del abre puertas de garaje 3 Conecte el c...

Page 75: ...ya completado 5 ciclos desde que se accionó Al instalar los sensores de reversa de seguridad verifique lo siguiente l Que los sensores estén instalados dentro del garaje uno de cada lado de la puerta l Que los sensores estén orientados frente a frente con las lentes alineadas y que la lente del sensor receptor no reciba la luz directa del sol l Que los sensores están montados a una altura máxima d...

Page 76: ...ara madera no incluidos 5 Si usa ménsulas de extensión o bloques de madera ajuste los ensamblajes derecho e izquierdo a la misma distancia de la superficie de montaje Asegúrese de retirar todas las obstrucciones de la puerta Instalación en el piso Figura 4 1 Use bloques de madera o ménsulas de extensión consultar la sección de Accesorios para elevar las ménsulas de los sensores de manera que los c...

Page 77: ...remo Asegúrese de elegir el mismo color de cable preinstalado para cada sensor Figura 8 3 Conecte los cables preinstalados con los cables del sensor usando capuchones de empalme Verifique que los colores correspondan a cada sensor Figura 9 CONEXIÓN AL ABRE PUERTAS DE GARAJE 1 Pele 11 mm 7 16 de pulg de cada juego de cables Separe los cables blanco y blanco negro lo suficiente para conectarlos a la...

Page 78: ...acia un lado 2 Quite el cable de tres entradas 3 Conecte el cable línea negro al tornillo del terminal de cobre el cable blanco neutral al tornillo del terminal color plata y el cable a tierra al tornillo verde de la puesta a tierra El abre puertas debe de estar puesto a tierra 4 Volver a colocar la tapa Para evitar posibles LESIONES GRAVES o la MUERTE por electrocución o incendio l Asegúrese de q...

Page 79: ...ercas mariposa alinee los sensores y vuelva a ajustar las tuercas mariposa SI EL LED ÁMBAR DEL SENSOR EMISOR NO SE ENCIENDE 1 Verifique que llegue energía eléctrica al abre puertas 2 Verifique que no haya un cortocircuito ni el sensor esté roto 3 Verifique que el sensor esté correctamente conectado cables blancos al terminal blanco y cables blanco negro al terminal gris SI EL LED VERDE DEL SENSOR ...

Page 80: ...ia atrás se deformará hará movimientos irregulares y o se sacudirá al abrir o al cerrar BOTONES DE PROGRAMACIÓN Los botones de programación están en el panel a la izquierda del abre puertas de garaje y se utilizan para programar el recorrido de la puerta Si el sistema de reversa de seguridad no se ha instalado debidamente las personas y los niños pequeños en particular podrían sufrir LESIONES GRAV...

Page 81: ...VES o incluso la MUERTE cuando se cierre la puerta del garaje l El ajuste incorrecto de los límites del recorrido de la puerta del garaje habrá de interferir con la operación adecuada del sistema de reversa de seguridad l Después de llevar a cabo CUALQUIER ajuste SE DEBE probar el sistema de reversa de seguridad La puerta DEBE retroceder al entrar en contacto con un objeto de 3 8 cm 1 1 2 de pulg ...

Page 82: ...ón al piso del garaje porque está desnivelado l Cualquier reparación o ajuste al abre puertas Si el sistema de reversa de seguridad no se ha instalado adecuadamente las personas y los niños pequeños en particular podrían sufrir LESIONES GRAVES o incluso MORIR al cerrar la puerta del garaje l El sistema de reversa de seguridad SE DEBE probar cada mes l Después de llevar a cabo CUALQUIER ajuste SE D...

Page 83: ...ería se carga cuando el abre puertas de garaje está conectado a un tomacorriente eléctrico de 110 Vca que tiene energía y requiere 24 horas para cargarse completamente Una batería completamente cargada suministra 12 Vcc al abre puertas de garaje durante uno o dos días de operación normal durante una falla de energía eléctrica Una vez restaurada la energía eléctrica la batería se recargará dentro d...

Page 84: ...sobre la conexión de su abre puertas de garaje visite support chamberlaingroup com Botones de navegación Un LED en el abre puertas de garaje indicará el estado de la conexión de Wi Fi Vea la siguiente tabla LED botón de aprendizaje Para que el LCD del panel de control de la puerta deje de mostrar CONNECT myQ APP En el LCD de control de la puerta presione MENU Menú seleccione PROGRAM Programar pres...

Page 85: ... use la manija para jalar la puerta para abrirla o cerrarla Si el nudo de la cuerda se suelta usted podría caerse 9 Después de llevar a cabo CUALQUIER ajuste SE DEBE probar el sistema de reversa de seguridad 10 El sistema de reversa de seguridad SE DEBE probar cada mes La puerta del garaje DEBE retroceder al entrar en contacto con un objeto de 3 8 cm 1 1 2 de pulg de altura o de 5 x 10 cm 2 x 4 pu...

Page 86: ...vo el abre puertas de garaje permanece apagado hasta que vuelva a activarse En modo pasivo está en sincronización con la bombilla del abre puertas de garaje Al apagarse la bombilla se apagarán los LED de los sensores y cuando se enciendan las luces del abre puertas de garaje se encenderán los LED del sensor El abre puertas de garaje no pasará al modo pasivo hasta que haya completado 5 ciclos desde...

Page 87: ... útil como medida extra de seguridad cuando no hay nadie en la casa por ejemplo durante vacaciones TEMPORIZADOR DE CIERRE TTC NO active el temporizador de cierre con puertas de una pieza El temporizador de cierre puede utilizarse ÚNICAMENTE con puertas seccionales Esta función viene desactivada de fábrica El TTC puede configurarse para que cierre automáticamente la puerta de su garaje desde la pos...

Page 88: ...NICAMENTE con puertas seccionales Bloqueo Active o desactive el seguro Programar Integre controles remotos otro botón remoto para controlar las luces del abre puertas de garaje o una llave digital Pulsador de barra Botón de LUZ Pantalla Detector de movimiento Botones de navegación CONFIGURACIÓN Para ver el menú de Parámetros presione el botón de navegación abajo de la flecha descendente hasta ver ...

Page 89: ... presione y mantenga presionado el botón en el control remoto 3 Suelte el botón cuando la luz del abre puertas de garaje empiece a parpadear Ya aprendió el código Si no se han puesto bombillas se escucharán dos chasquidos Al cambiar la tapa de la lente de luz verifique que los cables de la antena queden colgando hacia abajo AGREGAR REPROGRAMAR O CAMBIAR UN PIN DE CONTROL REMOTO LLAVE DIGITAL CON E...

Page 90: ...UIDOS LOS ACCESORIOS COMPATIBLES CON myQ 1 Mantenga presionado el botón de aprendizaje LEARN en el abre puertas de garaje hasta que se apague el LED aproximadamente 6 segundos 2 Inmediatamente presione y mantenga presionado el botón de aprendizaje LEARN otra vez hasta que el LED se apague Ahora todos los códigos estarán borrados Vuelva a programar todo accesorio que desee usar ELIMINAR LA CONEXIÓN...

Page 91: ...NTENIMIENTO DE SU ABRE PUERTAS DE GARAJE PROGRAMA DE MANTENIMIENTO Cada mes l Haga funcionar la puerta manualmente Si está desequilibrada o se atasca llame a un técnico capacitado en sistemas de puertas l Verifique que la puerta se abra y se cierre completamente Ajuste si es necesario consulte la página 30 l Pruebe el sistema de reversa de seguridad Ajuste si es necesario consulte la página 32 Cad...

Page 92: ...20 cm 6 a 8 pulg se detiene o retrocede Abra y cierre la puerta manualmente Verifique si hay atascos u obstrucciones por ejemplo un resorte roto o bloqueo de la puerta y corrija según sea necesario Revise las conexiones del cableado en el módulo de recorrido y en el tablero lógico Reemplace el módulo de recorrido si es necesario No hay movimiento tan solo un clic Abra y cierre la puerta manualment...

Page 93: ...garaje Vea la página 37 El control remoto no activa la puerta del garaje l Verificar que la función de bloqueo no esté activada en el control de la puerta l Vuelva a programar el control remoto l Si aun así el control remoto no activa la puerta revise los códigos de diagnóstico para comprobar que el abre puertas de garaje esté funcionando correctamente l Asegúrese de que los cables de la antena cu...

Page 94: ...era 4 041A2828 Ensamblaje de la manija y cuerda de liberación de emergencia 5 041B4494 1 Cable del timbre de 2 conductores blanco y blanco rojo 6 041A5047 2 Ménsula de cabezal con pasador de chaveta y seguro 7 041A5047 Ménsula de la puerta con pasador de chaveta y seguro 8 041B0035B Sección de brazo curvo de la puerta 9 4178B0034B Sección de brazo recto de la puerta 10 012B0776 Ménsula colgante 11...

Page 95: ...ente de luz 3 041D8006 1 Motor con módulo de recorrido 10 041C0279 Receptáculo para la bombilla 4 041D8071 4 Módulo de recorrido 11 041A3150 Bloque de terminales 5 050DCTWF Tabla de lógico de receptor 12 041D9491 Panel del extremo de la tarjeta lógica receptora 6 041D8385 1 Panel del extremo con receptáculo para la bombilla 7 041D0277 1 Transformador PIEZAS DE REPUESTO PIEZAS DE ENSAMBLAJE DE LA U...

Page 96: ...ue están cubiertos por esta garantía limitada serán reparados o reemplazados a opción única del Vendedor sin costo para usted y serán devueltos con el porte pagado Las partes defectuosas serán reparadas o reemplazadas a opción única del Vendedor por partes nuevas o reconstruidas de fábrica Usted es responsable de los costos incurridos en el retiro y o en la reinstalación del producto o cualquier c...

Page 97: ...ara referencia futura Revise la operación de su puerta de garaje y abre puertas para asegurarse de que funcionan de manera segura y sin problemas Asegúrese de leer toda la información importante de seguridad que se encuentra en el manual del abre puertas de garaje ya que proporciona más detalles y consideraciones de seguridad que las que se pueden proporcionar con esta guía LOS ABRE PUERTAS DE GAR...

Page 98: ...istemas de puertas para obtener asistencia l Verifique que la altura del sensor fotoeléctrico no esté a más de 6 pulg del piso del garaje Compruebe el funcionamiento correcto de la puerta l Abra y cierre la puerta manualmente mediante manijas o puntos de agarre adecuados l La puerta debe moverse libremente y sin dificultad l La puerta debe equilibrarse y mantenerse parcialmente abierta de 0 9 a 1 ...

Page 99: ...49 ...

Page 100: ...bleshoot problems or order parts Para respuestas a preguntas o problemas y ordenar piezas Be sure to register your product at https www craftsman com registration Asegúrese de registrar su producto en https www craftsman com registration CRAFTSMAN es una marca registrada de Stanley Black Decker Inc utilizada bajo licencia 2019 CRAFTSMAN 2019 The Chamberlain Group Inc 114 5311B ...

Reviews: