18
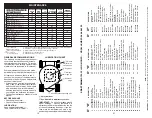
Does not start
1. Dirty air filter.
1. Clean/replace air filter.
2. Out of fuel.
2. Fill fuel tank.
3. Stale fuel.
3. Empty fuel tank and refill tank
with fresh, clean gasoline.
4. Water in fuel.
4. Empty fuel tank and refill tank
with fresh, clean gasoline.
5. Spark plug wire is
5. Connect wire to plug.
disconnected.
6. Bad spark plug.
6. Replace spark plug.
7. Loose blade or broken
7. Tighten blade bolt or
blade adapter.
replace blade adapter.
8. Control bar in released
8. Depress control bar to
position.
handle.
9. Control bar defective.
9. Replace control bar.
10. Fuel valve lever (if so
10. Turn fuel valve lever
equipped) in OFF position.
to the ON position.
11. Weak battery (if equipped). 11. Charge battery.
12. Disconnected battery
12. Connect battery to engine.
connector (if equipped).
PROBLEM CAUSE
CORRECTION
TROUBLESHOOTING - See appropriate section in manual unless directed
to a Sears Parts & Repair Centre.
15
SERVICE AND ADJUSTMENTS
WARNING:
To avoid serious injury, before per form ing any service or ad just ments:
1. Release control bar and stop engine.
2. Make sure the blade and all moving parts have completely stopped.
3. Disconnect spark plug wire from spark plug and place wire where it cannot come in
contact with spark plug.
CLEANING
IMPORTANT:
For best performance,
keep mower housing free of built-up grass
and trash. Clean the underside of your
mower after each use.
CAUTION:
Disconnect spark plug wire
from spark plug and place wire where it
cannot come in contact with plug.
• Clean the underside of your lawn
mower by scraping to remove build-up
of grass and trash.
• Clean engine often to keep trash from
accumulating. A clogged engine runs
hotter and shortens engine life.
• Keep finished surfaces and wheels free
of all gasoline, oil, etc.
• With the exception of the water washout
port (if equipped), we do not recommend
using a garden hose to clean the outside
of your lawn mower unless the elec tri cal
system, muffler, air filter and carburetor
are covered to keep water out. Water in
engine can result in shortened engine life.
LAWN MOWER
TO ADJUST CUTTING HEIGHT
See “TO ADJUST CUTTING HEIGHT” in
the Operation sec tion of this manual.
REAR DEFLECTOR
The rear deflector, attached between the
rear wheels of your mower, is provided to
minimize the possibility that objects will
be thrown out of the rear of the mower
into the operator mowing position. Re-
place the deflector if dam aged.
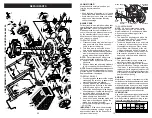
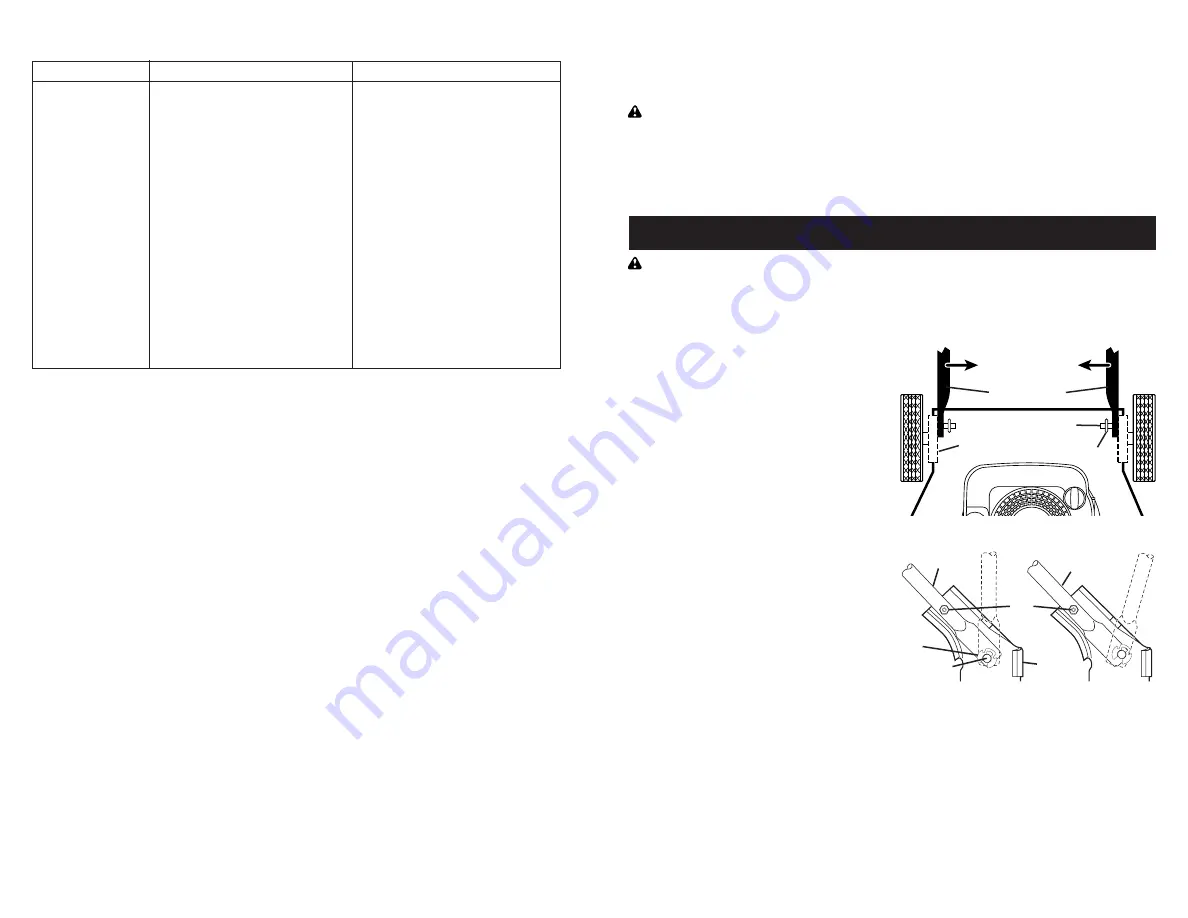
TO ADJUST HANDLE
The handle can be mounted in a high or
low position. The mounting holes in the
bottom of lower handle are off center for
raising or lowering the handle.
1. Remove upper handle and wire tie(s)
securing cable(s) to lower handle.
2. Remove klip rings from lower handle
bracket mount ing pins.
3. Remove bolts and nuts.
4. Squeeze lower handle in to remove it
from mounting pins.
5. Turn lower handle over to raise or
lower handle.
6. Squeeze lower handle in and po si tion
holes onto mount ing pins on handle
bracket.
7. Reinstall bolts and nuts.
8. Reassemble upper handle and all
parts removed from lower handle.
ENGINE
Maintenance, re pair, or re place ment of the
emission con trol de vic es and sys tems, which
are be ing done at the cus tom ers expense,
may be performed by any non-road engine
repair es tab lish ment or individual. Warranty
repairs must be performed by an authorized
engine man u fac tur er's service outlet.
Lower handle
Handle
bracket
Klip ring
SQUEEZE
TO ADJUST
Mounting pin
Mowing
position
Mowing
position
HIGH POSITION
LOW POSITION
Handle
bracket
Bolts
and
nuts
Klip
ring
Mounting
pin


