background image

4

WARRANTY

GENERAL: Craftsman products are warranted to be free from defects in materials 
or workmanship for a specifi c time period as set-out below (the “Warranty Period”). 


Warranties extend to the original purchaser of a Craftsman product only.  Purchases 
made through an online auction or through any website other than www.sears.ca are 
excluded.  The relevant Warranty Period commences on the original date of purchase. 
Within this period, Sears Canada, Inc. will, at its sole option, repair or replace any products 
or components which fail in normal use. Such repairs or replacement will be made at no 
charge to the customer for parts or labor, provided that the customer shall be responsible 
for any transportation cost.

EXCLUSIONS: This warranty does not cover failures due to normal wear, abuse, misuse, 
neglect (including but not limited to the use of stale fuel, dirt, abrasives, moisture, rust, 
corrosion, or any adverse reaction due to improper storage or use habits), improper 
maintenance or failure to follow maintenance guidelines and/or instructions, failure to 
operate the product in accordance with the owner’s manual or any additional instructions 
or information provided at the time of purchase or in subsequent communications with 
the original purchaser, accident or unauthorized alterations or repairs made or attempted 
by others.  Also excluded from warranty coverage – except as provided below - are the 
following: maintenance, adjustments, components subject to wear including but not 
limited to: cosmetic components, belts, blades, blade adapters, bulbs, tires, fi lters, guide 
bars, lubricants, seats, grips, recoil assy’s, saw chains and bars, trimmer lines and spools, 
spark plugs, starter ropers and tines, and discoloration resulting from ultraviolet light.  Any 
product missing the model and/or serial number identifi cation label will be disqualifi ed 
from coverage under this warranty.

REPAIRS: Repairs have a 90 day warranty. If the defective product is still within the 
Warranty Period, then the new warranty is 90 days from the date of repair or to the end of 
the original Warranty Period, whichever period is longer. 

DISCLAIMERS: THE WARRANTIES AND REMEDIES CONTAINED HEREIN ARE 
EXCLUSIVE AND IN LIEU OF ALL OTHER WARRANTIES, WHETHER ORAL OR 
WRITTEN (OTHER THAN AS STATED HEREIN), AND WHETHER EXPRESS, IMPLIED 
OR STATUTORY, INCLUDING BUT NOT LIMITED TO ANY. THIS WARRANTY 
GIVES YOU SPECIFIC LEGAL RIGHTS, WHICH MAY VARY FROM PROVINCE TO 
PROVINCE.

IN NO EVENT SHALL SEARS BE LIABLE FOR ANY INCIDENTAL, SPECIAL, INDIRECT 
OR CONSEQUENTIAL DAMAGES, WHETHER RESULTING FROM THE USE, MISUSE 
OR INABILITY TO USE THE PRODUCT OR FROM DEFECTS IN THE PRODUCT.   THE 
EXCLUSIONS IN THIS PARAGRAPH SHALL NOT APPLY IN JURISDICATIONS WHERE 
APPLICABLE LAW DOES NOT ALLOW FOR THE EXCLUSION OF INCIDENTAL OR 
CONSEQUENTIAL DAMAGES.  IN SUCH JURISDICTIONS, THIS PARAGRAPH SHALL 
NOT APPLY, BUT THE REMAINING PROVISIONS OF THIS DOCUMENT SHALL 
REMAIN VALID.

Sears retains the exclusive right to repair or replace the product or offer a full refund of 
the purchase price at its sole discretion. SUCH REMEDY SHALL BE YOUR SOLE AND 
EXCLUSIVE REMEDY FOR ANY BREACH OF WARRANTY.

CUSTOMER RESPONSIBILITIES: In additional to complying with all suggested 
maintenance guidelines and instructions, customers’ obligations shall include but shall 
not be limited to: operating the product in accordance with the owner’s manual or any 
additional instructions or information provided at the time of purchase or in subsequent 
communications to the purchaser from time to time, exhibit reasonable care in the use, 
operation, maintenance, general upkeep and storage of the product.  Failure to comply 
with these requirements will void any applicable warranty.

29

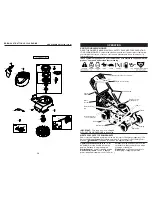
MODEL NUMBER 122T02-1334-B1

BRIGGS & STRATTON 4-CYCLE ENGINE

KEY PART
NO. NO. 

 DESCRIPTION

356 692390   Wire-Stop
358 794307   Gasket 

Set-Engine

362 793351   Shield-Spark 

Plug

365 691688   Screw 

(Carburetor)

404  690272 

  Washer (Governor Crank)

425  690670 

  Screw (Air Cleaner Cover)

443 692523   Screw


  (Air Cleaner Primer Base)

445  491588s    Filter-Air Cleaner Cartridge
455 791960   Cup-Flywheel
456 692299   Plate-Pawl 

Friction

459 281505s   Pawl-Ratchet
505  691251 

  Nut (Governor Control Lever)

523 499621   Dipstick
524  692296 

•  Seal- Dipstick Tube

525 495265   Tube-Dipstick
562  691119 

  Bolt (Governor Control Lever)

564  698589 

  Screw (Control Cover)

584 697734   Cover-Breather 

Passage

585 691879  • Gasket-Breather 

Passage

592  690800 

  Nut (Rewind Starter)

597  691696 

  Screw (Pawl Friction Plate)

601 791850   Clamp-Hose 

(Green)

604 790703   Cover-Control
608 497680   Starter-Rewind
613 790833   Screw 

(Muffl er)

615 690340   Retainer-Governor 

Shaft

616 698801   Crank-Governor
617  270344s  •*  Seal-O Ring (Intake Manifold)
621 692310   Switch-Stop 

(Brake)

633  691321 

*  Seal-Choke / Throttle Shaft


(Throttle 

Shaft)

684 690345   Screw


  (Breather Passage Cover)

689 691855   Spring-Friction
718 690959   Pin-Locating
741 795755   Gear-Timing
745 691648   Screw 

(Brake)

847 692047   Dipstick/Tube 

Assembly

851 692424   Terminal-Spark 

Plug

868 697338  • Seal-Valve
869 691155   Seat-Valve 

(Intake)

870 690380   Seat-Valve 

(Exhaust)

KEY PART
NO. NO. 

 DESCRIPTION

871 262001   Bushing-Valve 

Guide


(Exhaust 

Valve)

 63709  

Bushing-Valve 

Guide


(Intake 

Valve)

883 691881 •+ Gasket-Exhaust
921 795064   Cover-Blower 

Housing

922 692135   Spring-Brake
923 796136   Brake
957 692046   Cap-Fuel 

Tank

966  795259 

  Base-Air Cleaner Primer

968 692298   Cover-Air 

Cleaner

969 690700   Screw


  (Blower Housing Cover)

972 699374   Tank-Fuel
975 493640   Bowl-Fuel
976 694395   Primer-Carburetor
1036    - - - 

  Label-Emissions (Available


  From any Briggs & Stratton


Authorized 

Dealer)

1058 277039 

  Operator’s Manual

1059 692311 

  Kit-Screw/Washer


(Fuel 

Tank)

1095 498528 

  Gasket Set-Valve

1210 498144 

  Pulley / Spring Assembly


(Pulley)

1211 498144 

  Pulley / Spring Assembly


(Spring)

1329 126L021025F1 

Replacement Engine

1330 270962 

  Repair Manual

- - 

398067 

  Spark Arrester


  (available accessory)

Included in Carburetor Overhaul Kit,


Key Number 121

• 

Included in Engine Gasket Set,


Key Number 358

Included in Valve Gasket Set,


Key Number 1095

NOTE: All component dimensions given in U.S.
            inches.                        1 inch = 25.4 mm

Summary of Contents for 944.360040

Page 1: ...l No 944 360040 CAUTION Read and follow all Safety Rules and Instructions before operating this equipment Owner s Manual ROTARY LAWN MOWER 625 Series Briggs Stratton Engine Power Propelled 22 Multi Cut Sears Canada Inc Toronto Ontario M5B 2B8 ...

Page 2: ...op machine if anyone enters the area Do not operate the mower when barefoot or wearing open sandals Always wear substantial foot wear Do not pull mower backwards unless absolutely necessary Always look down and behind before and while moving backwards Never direct discharged material toward anyone Avoid discharging material against a wall or obstruction Material may richochet back toward the opera...

Page 3: ...entwithaportablecontainer ratherthan from a gasoline dispenser nozzle Keep the nozzle in contact with the rim of the fuel tank or container opening at all times until fueling is complete Do not use a nozzle lock open device Iffuelisspilledonclothing changeclothing immediately Never overfill fuel tank Replace gas cap and tighten securely V GENERAL SERVICE Never run machine inside a closed area Neve...

Page 4: ...AIN VALID Sears retains the exclusive right to repair or replace the product or offer a full refund of the purchase price at its sole discretion SUCH REMEDY SHALL BE YOUR SOLE AND EXCLUSIVE REMEDY FOR ANY BREACH OF WARRANTY CUSTOMER RESPONSIBILITIES In additional to complying with all suggested maintenance guidelines and instructions customers obligations shall include but shall not be limited to ...

Page 5: ...rque 35 40 ft lbs The model and serial numbers will be found on a decal on the rear of the lawn mower housing Record both serial number and date of purchase in space provided above PRODUCT SPECIFICATIONS LIST OF APPLICABLE WARRANTY PERIODS The following list contains the applicable Warranty Period for your Craftsman product and is based on a combination of the type of product or component and the ...

Page 6: ...e carefully so as not to pinch or damage control cables 1 Raise lower handle section to operating positionandalignholeinhandlewithone of three height positioning holes 2 Insert handle bolt through handle and bracket and secure with knob 3 Repeat for opposite side of handle 4 Remove protective padding raise up per handle section into place on lower handle and tighten both handle knobs 5 Remove any ...

Page 7: ...HOUT OIL OR GASOLINE in the engine Operator presence control bar Handle knobs MEETS CPSC SAFETY REQUIREMENTS Sears rotary walk behind power lawn mowers conform to the safety standards of the American National Standards Institute and the U S Consumer Product Safety Com mission WARNING The blade turns when the engine is running Operator presence control bar must be held down to the handle to start t...

Page 8: ...r DRIVE CONTROL Self propelling is controlled by holding the operator presence control bar down to the handle and pulling either drive control lever rearward to the handle The further toward the handle a lever is pulled the faster the unit will travel Forward motion will stop when either the operator presence control bar or a drive control lever are released To stop forward motion without stopping...

Page 9: ...rass catcher installed 2 Mulcher door closed and locked FOR SIDE DISCHARGING 1 Rear door closed 2 Discharge deflector installed CAUTION Do not run your lawn mow er without rear door closed or approved grass catcher in place Never attempt to operate the lawn mower with the rear door removed or propped open TO EMPTY GRASS CATCHER 1 Lift up on grass catcher using the frame handle 2 Remove grass catch...

Page 10: ...l to use see ENGINE in the Maintenance section of this manual CAUTION DO NOT overfill engine with oil or it will smoke heavily from the muffler on startup 1 Be sure lawnmower is level 2 Remove oil dipstick from oil fill spout 3 You receive a container of oil with the unit Slowly pour the entire container down the oil fill spout into the engine NOTE Initial oil fill requires only 18 oz due to resid...

Page 11: ...For extremely heavy grass reduce your width of cut by overlapping previously cut path and mow slowly Certain types of grass and grass conditions may require that an area be mulched a second time to completely hide the clippings When doing a sec ond cut mow across perpendicular to the first cut path Change your cutting pattern from week to week Mow north to south one week then change to east to wes...

Page 12: ...pe lubricant sparingly Wheel adjuster on each wheel Engine oil Rear door hinge Handle bracket mounting pins Mulcher door hinge pin 21 CRAFTSMAN ROTARY LAWN MOWER MODEL NUMBER 944 360040 NOTE All component dimensions given in U S inches 1 inch 25 4 mm IMPORTANT Use only Original Equipment Manufacturer O E M replacement parts Failure to do so could be hazardous damage your lawn mower and void your w...

Page 13: ... adapter and check the key inside hub of blade adapter The key must be in good condition to work properly Replace adapter if damaged TO REPLACE BLADE 1 Position the blade adapter on the en gine crankshaft Be sure key in adapter and crankshaft keyway are aligned 2 Position blade on the blade adapter IMPORTANT To ensure proper assembly center hole in blade must align with star on blade adapter 3 Be ...

Page 14: ...nning low on oil Change the oil after every 25 hours of operation or at least once a year if the lawn mower is not used for 25 hours in one year Check the crankcase oil level before starting the engine and after each five 5 hours of continuous use Tighten oil plug securely each time you check the oil level Container TEMPERATURE RANGE ANTICIPATED BEFORE NEXT OIL CHANGE SAE VISCOSITY GRADES 20 0 30 ...

Page 15: ... or broken 7 Tighten blade bolt or blade adapter replace blade adapter 8 Control bar in released 8 Depress control bar to position handle 9 Control bar defective 9 Replace control bar 10 Fuel valve lever if so 10 Turn fuel valve lever equipped in OFF position to the ON position 11 Weak battery if equipped 11 Charge battery 12 Disconnected battery 12 Connect battery to engine connector if equipped ...

Page 16: ...ualified service center for repair and or adjustment IMPORTANT Never tamper with the engine governor which is factory set for proper engine speed Overspeeding the engine above the factory high speed setting can be dangerous If you think the engine governed high speed needs adjusting contact a Sears or other qualified service center which has proper equipment and experience to make any necessary ad...

Reviews: