3
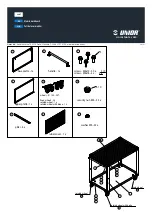
Pre-Assembly
Warranty
CRAFTSMAN ONE YEAR LIMITED WARRANTY
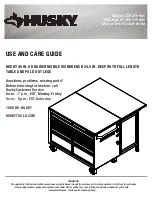
MAXIMUM WEIGHT CAPACITIES
Top storage tray
50 lbs.
Wooden top
300 lbs.
Drawer
100 lbs.
Bottom tray
350 lbs.
Total capacity
800 lbs.
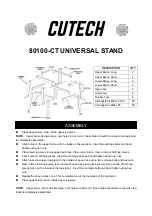
HARDWARE INCLUDED
NOTE:
Hardware not shown to actual size.
Part Description
Quantity
AA
Screw ST6.3x12
56 (+2 extra)
BB
Bolt M4x10
2
CC
Hex nut M4
2
DD
Bolt M6x12
6
EE
Hex nut M6
6
FF
Pan head tapping screw ST4.2X12
6
GG
Pan head tapping screw ST4X8
2
FOR ONE YEAR from the date of sale this product is warranted against defects in material or workmanship.
WITH PROOF OF SALE a defective part will be replaced free of charge. If a replacement part is unavailable, the product will be replaced with
one of equal value.
For warranty coverage details to obtain free replacement, visit the web page: www. craftsman. com/ warranty
This warranty does not apply to a product that is damaged or altered through transportation, misuse, abuse,
corrosion, accident, neglect modification or mishandling, nor does coverage apply if the product is ever attached to a moving vehicle.
This warranty is void if this product is ever used while providing commercial services or if rented to another person.
This warranty gives you specific legal rights, and you may also have other rights which vary from state to state.
Sears Brands Management Corporation, Hoffman Estates, IL 60179
Phillips screwdriver
#2 and # 3
7mm for NUT M4
10mm for NUT M6
TOOLS REQUIRED