background image

13


OPERATING TIPS

•  To help prevent 

granular

 material from compacting 

and clogging the hopper, avoid unnecessary towing 
when the hopper flow plates are closed.

•  Reduce the flow setting for speeds slower than 
 

3 M.P.H. and increase the setting for higher speeds.

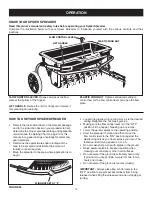
•  To avoid misses or striping, overlap the previous 

wheel tracks by approximately 5" to 6".

FIGURE 25

MAINTENANCE

Spike points are sharp. Exercise caution 
when handling or working near spike disks.

Service Dates

  Check for loose fasteners 


X

  Lubrication 


X

  Cleaning 


X

  MAINTENANCE SCHEDULE
 

Fill in dates as you

  complete regular service.

Bef

ore each use

After each use

Ev

ery y

ear

Bef

ore stor

age

CUSTOMER RESPONSIBILITIES

•  Read and follow the maintenance schedule and the maintenance procedures listed in this section. 

CHECK FOR LOOSE FASTENERS


Before each use make a thorough visual check of 
the spiker spreader for any bolts and nuts which may 
have loosened. Retighten any loose bolts and nuts.

LUBRICATION


Apply a few drops of oil to wheels and to plastic 
bearings in spike disks and at end of spike axle.

•  Remove chain cover, clean and oil drive chain.

CLEANING

•  Always empty spiker spreader after each use, storing 

leftover material in it's original bag.


Wash the spiker spreader and dry thoroughly after 
each use.

• 

For easiest application, first apply material across 
both ends of the area. Two or three passes on each 
end are sufficient. Then apply material back and forth 
as shown. Use the end areas for turning around, 
shutting off the spreader as you enter the end areas 
and turning the spreader on again as your leave the 
end areas for your next pass. See figure 25.

•  If lawn is odd shaped, spread a border around the 

edges and then spread between the border.


Be careful when spreading around ornamental plants 
because weed control chemicals can damage these 
plants.

•  Empty the spiker spreader, storing leftover material in 

it's original bag.

•  Apply a light coat of oil on exposed metal to help 

prevent rust.

STORAGE


Wash the spiker spreader and dry thoroughly before 
storing.

•  Store in a clean, dry area.


Flow Rate Setting

 MATERIAL 

TYPE 

At 3 M.P.H.

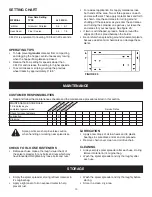
SETTING CHART

 Fertilizer 

Granular / Pelleted 

5-6  /  6-7

 Grass Seed 

Fine / Coarse 

5-6  /  7-8

3 M.P.H. is equivalent to traveling 100 feet in 23 seconds.

Summary of Contents for 486.24331

Page 1: ...ebuck and Co Hoffman Estates IL 60179 U S A www sears com craftsman CAUTION Before using this product read this manual and follow all Safety Rules and Operating Instructions Safety Assembly Operation Maintenance Parts STOP DO NOT RETURN TO STORE For Missing Parts or Assembly Questions Call 1 866 576 8388 ...

Page 2: ...rchase and keep in a safe place for future reference WARRANTY ONE YEAR FULL WARRANTY When operated and maintained according to the instructions supplied with it if this Spiker Spreader fails due to a defect in material or workmanship within one year from the date of purchase call 1 800 4 MY HOME to arrange for free repair or replacement if repair proves impossible If this product is used for comme...

Page 3: ...ructions Read the chemical label for instructions and cautions for handling and applying chemicals Wear eye and hand protection when handling and using lawn chemicals Always begin with the transmission in first low gear and gradually increase speed as conditions permit Maximum towing speed 10 M P H Do not drive too close to a creek or ditch and be alert for holes and other hazards which could caus...

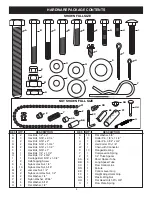
Page 4: ...g Screw K 6 Nylock Hex Nut 1 4 L 10 Nylock Hex Nut 5 16 M 2 Jam Hex Nut 1 2 N 2 Nylock Jam Hex Nut 1 2 O 2 Flat Washer 1 4 P 2 Nylon Washer 21 64 Q 4 Flat Washer 5 16 R 4 Flat Washer 1 2 REF QTY DESCRIPTION S 10 Flat Washer 5 8 T 3 Cotter Pin 1 8 x 1 1 2 U 1 Cotter Pin 3 32 x 3 4 V 1 Hair Cotter Pin 1 8 W 1 Chain with Connector X 13 Flanged Bearing Y 1 Compression Spring Z 1 1 4 Thick Spacer AA 2 ...

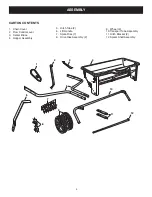
Page 5: ... Cover 2 Flow Control Lever 3 Center Brace 4 Hopper Assembly 5 Hitch Tube 2 6 Lift Handle 7 Spike Disk 7 8 Drive Disk Assembly 2 9 Wheel 2 10 Transport Tube Assembly 11 Hitch Bracket 2 12 Spiker Shaft Assembly 1 2 3 8 12 10 9 4 6 7 5 11 ...

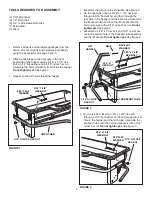
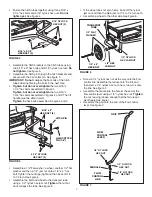
Page 6: ...EX BOLT FIGURE 2 FIGURE 3 5 16 x 1 3 4 HEX BOLT 5 16 FLAT WASHER 5 16 NYLOCK HEX NUT On the left side insert a 5 16 x 1 3 4 hex bolt through a 5 16 flat washer and then through the rear hole in the hopper and the hitch tube Assemble the transport tube onto the bolt and secure it with a 5 16 nylock hex nut Do not tighten yet See figure 3 TOOLS REQUIRED FOR ASSEMBLY 2 7 16 Wrenches 2 1 2 Wrenches 2 ...

Page 7: ...nto the hole at the end of the flow control lever using a 1 4 nylock hex nut Tighten the nut leaving it loose enough that the ferrule can pivot freely See figure 7 Assemble the grip onto the end of the flow control lever See figure 7 FLOW CONTROL LINK FERRULE GRIP FLOW CONTROL LEVER 1 4 NYLOCK HEX NUT 1 4 NYLOCK HEX NUT 1 4 NYLOCK HEX NUT Assemble the hitch brackets to the hitch tubes using two 5 ...

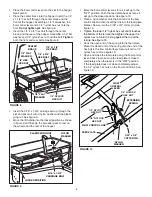
Page 8: ...he front and rear bolts See figure 8 FIGURE 10 EXTENSION SPRING NYLON WASHER 3 32 x 3 4 COTTER PIN FLOW CONTROL LEVER FLOW CONTROL LINK FEED PLATE 1 4 NYLOCK HEX NUT 1 4 NYLOCK HEX NUT 1 4 NYLOCK HEX NUT Move the flow control lever as far as it will go to the OFF position Push the feed plate back as far as it will go to the closed position See figure 10 Place a nylon washer onto the bent end of th...

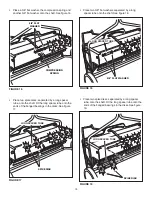
Page 9: ...acer tube a drive disk a 5 8 flat washer another drive disk and a second 5 8 flat washer onto the shaft Fit the short spacer tube onto the flanged bearing in the end plate See figure 14 FIGURE 14 FIGURE 15 IMPORTANT When assembling the spike disks be sure they face in the direction shown in the instructions Place two spike disks separated by a long spacer tube onto the shaft Fit the long spacer tu...

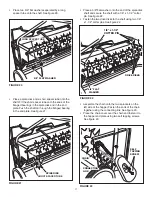
Page 10: ...t Fit the long spacer tube onto the ends of the flanged bearings in the disks See figure 17 FIGURE 16 FIGURE 17 Place two 5 8 flat washers separated by a long spacer tube onto the shaft See figure 18 FIGURE 18 5 8 FLAT WASHER LONG SPACER TUBE SPIKE DISK LONG SPACER TUBE FIGURE 19 Place two spike disks separated by a long spacer tube onto the shaft Fit the long spacer tube onto the ends of the flan...

Page 11: ...IGURE 21 FIGURE 23 Place a 5 8 flat washer onto the end of the spike disk shaft and secure the shaft with a 1 8 x 1 1 2 cotter pin See figure 22 Fasten the two drive disks to the shaft using two 1 8 x 1 1 2 cotter pins See figure 22 5 8 FLAT WASHER 1 8 x 1 1 2 COTTER PIN DRIVE DISKS FIGURE 22 Assemble the chain onto the two sprockets on the left side of the hopper Fasten the ends of the chain toge...

Page 12: ...ired Move the spreader to the area where application is to begin FIGURE 24 FLOW CONTROL LEVER PLASTIC WING NUT LIFT HANDLE Loosen the plastic wing nut and move it to the desired setting Retighten the nut See figure 24 Making sure the flow control lever is in the OFF position fill the hopper breaking up any lumps Lower the aerator spikes to the operating position Start the spreader in motion and th...

Page 13: ... in spike disks and at end of spike axle Remove chain cover clean and oil drive chain CLEANING Always empty spiker spreader after each use storing leftover material in it s original bag Wash the spiker spreader and dry thoroughly after each use For easiest application first apply material across both ends of the area Two or three passes on each end are sufficient Then apply material back and forth...

Page 14: ...2 3 5 6 10 16 19 10 11 63 12 12 62 13 21 14 13 7 8 8 9 13 17 49 50 51 52 53 54 55 18 28 29 33 35 36 37 38 39 40 41 42 30 31 22 23 25 23 26 27 42 42 43 43 44 44 46 47 48 45 56 57 57 58 59 58 58 15 59 43 34 43 54 43 58 59 F B 42 32 24 C 20 60 61 4 59 59 59 ...

Page 15: ... 47960 1 Chain with Connector 31 43848 1 Grip Control Arm 187 x 75 32 43943 1 Grip Height Adjustment 32 38 33 47959 1 Link Flow Control 34 47969 1 Ferrule 5 16 Thread x 1 4 Hole 35 43224 3 Bolt Hex 5 16 x 2 1 4 36 44180 2 Bolt Hex 5 16 x 2 37 43085 2 Bolt Hex 5 16 x 1 1 2 38 43084 2 Bolt Hex 5 16 x 1 3 4 39 43063 1 Bolt Hex 5 16 x 1 40 44731 2 Screw Self Tapping 1 4 x 1 41 43012 1 Bolt Hex 1 4 20 ...

Page 16: ...iances and items like garage door openers and water heaters 1 800 4 MY HOME 1 800 469 4663 Call anytime day or night U S A and Canada www sears com www sears ca For expert home solutions advice www managemyhome com Our Home For repair of carry in items like vacuums lawn equipment and electronics call or go on line for the location of your nearest Sears Parts Repair Service Center 1 800 488 1222 U ...

Reviews: