background image

5. Fan Assembly. (cont.) 

page 6

hanging bracket tab

hanging ball slot

6. Wiring.

WARNING

: Turn off circuit breakers to current 

fixture from breaker panel and be sure switch is 
turned to the OFF position.

CAUTION

Be sure outlet box is properly grounded 

and that a ground wire (

GREEN

 or Bare) is present.

Make sure all electrical connections comply with 
Local Codes or Ordinances and the National 
Electrical Code. If you are unfamiliar with electrical 
wiring or if the house/building wires are different 
colors than those referred to in the diagram to the 
right, please use a qualified electrician.

Wire the receiver with wire connectors provided 
as shown in diagram at right.

Tip:

 While you are wiring, keep in mind that wires 

must not obstruct receiver from sliding into 
hanging bracket.

* Wrap each wire connector separately with 
electrical tape as an extra safety measure.

Insert receiver into hanging bracket (flat side up) 
and gently push taped wire connectors into 
outlet box. Allow antenna from remote control 
receiver to hang out of the hanging bracket.

["Wiring"  continued on next page.]

black

black

black

from receiver

from fan

from ceiling

from receiver

white

white

blue

blue

black supply wire

ground (green

or bare)

white supply wire

white

AC IN N

AC IN L

receiver

black

whit

e

With the hanging bracket secured to the outlet 
box and able to support the fan, you are now 
ready to hang your fan. Grab the fan firmly with 
two hands. Slide downrod through opening in 
hanging bracket and let hanging ball rest on the 
hanging bracket. Turn the hanging ball slot until it 
lines up with the hanging bracket tab.

WARNING

: Failure to align slot in hanging ball 

with tab in hanging bracket may result in serious 
injury or death.

Tip

: Seek the help of another person to hold the 

stepladder in place and to help lift the fan up to 
you once you are set on the ladder.

*

antenna

ground
(green or bare)

(wiring for receiver)

Summary of Contents for Cavalier CAV52

Page 1: ...pport Assembly pg 8 Blade Assembly pg 8 Light Kit Assembly pg 9 Handheld Remote Control Assembly pg 10 Automated Learning Process Activating Code pg 11 Remote Control Operation pg 11 Testing Your Fan pg 11 Troubleshooting pg 12 Warranty pg 12 Parts Replacement pg 12 net weight of fan 29 7 lb 13 47 kg page 1 PRINTED IN CHINA READ THESE INSTRUCTIONS AND SAVE THEM FOR FUTURE USE For Model CAV52 Caval...

Page 2: ...th the grounded conductor and the equipment grounding conductor on opposite sides of the outlet box WARNING To reduce the risk of fire or electrical shock do not use this fan with any solid state speed control device or control fan speed with a full range dimmer switch Using a full range dimmer switch to control fan speed will cause a loud humming noise from fan 8 Do not operate the reverse switch...

Page 3: ...iver 1 piece d rod support cap 1 piece e rod 3 pieces f downrod and hanging ball with pin and clip 1 piece g wall control 2 pieces h rod support 1 piece i plate 1 piece j remote control cover 1 piece k faceplate 3 pieces l yoke cover 1 piece m motor housing 1 piece n light kit fitter 1 piece o finial plate 1 piece p finial 1 piece q glass shade 1 piece r blade 5 pieces s hardware packs page 3 IMPO...

Page 4: ...ker panel and be sure operating light switch is turned to the OFF position WARNING Failure to disconnect power supply prior to installation may result in serious injury Remove existing fixture WARNING When using an existing outlet box be sure the outlet box is securely attached to the building structure and can support the full weight of the fan Ensure the outlet box is clearly marked Suitable for...

Page 5: ...nut at top of motor housing Remove pin and clip from downrod if you have not already done so Slide downrod through canopy rod support cap rod support loosen rod support set screw to prevent scratching the downrod finish and then the yoke cover Thread electrical wires through downrod and pull extra wire slack from the upper end of the downrod Thread downrod into the motor housing yoke until holes f...

Page 6: ...tra safety measure Insert receiver into hanging bracket flat side up and gently push taped wire connectors into outlet box Allow antenna from remote control receiver to hang out of the hanging bracket Wiring continued on next page black black black from receiver from fan from ceiling from receiver white white blue blue black supply wire ground green or bare white supply wire white AC IN N AC IN L ...

Page 7: ...gram at right Wrap each wire connector separately with electrical tape as an extra safety measure Gently push wires and taped wire connectors into outlet box Install one 12 volt battery included in wall control IMPORTANT Wall control will not function unless battery is installed Since this fan comes with an incandescent bulb the dimmer switch labeled DIM and ON has been pre set to the ON position ...

Page 8: ...th washers from underside of motor housing Tighten screws securely with a Phillips screwdriver Repeat for remaining blades Note Tighten blade arm screws twice a year motor housing blade page 8 blade plate blade attachment screws and washers rod support cap rod support rod support set screw canopy yoke cover rod 8 Rod Support Assembly Hook one end of rod to loop on motor housing Adjust rod support ...

Page 9: ...stall screw that was previously removed and then securely tighten all 3 screws Install 3 medium base 6 5 watt LED bulbs included Important When replacing bulbs please allow bulbs and glass shade to cool down before touching Align hole in glass shade with threaded rod on light kit fitter and push up gently until threaded rod comes through hole Align hole in center of finial plate with threaded rod ...

Page 10: ...e control cover and press together firmly Place wall control into BOTTOM part of remote control cover aligning posts in top of remote control cover with post holes in the bottom Refer to diagram 3 NOTE Make sure to align narrower ends of remote control cover before closing Squeeze top and bottom of remote control cover together until you hear a click at each end indicating that the remote control ...

Page 11: ...lding it down for1 second Test fan speeds with the different fan speed buttons If the wall and or handheld remote control operates all of the functions of the fan battery has been installed correctly If the wall and or handheld remote control do does not operate all of the fan light functions refer to Troubleshooting section to solve any issues before contacting Customer Service Turn fan completel...

Page 12: ...g kit in one of the hardware packs If no blade balancing kit is provided please call Customer Support 1 800 486 4892 to request one 2 Check to be sure set screw s on motor housing yoke is are tightened securely 3 Check to be sure set screw on hanging ball is tightened securely page 12 JMLI1706 CRAFTMADE LIFETIME LIMITED WARRANTY CRAFTMADE warrants this fan to the original household purchaser for i...

Page 13: ... 8 Colocación de las aspas Pág 8 Instalación del juego de luz Pág 9 Ensamblaje del control remoto de mano Pág 10 Proceso de aprendizaje automático El activar el código Pág 11 Funcionamiento del control remoto Pág 11 Verificación del funcionamiento del ventilador Pág 11 Localización de fallas Pág 12 Garantía Pág 12 Piezas de repuesto Pág 12 IMPRESO EN CHINA LEER ESTAS INSTRUCCIONES Y GUARDARLAS PAR...

Page 14: ...ués de haber terminado todas las conexiones eléctricas los conductores empalmados deben ser volteados para arriba y colocados cuidadosamente dentro de la caja de salida Los alambres se deben de separar con el conductor a tierra a un lado y el conductor a tierra del equipo al lado opuesto ADVERTENCIA para reducir el riesgo de incendio o un choque eléctrico no usar el ventilador con ningún control d...

Page 15: ...sar ese agujero al colocar el tornillo de fijación Introducir el perno de tope en la parte de arriba del tubo más largo y subir la bola que sirve para colgar Asegurarse de que el perno de tope se ponga en línea con las ranuras dentro de la bola Apretar bien el tornillo de fijación Sugerencia para preparar los cables para pasarlos por el tubo poner un pedacito de cinta aisladora en la punta de los ...

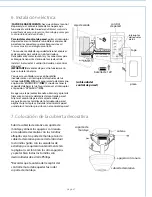
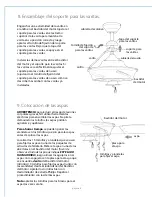
Page 16: ...nen cinta dentro de la caja de salida Dejar que la antena se quede fuera del soporte de montaje parte saliente del soporte de montaje ranura en la bola que sirve para colgar negro negro negro negro del receptor del techo del receptor blanco blanco blanco azul azul alambre conductor negro toma de tierra verde o pelada blanco Entrada CA N Entrada CA L receptor alambre conductor blanco del ventilador...

Page 17: ...a cable provistos así como se muestra en el diagrama al lado Como una medida de seguridad adicional envolver cada conector para cable con cinta aisladora Delicadamente meter los cables y los conectores para cable que tienen cinta dentro de la caja de salida Instalar 1 batería de 12 voltios incluida en el control de pared IMPORTANTE el control de pared no funcionará sin que se instale la batería Ya...

Page 18: ...on las varitas ya instaladas anillo placa para el aspa tornillos y arandelas para fijar el aspa ADVERTENCIA para reducir el riesgo de lesiones corporales graves NO utilizar herramientas eléctricas para ensamblar las aspas Si aprieta demasiado los tornillos las aspas podrían agrietarse y quebrarse Para ahorrar tiempo se pueden poner las arandelas en los tornillos que son para las aspas antes de col...

Page 19: ...el conectador para el juego de luz con los tornillos aflojados en la placa de conexión girar el conectador para el juego de luz para cerrarlo Volver a introducir el tornillo que se quitó anteriormente y apretar bien los 3 tornillos Instalar 3 bombillas LED de base mediana de 6 5 vatios incluidas Importante Cuando necesite reemplazar las bombillas dejar que se enfríen las bombillas y la pantalla de...

Page 20: ...s postes en la parte superior de la cubierta del control remoto con los agujeros para los postes en la parte inferior Referirse al diagrama 3 NOTA asegurarse de alinear los extremos más angostos de la cubierta del control remoto antes de cerrarla Apretar la parte superior e inferior de la cubierta del control remoto hasta que se oiga un clic en cada extremo lo cual indicará que se haya cerrado com...

Page 21: ... más de 1 segundo Verificar las velocidades del ventilador con los diferentes botones de velocidad Si el control de pared control remoto de mano maneja todas las funciones de ventilador y luz se ha instalado bien la batería Si el control de pared y o el control remoto de mano no controla n todas las funciones del ventilador la luz favor de referirse a la sección Localización de fallas para resolve...

Page 22: ...rse de que las bombillas en la fuente de luz no sumen más de 190W Problema el ventilador se tambalea Soluciones 1 Usar el juego para balancear las aspas incluido en uno de los paquetes de artículos de ferretería Si no se incluye un juego para balancear las aspas llamar al Servicio al cliente 1 800 486 4892 para pedir uno 2 Averiguar que se apretó apretaron bien el los tornillo s de fijación en el ...

Reviews: