background image


23 


2.


After moving the cursor up or down and selecting the files, left-click to enter the playback 
menu. It will play the video from a single channel in full-screen view. 

3.


If the “RECORD TIME” section is marked as “ON” under the “VIDEO DISPLAY” section, 
it will show the date/time that the video was recorded when playing back recorded file

if it 

is marked as “OFF,” it will not display the time. 

4.


During playback, press “

►►▌

”to play the video in slow-motion; press “

►►

” to fast 

forward; press “

◄◄

” to rewind; press”

▌►

” to pause and run frame-by-frame playback; 

press” “to exit from playback and return to the former menu. 

5.


When the selected files finish, the screen will return to the file list menu.   


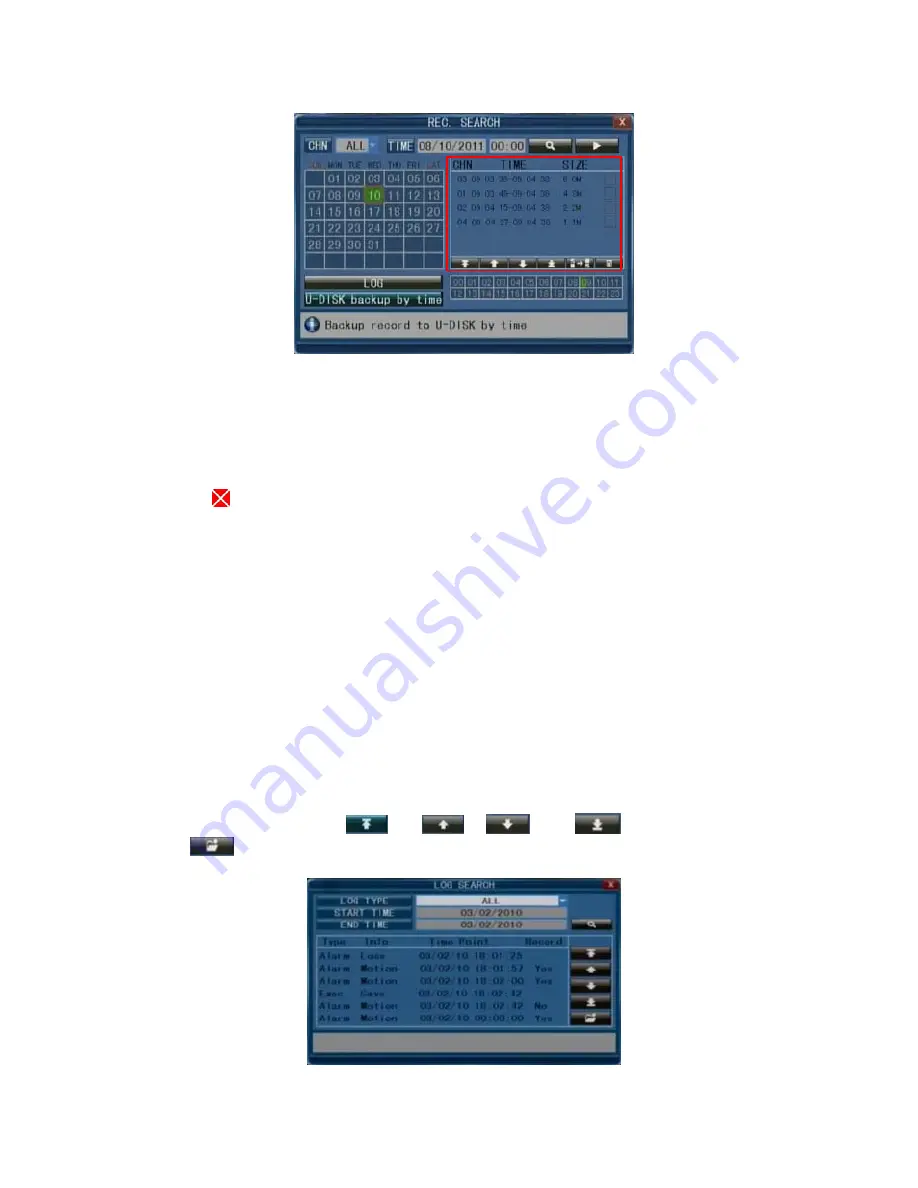
LOG SEARCH 


Move the cursor over the “

” icon(the icon will be highlighted when selected) and left-click to 

enter the “REC. SEARCH” setting menu, or press the “

/

” button to enter the settings menu, 

move the cursor over the “LOG” option and press the “ENTER” button or left-click to access 
the Log Search option(as shown in the following figures). 
 
At the top of the “Log Search” page are the following filters to facilitate locating the desired 
file(s): 

“LOG TYPE”: 

Choose from the following options: “All”, ”ALARM,” and “OPERATION.” 

“STARTING TIME”: 

Set the starting time of the log being searched for. 

“END TIME”: 

Set ending time of the log being searched for. 

 
Click the “Search” button after setting the log time and type, and the system will display the 
selected log in the list. Click “

”,  “

,” “

” and “

” to navigate pages, and 

click “

” to save the log list to a USB drive. 


Summary of Contents for 16 CH

Page 1: ......

Page 2: ...igned to provide reasonable protection against harmful interference when the device is operated in a commercial environment This device generates uses and can transmit radio frequency energy and if not installed and used in accordance with the instructions in the user manual may cause harmful interference with radio communications FCC Caution To ensure continued compliance use only shielded interf...

Page 3: ... modification of the product by the user Any problems or consequential inconvenience loss or damage caused by connecting this product to devices of the third parties Any claim or action for damages brought by any photogenic subject be it a person or an organization due to invasion of privacy whereby the surveillance picture and or saved data becomes public or is used for purposes other than survei...

Page 4: ...o not install the unit in an area where condensation occurs Do not operate with wet hands Take immediate action if the appliance becomes wet Turn the power off and refer servicing to qualified service personnel as moisture may damage the appliance and cause electric shock Do not use strong or abrasive detergents when cleaning the body of the device If dirt is difficult to remove use a mild deterge...

Page 5: ...y form or by any means transcribed translated into any language or computer language transformed in any other way stored in a retrieval system or transmitted in any form or by any means electronic mechanical recording photocopying or otherwise without the prior written permission from the owner ...

Page 6: ...DDs 16 3 5 3 PTZ Control Connections optional 17 4 Getting Started and the Main Screen 18 4 1 The Main Screen 18 4 1 1 Displaying a Single Channel 18 4 1 2 Status Bar 19 4 1 3 Login DVR 19 4 1 4 Tool Bar Please take actual machine model as quasi 19 4 2 Tool Bar Menu Options 21 4 2 1 System Configuration 21 4 2 2 Manual Recording 21 4 2 3 Video Playback 21 4 2 4 Video Backup 24 4 2 5 Playing Backed...

Page 7: ...up 43 5 5 5 Mobile Setup 44 5 5 6 IP Access Setup 45 5 5 7 ESMS Settings 45 5 5 8 FTP Settings 46 5 5 9 Other Settings 46 5 6 Alarm 46 5 6 1 OUTPUT 46 5 6 2 DURATION 46 5 6 3 BUZZER 46 5 6 4 PRERECORD 47 5 6 5 EXCEPTION ALARM 47 5 6 6 I O ALARM 47 5 6 7 Motion Detection 48 5 7 PTZ optional 49 5 7 1 PTZ Channel 50 5 7 2 PTZ Protocol 50 5 7 3 PTZ Baud Rate 50 5 7 4 PTZ Data Bit 50 5 7 5 PTZ Stop Bit...

Page 8: ... Mobile 85 Troubleshooting 93 Appendix 1 Setting up Internet Connections for Remote Access 96 Appendix 2 DVR Compatible Hard Disk Drives 97 Appendix 3 DVR Compatible Portable USB DVD Recorders 97 Appendix 4 DVR Compatible Portable SATA DVD Recorders 98 Appendix 5 DVR Compatible Portable DVD Disks 98 Appendix 6 DVR Compatible Portable Wireless Mouse 99 Appendix 7 Accessing the DVR via Mozilla Firef...

Page 9: ...TSC 480FPS CIF 240 FPS HD1 120 FPS D1 Recording Modes Power on Auto Record Scheduled Record Normal Recording Motion Detection Sensor Trigger Manual Recording HDD Interface SATA Interface support 2TB HDD 1 Up to 2TB for each SATA interface 1U SIZE HDD 1 DVD RW non 1U SIZE HDD 1 Up to 2TB for each SATA interface HDD 1 DVD RW or HDD 2 Network Protocol TCP IP DHCP DDNS PPPOE E Mail Network Functions L...

Page 10: ...ies as well as how to use the device as described in this instruction manual For any questions that this guide does not answer please contact a local vendor or a certified specialist In this manual ch and CH are used as abbreviations for channel so for example 4 ch means 4 channel i e a 4 channel DVR model and 16 ch means 16 channel 2 Contents of the Package Digital Video Record DVR User manual In...

Page 11: ...onnection to the power supply recording status and net status Menu Press this button to access the toolbar hide the toolbar enter or exit from the menu and enter or exit sub menus Rewind Press this button to rewind the video during playback Play Pause Pressing this button opens the video search function and the playback menu When the playback mode is activated press this button to play pause playb...

Page 12: ...t channels between Channels 10 16 For example if you want to display Channel 12 in full screen mode press button and button 2 then Channel 12 will be displayed full screen NOTE On live view press the button the button or the numerical button 10 times when there is no toolbar and this will switch the main menu between CVBS video output and VGA video output 3 2 Back Panel The following are diagrams ...

Page 13: ...9 1 8 CH NON 1U 7 1 17 3 9 1 6 5 2 4 16 CH 1 USB connectors Use these USB ports to connect the mouse and backup devices flash drives USB DVD recorders to the DVR Note On some models the USB port is on the side panel or on the front panel ...

Page 14: ...NNELS 1 4 16ch ALARM IN CHANNELS 1 16 optional For connecting to external sensor devices Each alarm has one input pin on the terminal block of the rear panel Connect the positive output pins of the device to the input slots Alarm In on the DVR terminal block 4 ch 8 ch 1 4 16ch 1 16 Connect the ground output pins of the device to the DVR ground slots G Multiple devices can be connected to one groun...

Page 15: ...enabled press this button to log out of the system Numerical Buttons Using these buttons you can choose to display video on your monitor either as a full screen view of each of the cameras individually Channels 1 through 9 or you can press the button in combination with other buttons to select channels between Channels 10 16 For example if you want to display Channel 12 in full screen mode press b...

Page 16: ...rface left clicking can control the fast forward function the rewind function the slow motion function frame by frame playback function the normal play function and can stop any of these processes or be used to exit from a mode or menu Left clicking can be used to access the color control bar the volume control bar and the screen control bar From the main menu sub menus or playback view left click...

Page 17: ...arm 4ch 8ch 16ch Ethernet For remote access to the video images from your cameras via LAN or Internet connect a standard RJ 45 twisted pair Ethernet cable to the Ethernet port USB Use this port for connecting the mouse USB flash drives USB portable HDDs USB portable DVD Recorders to the DVR for the list of compatible HDDs see Appendix 2 for the list of compatible DVD Recorders see Appendix 3 The U...

Page 18: ...per wiring and installation Connect the power cable to the appropriate socket and connect the data cables to their corresponding ports For a list of HDDs tested and approved for compatibility with LB Tech DVRs see Appendix 2 3 5 3 PTZ Control Connections optional Connect the PTZ point tilt and zoom control jacks to the corresponding RS485 A and B interfaces on the rear panel For a detailed descrip...

Page 19: ...hen select HDD management and lastly select format If the HDD is already installed the default setting is for the DVR to start recording and a red dot icon on the screen will indicate that it is functioning normally 4 1 The Main Screen The standard layout is four or depending on the device nine or sixteen windows evenly distributed over the screen From the main screen you can access menu options a...

Page 20: ... by pressing the Menu button or right clicking anywhere on the screen System time Approximate Remaining Hours of HDD recording 4 1 3 Login DVR In live view press the button twice or double click the right key of the mouse in live view to display the tool bar The login window will appear if the password is enabled You can log in from the LOGIN window as shown in the adjacent figure Select a user na...

Page 21: ...cons will have no effect on DVR activity until a user enters the password to disable the keylock PTZ Opens the PTZ control menu optional Pressing these keys switches split modes between quad view and views with six eight nine and sixteen windows the number of windows depends on the model of the DVR being used AUTO SEQUENCE Click AUTO SEQUENCE on the toolbar to enable auto sequencing this will disp...

Page 22: ...ption of these settings Note In order to for changes to sub menu settings to take effect it is necessary to press Changes to the sub menu settings will not be saved if you do not press and exit the sub menu immediately afterward A special feature of this DVR is that an explanation of each menu item will be displayed automatically when the cursor is moved over it 4 2 2 Manual Recording There are th...

Page 23: ...This option will show all the recordings in a given month A green background on the calendar indicates normal recording a red background indicates alarm recording and a gray background indicates that there was no recording Click any date in this frame to search by the recording status of that day and the search results will be shown in the date frame DATE This option will show all the recordings a...

Page 24: ...eturn to the file list menu LOG SEARCH Move the cursor over the icon the icon will be highlighted when selected and left click to enter the REC SEARCH setting menu or press the button to enter the settings menu move the cursor over the LOG option and press the ENTER button or left click to access the Log Search option as shown in the following figures At the top of the Log Search page are the foll...

Page 25: ...rward the available speeds are 2x 4x 8x 16x 32x and 64x Ezoom While the video is playing normally click this icon to enter zoom mode and then left click and drag the cursor to select the area to be magnified Right click to exit Volume control 4 2 4 Video Backup Backup of videos can be initiated from the same dialog window as the playback function You can use USB devices for backup by inserting a U...

Page 26: ... to access the U DISK backup by time search option as shown in the following figure Note 1 If the backup device being used does not have enough free space to save the file a not enough space warning will appear 2 The USB device can be removed immediately after the backup is complete 3 If the system cannot recognize the connected devices or if none are connected a No USB DISK warning message will a...

Page 27: ...ose the Window Open Capture Play Slow Fast Mute Volume Slide Setting Next Frame 2 Click to open the video recorder in avi or 264 format Select a file and click Open to play the file 3 Click to capture a still picture Then click to enter the Settings menu to set up the path for saving captured images Click Browser to change the path for captured images For example select the folder Desktop and clic...

Page 28: ...face of the DVR Make sure that A a k a the TxD RxD or non inverting pin and B a k a the TxD RxD or inverting pin are matched properly 2 Connect the video line of the speed dome camera to video input of DVR 3 Activate the speed dome camera B Preparation 1 Set the control address of the speed dome camera and select the relevant control protocol 2 Switch the current frame to the corresponding display...

Page 29: ...le values ranging from 0 63 with a speed value of 0 the camera will not rotate IRIS IRIS This regulates the diaphragm FOCUS FOCUS This brings objects into clear focus ZOOM ZOOM Pressing this causes the lens to zoom in and out Magnification can be changed by using the mouse wheel under the current frame MODE There are several scanning modes to choose from Auto scan controls the automatic scanning o...

Page 30: ...make and model of the PTZ camera being used For a detailed explanation of the available options refer to the user manual included with the PTZ camera 4 3 Channel Status Display The following status icons will appear in the upper right corner of each channel frame This indicates that the channel has detected motion while in motion detection mode This indicates that the channel has detected that som...

Page 31: ...screen Record Video System Network Alarm and PTZ optional The following are detailed descriptions of these settings The System tab provides access to the general system settings for the DVR The titles of the menu items are located on the left and the corresponding adjustable or non adjustable values for these items can be found in the fields to the right Users can a Select the values from a list b...

Page 32: ...n more than one window and they can be found by navigating among the windows by clicking 5 2 System Move the cursor to select SYSTEM the tab will be highlighted when selected and press Enter to enter the System menu 5 2 1 Language Use this field to change the language of the DVR menu text and the on screen display 5 2 2 Video System From this field select the system output type that is consistent ...

Page 33: ...following screenshot to the left the starting time is 10 00 00 on Sunday of the first week in January and the ending time is 20 00 00 on Sunday of the second week in February Note It is necessary to click to save the changes after modifying the time and date the changes to DST settings will not be saved if you exit Time setup without clicking 5 2 4 User Management To enter the User Management menu...

Page 34: ...nistrator can delete users by selecting the username of the user account to be deleted and clicking to save the change SET PERMISSION This allows the Administrator to give each user permission to access a unique set of DVR functions That is the Administrator can give a user access to one some or all of the following functions PTZ control Manual Recording Playback Backup System Settings Ezoom Mute ...

Page 35: ...sers The Administrator s username Admin cannot be modified The default password for Admin is 888888 and the default password for User1 is 666666 5 2 5 HDD Hard Disk Drive First click System Settings then click System and then select HDD to enter the HDD Management menu see adjacent figure STATE There are three available statuses OK un format and No Disk If the HDD cannot operate normally including...

Page 36: ...ume optional Click System Settings then click System and select Volume to access the volume control Press or or click the vertical line on the slide bar and drag the cursor to the left or to the right to adjust the volume and click to save the setting 5 2 7 Maintenance To enter the Maintenance menu click System Settings then click System and select Maintenance SYSTEM UPDATE Create a new root direc...

Page 37: ... used to change the settings 5 3 1 Record Channel After clicking the Channel tab users can modify the settings of the camera connected to the selected channel Alternatively users can make the same change or set of changes to the settings of all of the cameras at once To apply the change s to all available channels first select All from the Channel field by pressing the arrow buttons the options in...

Page 38: ... which means the system will record 120 frames per second with all channels running if there are four channels that are all recording Users can set the frame rate from 1 to 30 frames per second for each channel The maximum value of total frames recorded per second with all channels is 240 frames with CIF resolution with 4 ch or 8 ch DVRs and 480 frames with CIF resolution for 16 ch DVRs 5 3 6 Reco...

Page 39: ...en to save it Alternatively left click to drag the frames of the boxes in the schedule timeline where you want to Another way to set up schedules is to create a schedule for one day of the week and then use the FROM and TO dropdown menus and COPY button settings to apply the setting from one day to another day or a series of up to all seven days of the week To do this first create a schedule for o...

Page 40: ...tion keys and cursor can be used to change the settings 5 4 1 Channel Use this field to select a channel to set up or to modify its settings 5 4 2 Name Users can modify the name of the camera for each channel Note that the name of the camera for each channel must not exceed nine Romanized letters or four Chinese characters 5 4 3 Position Naming the location is optional By pressing Enter users can ...

Page 41: ...ntrast and or saturation as appropriate depending on the actual conditions at the location where the camera is installed Press or or click the vertical bar on the slide bar and drag the cursor to the left or right along the slide bar to set color attributes Clicking the DEFAULT button will reset the color attributes to their original values Once the color attributes have been set press to save the...

Page 42: ...use this menu to set up the network DDNS email and mobile phone access to video recorded by the DVR and an IP address 5 5 1 Network After selecting an Internet connection setting such as static DHCP or PPPoE and allocating a port users can access the DVR remotely via the Internet 1 If static allocation has been selected it is necessary to set up an IP address a subnet mask a gateway and a Web port...

Page 43: ...ess In this field enter the IP address of the computer connected to the DVR that is being used to connect it to the Internet PPPOE username and password Enter the username and password provided by the ISP Click and the system will automatically reboot After rebooting the device will save the username and password and set PPPOE as the default network type The IP address will be automatically config...

Page 44: ...ptions are ON and OFF If there is a DDNS server select ON SERVER There are two options 3322 and dyndns HOST NAME In this field enter the name of the host server USER NAME In this field enter the username PASSWORD In this field enter the password 5 5 4 Email Setup Click Email Setup to enter into its sub menu In the Email setup mode refer to its parameter setup shown in the adjacent figure when sett...

Page 45: ...der s email address The email address should be consistent with the server being used That is if the sender s email address is abc gmail com the corresponding server should be smtp gmail com Receiver In this field enter the receiver s email address the email address being used to receive images transmitted from the DVR s motion detection alarm Clear the images received as soon as possible to avoid...

Page 46: ...u IP access The options for IP access settings are disable forbidden and allow access Press to confirm a setting 5 5 7 ESMS Settings Move the cursor to SMS Setting the icon will be highlighted when selected and press Enter to access the SMS settings menu Interval From this field choose the interval of time for sending alarm SMS messages User Name Sensor PWD Open an Internet browser and in the addr...

Page 47: ...e DVR to an Internet browser interface For detailed instructions refer to Appendix 6 5 6 Alarm Move the cursor to ALARM the icon will be highlighted when selected and press Enter to access the alarm settings menu 5 6 1 OUTPUT This function sets the output time for an I O alarm when an alarm is triggered The options are OFF 5s 10s 30s and 60s When the OFF option is chosen the alarm will not be trig...

Page 48: ...d to the DVR and a icon will be displayed in the lower left corner of channel 1 while in live view mode VIDEO LOSS When ON setting has been selected for Video Loss the relevant alarm will be triggered when one or more channels lose video input Note If the buzzer mentioned in Section 5 6 3 and the I O alarm mentioned in Section 5 6 6 are in the OFF setting they will not be triggered by any kind of ...

Page 49: ...tered email address and FTP if it has been triggered by activity detected by the sensor Mobile Alarm indicates that an SMS will be sent to the pre registered phone number when an I O alarm has been triggered Note If the OFF setting is selected for any of the preceding options the relevant alarms and notifications will not take place regardless of activity near the sensor 5 6 7 Motion Detection To ...

Page 50: ...click to save the settings Note Mouse operation Left click and drag the frame to set up the region for motion detection OUTPUT indicates that an alarm will be activated if it has been triggered by motion RECORD indicates that the selected channel will record if it has been triggered by motion BUZZER indicates that the buzzer will sound if it has been triggered by motion Prerecord indicates that th...

Page 51: ...e PTZ parity options are None Odd Even Mark and Space The default setting is None 5 7 7 PTZ Address In this field select the PTZ device ID It must be consistent with the ID of the actual PTZ cameras installed Choose any number from 1 to 255 but note that this is not the same as the number of the channel to which the PTZ camera is connected in the DVR system The changes will take effect after click...

Page 52: ...level by following the following instructions 1 Open the Internet Explorer browser and click the Tools tab located in the bar at the top of the browser from the dropdown menu select Internet Options 2 Click the Security tab in the dialogue box 3 Click Custom level at the bottom of the dialogue box to set the security level Set the appropriate settings for the ActiveX controls and plug ins Find the...

Page 53: ...cus on connecting and setting up the local area network Step 1 Right click on Network Neighborhood and click Properties in the menu to open the Network Connections menu Alternatively if the operating system being used does not have a Network Neighborhood icon enter the Control Panel found in the Start menu then click Network and Internet and select Network and Sharing Center On the Network and Sha...

Page 54: ... refer to Section 5 5 5 Network Setup If the subnet mask and default gateway on DVR are the same as those of the computer then the IP address is most likely in the same network segment However they must not be exactly the same as the ones on the DVR as this will cause IP address conflicts Taking the preceding figure as an example the IP address should be 192 168 0 X where X cannot be 40 or 1 inclu...

Page 55: ...oad the file to the computer as follows The system will automatically enter the GUI as follows Select the English interface from the upper left side Enter the correct password if a password has been enabled The password is the same as the one set in DVR USER ID In this field enter a username The Administrator has all permissions but other users have limited permissions The Administrator can change...

Page 56: ...per left corner of each channel has a normal recording video symbol Click these icons to switch between the single screen quad nine 16 split and full screen options Click on the vertical bars to adjust the volume 6 5 3 Other Operations 1 Select one channel from the preview screen the color of the selected channel s frame will change to blue and double click it for a full screen display of the sele...

Page 57: ...ll or disconnect all to quickly open or close all windows 6 5 4 Replay Click REPLAY to enter the playback interface To search for a recording by date click calendar in the upper right corner and use and to set the month of the video being searched for click REFRESH located just below the calendar to display the recording information of current month ...

Page 58: ...ouble click one of the listed recorded videos or select one of the listed recorded videos and then click PLAY to begin playback The file icon will change to Using this button users can download files to their computers and save them to a HDD for backup or later viewing The downloaded file format is AVI 6 5 5 Toolbar Guide Play Stop Fast play Pause Slow Play Single Frame 6 5 6 Remote Settings Click...

Page 59: ...ngs menu From this page users can enable or disable recording for each channel set recording schedules and adjust specific recording parameters i e enabling disabling audio setting the pack time and setting recording modes C Alarm Settings Device Alarm Settings From the sidebar on the left click Alarm Setting then ...

Page 60: ...hey can also turn the buzzer and alarm out on or off from this page Channel alarm settings From the sidebar on the left click Alarm Setting then select Channel Alarm to enter the Channel Alarm setup interface From this interface users can set I O alarms for each channel set motion detection alarms define motion detection privacy masking areas motion sensitivity alarm out time buzzer time prerecord...

Page 61: ...ethods used in the local DVR setup All of the parameters can be adjusted by selecting values from their respective dropdown menus E Network Settings From the sidebar on the left click Network Setting and then select Network to enter the network settings interface The menu allows users to set a lower bandwidth for Internet video transmission ...

Page 62: ...elect a network type G Email Settings From the sidebar on the left click Network Setting and then select Email to enter the email settings interface From this menu users can enable or disable email notifications set the time interval for sending email notifications enable or disable SSL and modify SMPT settings i e setting the SMTP server port sender password and addresses ...

Page 63: ... page users can turn the firewall on or off for specific IP addresses I ESMS Settings From the sidebar on the left click Network Setting and then select ESMS Settings to enter the ESMS settings interface From this interface users can select the interval for receiving ESMS alerts and add phone numbers that should receive ESMS alerts if alarms are triggered ...

Page 64: ...page users can set the port username password and host name for FTP K System Settings From the sidebar on the left click Advanced Setting then select System Setting to enter the system settings menu From this menu users can set the language and TV mode for the DVR and set starting and ending times and dates for Daylight Savings Time or turn the setting off altogether ...

Page 65: ... interface Here users can find out the device name and software version and the release date HDD Information Clicking HDD INFO under the System INFO tab will open the hard disk drive information interface From this page users can check the hard disk drive status the total storage capacity of hard disk drive and of the amount of free space left on the hard disk drive ...

Page 66: ...MOTE UPGRADE to enter the remote upgrade interface Clicking will select file for upgrading Then click the Remote Upgrade button in the center of the screen N User Management Add Delete Users From the sidebar on the left click User Manager and then select ADD ...

Page 67: ... the sidebar on the left click User Manager and then select MODIFY PASSWORD OR PRI to enter the privacy settings interface Once a password has been enabled this interface can only be accessed by the Administrator The Administrator can use this page to set and or modify the system password local permissions and remote permissions 6 5 7 Local Settings From the sidebar on the top click Local Setting ...

Page 68: ...To access the digital video recorder follow these instructions 1 Make sure the digital video recorder is connected to the Internet 2 Open the Internet browser on the mobile phone and enter the IP address of the DVR For example if the IP address of the DVR is 192 168 1 157 and its web port is 86 enter http 192 168 1 157 86 wap html in the address field and then click ENTER 3 A login interface will ...

Page 69: ...l not refresh until the user clicks refresh The channel being monitored the image size and the refresh rate are can only be set or modified on the settings page To adjust them click Return to reconfigure the parameters Note It is only possible to monitor one channel at a time To view another channel press return and choose another channel number in the settings page 8 Mobile Phone Support This DVR...

Page 70: ...ye Click the Settings button and enter the IP address of the DVR A screen that looks like the adjacent screenshot will appear enter the username password server the IP address of the DVR and Port the default is 10510 in their respective fields Next choose the Channel Count for streaming data from the dropdown menu and choose a Default Channel for remote access viewing Choose a Record Name for the ...

Page 71: ...ns the following controls Directional buttons for controlling the direction of the PTZ camera view Zoom in out Iris Focus Snapshot 8 2 Symbian S60 3rd and 5th Edition Phones From the installation CD install the file MobileEye sisx onto the Symbian S60 mobile phone for the list of mobile phones tested and approved for compatibility see List of Symbian Supported Mobile Phones For instructions on ins...

Page 72: ...e WAP over GPRS and local mobile service providers If the None option is selected after pressing the button a list of available networks to choose from will appear Server Address Enter the DVR s IP address in this field Server Port Enter 10510 the default port number in this field Username Enter the user name of the DVR in this field Password The password field should be left blank if the password...

Page 73: ...cent illustration it is Connecting Control buttons Use these buttons to select channels If the DVR supports 8 channels use the button to switch between channel buttons 1 4 and 5 8 Use these to adjust the direction of a PTZ camera Use these to adjust the zoom focus and iris of the PTZ camera Function Buttons When highlighting these buttons the name of the corresponding function will be displayed in...

Page 74: ... Symbian Supported Mobile Phones Review the list of Symbian mobile phones tested and approved for compatibility with the remote access to DVR LG KT610 Nokia N71 LG KS10 Nokia N73 LG KT615 Nokia N75 Nokia 3250 Nokia N76 Nokia 5320 XpressMusic Nokia N77 Nokia 5500 Sport Nokia N78 Nokia 5630 XpressMusic Nokia N79 Nokia 5700 Nokia N80 Nokia 5730 XpressMusic Nokia N81 Nokia 6110 Navigator Nokia N81 8GB...

Page 75: ... E63 Samsung SGH G810 Nokia E65 Samsung SGH i400 Nokia E66 Samsung SGH i450 Nokia E70 Samsung SGH i520 Nokia E71 Samsung SGH i550 Nokia E75 Samsung SGH i560 Nokia E90 Samsung SGH L870 8 3 Apple iPhone 1 MobileEye installation Open iPhone App store as follows Figure 1 Touch and search for MobileEye It is a free application ...

Page 76: ...screen shown in Figure 4 will then appear Press shown in Figure 4 and the screen shown in Figure 5 will appear Enter the password for a registered Apple iTunes account and press Users without an iTunes account will need to register for one before they can download applications After entering the ...

Page 77: ...ure 4 Figure 5 Figure 6 Loading this indicates that the MobileEye software is downloading When the process bar displays a status the MobileEye software has finished installing After installing MobileEye the iPhone screen will display the screen shown in Figure 7 ...

Page 78: ...use MobileEye 1 Click the MobileEye icon to open the program Figure 8 2 Press the settings button shown inside the red box in Figure 8 After pressing the settings button a screen like the one shown in Figure 9 will appear ...

Page 79: ...is is the DVR s device ID number User ID Enter the user name of the DVR in this field Password The password for the DVR system b If Direct Access is selected a screen like the one in Figure 11 will appear After entering the Settings menu the following fields will need to be completed Server IP DVR Internet address Port the default is port is 10510 User ID Enter the user name of the DVR in this fie...

Page 80: ...cus focus iris iris 3 Use the numbers to select the live view channel to display 4 Shortcut keys including play pause capture to capture a frame of the video stream as a still photo full screen to view the video in full screen mode next channel grouping pressing this changes the numerical keys 1 2 3 and 4 to 5 6 7 and 8 for viewing other channels when using an 8 channel DVR and settings ...

Page 81: ...an HTC manager HTCSync exe on the same computer where Mobile Eye Android apk was installed Otherwise the phone will not be able to establish a connection with the computer 4 Connect the HTC mobile phone to the computer using a USB cable Run the program HTC Sync Select the option Application Installer and left click it to open the setup file then install Mobile Eye Android apk on the Android phone ...

Page 82: ...81 If prompted make sure to allow the application to access the internet ...

Page 83: ...tion are remote access viewing of live video surveillance recorded with a DVR via mobile phones full screen viewing of videos streamed from a DVR remote access control of PTZ cameras capturing video frames as still images and tagging recordings as favorites 2 1 Main System Interface After installation select the Mobile Eye icon from the program menu see following image ...

Page 84: ...ettings Interface Press the Setting button to access the settings page This page will be used during the first time entering the system and later if it becomes necessary to change the parameters of the system PTZ Control PTZ Zoom Focus Iris Snapshot Full Screen Switch Video ...

Page 85: ...hannel to be displayed when the mobile phone is connected to the DVR for remote access viewing Record Name Use this field to save the name of the recording After changing settings always press SAVE to save the information in the designated folder Later it will be easier to find the record in the file After saving settings press setting to return to the main interface Next press connect on the main...

Page 86: ...ile Eye Program Installation 1 Copy the setup software MobileEye cod and MobileEye alx to a computer 2 In order to be able to install applications and themes via BlackBerry Desktop Manager the computer must already have BlackBerry Desktop Manager installed on it in this manual BlackBerry Desktop Manager will be referred to as DM otherwise the phone will not be able to establish a connection with t...

Page 87: ...ccessfully connected to it as indicated by the status circled in red in each figure Figure1 Figure 2 5 Click Application Loader to access its interface In this screen there are two options to select from Select Add Remove Applications shown in the following illustrations and click Start ...

Page 88: ...he following screenshot 7 After clicking Browse the following file search screen will appear Open the folder to which the application files were saved Make sure that both the alx and cod files have been saved in the same folder After finding the MobileEye alx file for the application select it and click Open ...

Page 89: ...eenshot if the installation was successful 9 From the same Application Loader screen MobileEye can also be removed from the BlackBerry by taking the following steps From the Application Loader screen under the Device application selection list select the application to be removed from the BlackBerry When the option under the Action column is listed as Remove the program will be removed from the de...

Page 90: ... the application MobileEye will be removed from the device 2 Mobile Eye Program Description The main functions of the Mobile Eye application are remote access viewing of live video surveillance recorded with a DVR via mobile phones full screen viewing of videos streamed from a DVR remote access control of PTZ cameras capturing video frames as still images and tagging recordings as favorites ...

Page 91: ...the following screen will appear this is the main system interface System Configuration interface Press Configure see preceding screenshot to access to the page for configuring and modifying settings The settings or parameters can be modified as necessary The following offers an explanation of some of the fields in the system configuration interface ...

Page 92: ... Use this field to save the name of a record After the naming the record press SAVE and it will be saved in the Favorites folder Save Press this to save the settings or any changes to the settings Cancel Press this to cancel all operations Live View Interface After changing the settings press Save or Cancel to return to the main interface and press Live to enter into the interface for live view re...

Page 93: ...een the Menu screen on the left will appear Select Connect and the Connect tab will be highlighted Then press the Enter button to connect to the server Menu Video Playback After clicking Enter a screen similar to the preceding Video Playback screen on the right will appear From this interface users can switch channels adjust PTZ controls capture still images of video frames and view videos in full...

Page 94: ...ve Or the camera itself may have hardware problems i e it may not be able to pan tilt or zoom properly even when operated locally To solve this problem first check that the camera recording the video that is currently being viewed is actually a PTZ camera next check to make sure that it is properly set up and does not have any damaged or dysfunctional parts B The remote PTZ control function might ...

Page 95: ...ake the device to a certified technician to have it examined 3 What if there is no output of single channel multi channel or all channel video Check the adapter of the camera to make sure it is securely connected Check the cable for connecting video input output in the back panel of DVR to make sure it is securely connected Insert the video source directly into the display device and check if the ...

Page 96: ...htness and so on 6 What if there is no sound Check that the sound box or speaker functions Also check for possible short circuiting problems The audio source may be connected to the video channel Select the full screen mode to check The hardware of DVR could be defective take the device to a certified technician to have it examined 7 What if the sound cannot be heard during playback There may be a...

Page 97: ...ront panel of the DVR are not damaged 12 Why I can t log in to the WEB Check to make sure that the computer has been connected to the Internet properly Check if the LINK or 100M LED is displayed normally on the panel use ping xxx xxx xxx xxx DVR IP to check if the Internet is linked properly It is recommended that you use either Windows XP or Vista as the operating system and Internet Explorer 6 0...

Page 98: ... can acquire an IP address See Section 5 5 2 for details Set up an account with a DDNS service provider and with the account information available log in to the router and go to the DDNS page Select the address of your service provider and type in the account password After saving this information the router will send IP updates to your DDNS account and the connection will always be forwarded to y...

Page 99: ...MSUNG TS H663 Appendix 5 DVR Compatible Portable DVD Disks The following is a list of portable DVD RW DVD R disks tested and found to be compatible with the DVR Before using a DVD RW DVD R disk not found on this list to back up data from the DVR it extremely important to test it for compatibility first Suggested that users use a DVD RW or DVD R disk to backup Brand Name Model Number TDK DVD RW Sin...

Page 100: ... Then choose tab which is named Get Accessory Discreteness and copy and paste ie_tab_plus 1 95 20100930 fx sm IE Tab Plus FF 3 6 xpi into the address field A dialog box will prompt you to install or cancel the program choose Install immediately After installing the program restart Firefox Browser 4 Open Firefox and enter the DVR IP address in the address field 5 Right click at blank select Use IE ...

Page 101: ... the following screen will appear 5 Select Allow to download multiple files and the following screen will appear 6 Select Continue to continue installing extensions and the following screen will appear 7 Click Install and the following screen will appear ...

Page 102: ...e and password to log in and the following screen will appear Appendix 9 How to Use Auto ID Plug n play Quick Guide 1 The ID number of each product is set in the factory From the toolbar click System Setting and select user The screen will display the user management menu and the DVR s ID number will appear at the top of the screen as in the following illustration ...

Page 103: ... Settings and select Auto ID to access the Auto ID option 3 Regarding use of the router to browse the Internet first you should have the transmit codex of the router s port already mapped Alternatively open the UPnP and the router will automatically map the port ...

Page 104: ...r into the Product ID field as shown in the following screenshot Note If after following the preceding instructions the login page does not work or the Auto ID function fails try the following steps to add the website to the zone 5 After the connection has been established the Web Application Management see the following figure will appear ...

Page 105: ...pany for clarification This manual provides reference information for several types machines contact our customer service department if you have any questions or encounter any difficulties using your device There maybe some differences between the descriptions provided here and the actual devices as our products are constantly developing and upgrading We apologize if this manual does not contain a...

Reviews: