background image

O

PeratiOn

 i

nstructiOns


How to 

OPEN

 your spa cover using 

the Cover ROCK-IT:  

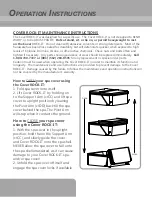
1. Fold spa cover onto itself.

2. Lift Cover ROCK-IT  by holding on 

to the Support Arm (crCC) and lift spa 

cover to upright position by leaning 

the Pivot Arm (crDD) back till the spa 

cover behind the spa. The Pivot Arm 

will stop when it contacts the ground. 


COVER ROCK-IT MAINTENANCE INSTRUCTIONS 

The Cover ROCK-IT was designed for a specific use.  The Cover ROCK-IT is not designed to BEND, 

WARP, or to be ABUSE PROOF.  

Do Not stand, sit, or lie on, or permit heavyweight to rest 

on the Cover 

ROCK-IT.  Do not clean with abrasives, solvents, or strong detergents.  Most of the 

hardware has been Zinc coated for durability, but will deteriorate quicker when exposed to high 

levels of Chlorine, Bromine, Ozone, or other active chemicals.  Check nuts and bolts often and 

tighten if necessary.  Any parts showing evidence of wear should be replaced immediately.  

Call 

1-800-730-7727 or (001) (562) 283-0595

 for any replacement or special order parts.     

Caution must be used when operating the Cover ROCK-IT in order to maintain its function and 

longevity.  The maintenance and use instructions are provided to prevent damage to the Cover 

ROCK-IT.  Damage caused by the failure to follow the maintenance and operation instructions will 

not be covered by the manufacturer’s warranty. 

How to 

CLOSE

 your spa cover 

using the Cover ROCK-IT:

1. With the spa cover in the upright 

position, hold the on the Support Arm 

(crCC), and slowly guide the cover 

and Cover ROCK-IT onto the spa shell. 

NEVER allow the spa cover to fall onto 

the spa shell unassisted, as it can cause 

damage to your Cover ROCK-IT, spa, 

and/or spa cover! 

2. Unfold the spa cover off itself and 

engage the spa cover locks if available.  


OPEN

CLOSE

Summary of Contents for Cover Rock-It

Page 1: ...TM ROCK IT Premium Hot Tub Cover Lifter TM ...

Page 2: ...t crC 3 8 Flat Washer crB Protective Cap crHP Small Dome Cap crHP Large Dome Cap crF 10 x 5 8 Self Tapping Screw crA Plastic Pivot crGG Center Coupler Fluted crAA Center Coupler Extension Non Fluted crBB Base Bracket crFF 15x 2x 4x 4x 4x 15x 2x 1x 2x 1x 2x Pivot Arm crDD 2x ...

Page 3: ...n the closed position on the spa making sure that all four corners are properly positioned and square on the spa See Figure 1 Figure 1 Figure 2 Step 2 Slide the Base Bracket under the spa 8 from the back edge See Figure 2 Placing the Base Bracket 8 2x ...

Page 4: ...rm crDD then attach it to the Base Plate using a 3 8 x 3 1 2 Hex Bolt crC 2 Flat Washer crB and 3 8 Nylon Locknut crC as shown in Figure 3 3a Note Ensure the short side of the Pivot Arm crDD is facing the back of the spa where the cover will rest while open Installing the Pivot arm 2x 2x 4x 2x 4x 4x Figure 3 Figure 3a ...

Page 5: ...insert the short side of the Support Arm crCC into the Center Coupler crAA Join the small end of the Center Coupler Extension crBB into one end of the Center Coupler crAA Then insert the long arms of the Support Arms crCC into the ends of the Center Coupler Assembly See Figure 4b Figure 4a Under 6 ft Over 6 ft Figure 4b Depending on the width of your spa this step will vary Start by measuring the ...

Page 6: ...ion of the Pivot Arm crDD Lean the pivot arms forward so the center coupler s rest short of the center seam Do not allow the center coupler s rest directly on top of or past the center seam Put on the Protective Cap crHP on the short end of your Pivot Arms crDD See Figure 5a Figure 5 Figure 5a 2x Continued ...

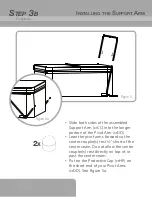
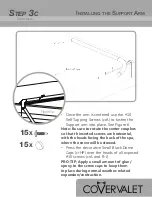
Page 7: ...ouplers so that th inserted screws are horizontal with the heads facing the back of the spa where the cover will be stowed Press the decorative Small Black Dome Caps crHP over the heads of all exposed 10 screws crA and R J PRO TIP Apply a small amount of glue epoxy to the screw caps to keep them in place during normal weather related expansion contraction 15x 15x Continued Figure 6a ...

Page 8: ...other active chemicals Check nuts and bolts often and tighten if necessary Any parts showing evidence of wear should be replaced immediately Call 1 800 730 7727 or 001 562 283 0595 for any replacement or special order parts Caution must be used when operating the Cover ROCK IT in order to maintain its function and longevity The maintenance and use instructions are provided to prevent damage to the...

Page 9: ...This warranty gives you specific legal rights and you may have other rights which can vary in different states and countries C Any dispute between the Buyer and California Home Spas INC pertaining to this warranty may at the option of the Buyer be resolved in the State of California USA in according to the rules of the American Arbitration Association D Should any one or more of the terms provisio...

Reviews: