ENG
LISH
14
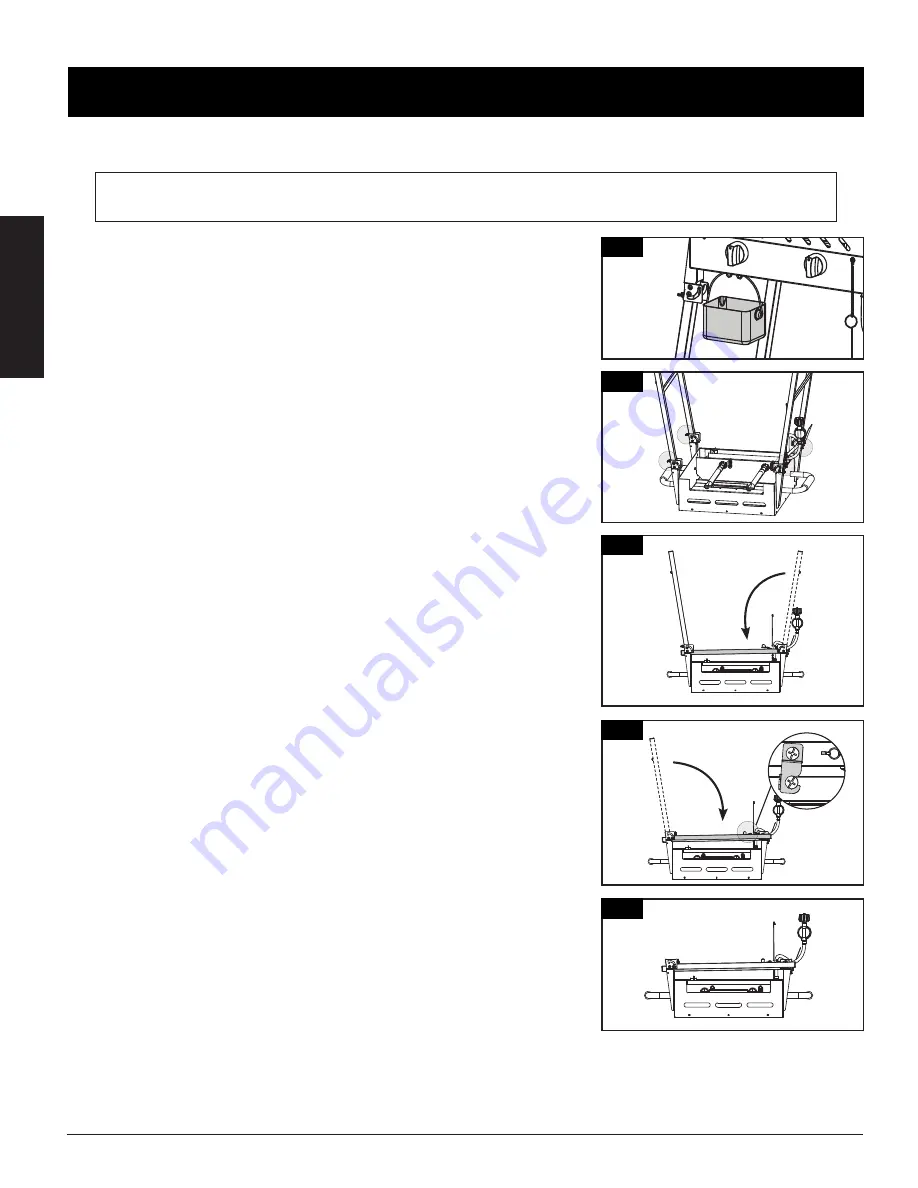
2. Flip the unit upside-down. Loosen the four wingnuts, leaving a gap
of 6-7mm (0.5 in), on both the Left and Right Cart Leg Assemblies.
Unscrew the wingnuts with leaving a
gap of 6.5mm and remove the oil drum
Fold up the legs on the
right side
Fold up the legs on the
left side and lock it as
shown
5. The unit is now ready for storage or easy transportation, using the
handles on each side.
IMPORTANT: Keep unit upside-down during storage or transport.
COLLAPSING FOR STORAGE
Your griddle can quickly and easily be collapsed for storage and easy transportation. To fold down and securely store your griddle,
simply follow the assembly instructions in reverse or the following summary:
IMPORTANT: Ensure the griddle is disconnected from the gas supply, turned OFF and completely cooled
before collapsing for storage or travel.
1. First, remove (and empty) the Grease Cup. Set aside.
NOTE: There is no storage location directly on the collapsed unit
for the Grease Cup. Take care not to lose this part as it is needed
for proper operation of the unit.
Attach the handles (4) from underneath using screws (G), washers (E) and nuts (F) to
secure the handles.
Further install the regulator hose hook (5) with a screw (G) and a nut (F).
1
2
3
4
5
Unscrew the wingnuts with leaving a
gap of 6.5mm and remove the oil drum
Fold up the legs on the
right side
Fold up the legs on the
left side and lock it as
shown
3. Fold-in the Cart Legs on the right side.
4. Fold-in the Cart Legs on the left side. Lock the Cart Legs into place
using the latch.
Unscrew the wingnuts with leaving a
gap of 6.5mm and remove the oil drum
Fold up the legs on the
right side
Fold up the legs on the
left side and lock it as
shown
Unscrew the wingnuts with leaving a
gap of 6.5mm and remove the oil drum
Fold up the legs on the
right side
Fold up the legs on the
left side and lock it as
shown
Unscrew the wingnuts with leaving a
gap of 6.5mm and remove the oil drum
Fold up the legs on the
right side
Fold up the legs on the
left side and lock it as
shown


