2/7
PRODUCT ASSEMBLY
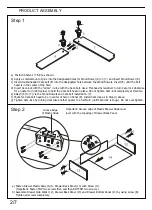
Step 1
Step 2
G
H
G
H
a) Position Shelves (7 & 8) as shown.
b) Apply a small amount of glue into the designated holes for Wood Dowel (A) on (7 ) and insert Wood Dowel (A).
c) Insert double-headed Cam-bolt (E) into the designated hole between the Wood Dowels. Insert (E) until the bolt
head is in the center of the hole.
d) Insert Cam-lock with the “arrow” in-line with the Cam-bolt. Use a Flat-head Screwdriver to turn Cam-lock clockwise
for a quater turn (90 degree) to hold the Cam-bolt head in place. Do not tighten Cam-lock completely at this time.
e) Attach (8) to (7) via the Wood Dowels and Cam-bolt installed on (7).
f) Check for Cam-bolt head to be in center of hole on Panel (8). Install Cam-lock as in Step d) above.
g) Tighten Cam-lock by turning clockwise another quater to a half-turn (until Cam-lock is snug.). Do not over-tighten.
a) Fasten Drawer Plastic Glide (G) to Drawer Back Panel (13) with Screw (H).
(Important: Fasten TOP two screws first, and then BOTTOM two screws.)
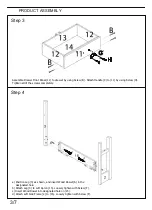
b) Assemble Drawer Side Walls (12), Drawer Back Panel (13) and Drawer Bottom Panel (14) by using screw (B).
Tighten all screws completely.
Groove Edge
of Plastic Glide
Important: Groove edge of Plastic Drawer Glide must
level with the top edge of Drawer Back Panel.

