Cornick VIP Vision NVR16PRO7 Quick Start Manual Download Page 4

VIP Vision NVR Quick Start Guide - Version: VIPNVR-Q119

4

2. NVR and Camera Configuration

2.1 First Boot and Startup Wizard

After successful connection and boot of your NVR, you will be taken through first-time setup for your surveillance 
system. Here you will configure system security and begin customising your NVR, including setting camera encoding 
options, record scheduling, network setup and remote view configuration. A 

physical keyboard is not required or 

supported;

 an on-screen keyboard will appear when required.

NOTE: 

Each setting shown in the Startup Wizard can be modified later via the NVR Main Menu. See the Menu Quick 

Guide in Section 6 or see the full user manual for more information.

Following the prompts, complete each section in the Startup Wizard, as detailed below: 

2.1.2  Securing your NVR 

In the Startup Wizard, you will be prompted to change the 

admin 

user password. This is to prevent unauthorised 

remote access via the Internet to your NVR. 
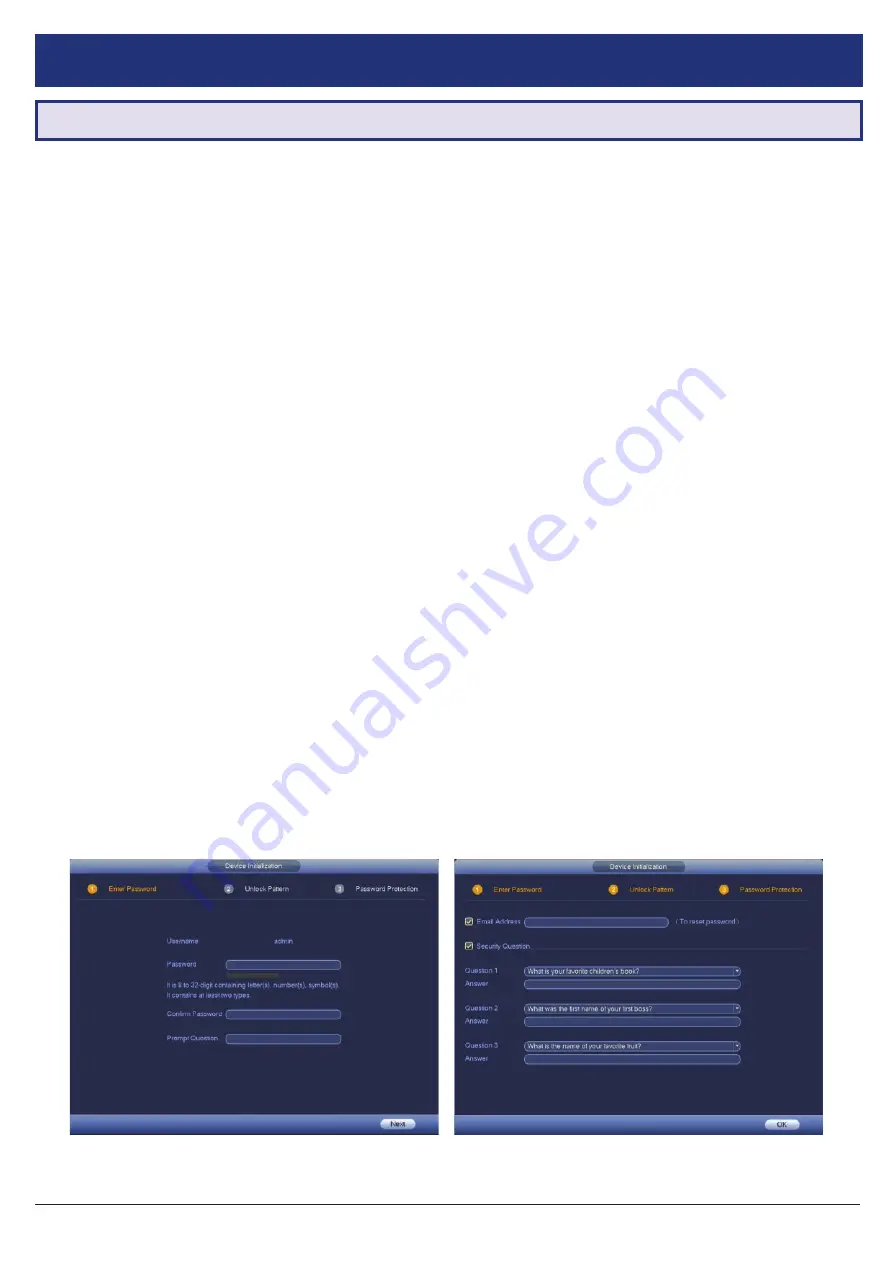
1.  Enter a strong 

admin 

user password, using letters, numbers & symbols. Confirm this password.

2.  (Recommended)

 Enter a 

Prompt Question

 (password hint).

3.  (Optional) 

Draw an 

Unlock Pattern

 for quick unlocking.

4.  (Recommended) 

Enter an email address to be used for password resets. 

5.  (Recommended) 

Enter security questions/answers to be used if the admin password is forgotten. Note that answers 

are 

case-sensitive

.

2.1.1  Startup Wizard

When the NVR is powered up for the first time or the NVR is restored to factory settings, the Startup Wizard will be 

displayed. Users can set common NVR functions by following the procedures step-by-step

NOTE: 

Email address password resets require a mobile phone with the DMSS app & internet access.

NOTE: 

We 

strongly recommend 

setting up email password reset and security questions. If the password is forgotten 

and no recovery method is set up, the recorder will need to be sent back to VIP Vision for a system reset, which will 
incur a fee even if the system is still within the warranty period.

Fig. 2.2: 

Enter Password screen.

Fig. 2.3: 

Password Protection screen.

NOTE: 

Screenshots have been edited for legibility in print.

Summary of Contents for VIP Vision NVR16PRO7

Page 1: ...basic setup installation and use of your surveillance system For the full user manual instructional videos tips on using your surveillance system warranty information please visit www vip vision com VIP Vision Network Video Recorder Quick Start Guide Version VIPNVR Q119 1 Models NVRPRO Series ...

Page 2: ...AT5e CAT6 LAN cable No external power supply is needed 3 Connect a display Using an HDMI or VGA cable connect a monitor or television not included 4 Connect the mouse Connect the USB mouse to the rear USB port saving the front port for easy USB backup 5 Connect to your local network Using the included Ethernet patch cable connect to your switch or router 6 Connect NVR power Plug in the supplied AC...

Page 3: ... TVs LAN Network Ethernet Port USB Connect mouse or backup device 100 240VAC Power input Audio 1x channel RCA input 2x channel output for microphone loudspeaker VGA Video output for older monitors Alarm External alarm trigger input output Fig 1 1 NVR Rear Panel Diagram Fig 1 2 System Setup Diagram 1 3 NVR Rear Panel Setup Diagram Monitor Router IP Cameras NVR Mouse 100 240VAC Mains Internet Connec...

Page 4: ...t to your NVR 1 Enter a strong admin user password using letters numbers symbols Confirm this password 2 Recommended Enter a Prompt Question password hint 3 Optional Draw an Unlock Pattern for quick unlocking 4 Recommended Enter an email address to be used for password resets 5 Recommended Enter security questions answers to be used if the admin password is forgotten Note that answers are case sen...

Page 5: ...TP to ensure a correct time this requires an internet connection 3 Users in NSW VIC SA TAS and ACT will need to enable DST Daylight Saving Time Adjust Start Time End Time settings according to your region and the year 2 1 3 Automatic Updates Here you can choose whether you want your system to Auto check for updates This feature will notify you whenever a new firmware update is available and downlo...

Page 6: ...n Protocol 3 Should you wish to use a static address contact your Internet administrator for details 4 Click Next to continue 5 Click Enable to enable P2P remote view 6 NVR Status should read Online This indicates an active Internet connection This may take a few minutes 7 Scan the left QR code Cell Phone Client or search your App Store to download the iDMSS gDMSS or the EasyviewerLite app 2 1 Fir...

Page 7: ...heck the box then click Add button To add camera manually with known IP address you can 1 Type the camera s IP address in the box left of the Search button then click Search or 2 Click the Manual Add button and input the camera s IP address and password Channel This is the camera s channel number Status The connection status of the camera A red circle indicates the camera is offline A green circle...

Page 8: ...ering IVS Intelligent Video Surveillance such as a virtual tripwire POS light blue for point of sale transactions We recommend adding motion detection and intelligent recording to all channels to accompany your regular recording Fig 2 11 Recording Schedule Setting Motion Detection Intelligent Recording 1 Click the Channel drop down to select All cameras 2 In the days column toggle the All check bo...

Page 9: ...n Menu 2 1 8 Completed Setup Startup setup is complete Below is an example of a View 8 Liveview setup Before mounting cameras familiarise yourself with the user interface and menu layout Right click Menu Main Menu Search Playback PTZ Focus Control Viewing Options Search Playback Manual Record Preview Mode Colour Control Image Snapshot 2 1 First Boot and Startup Wizard continued Setting Snapshot Sc...

Page 10: ... 15 Encode setup section channel 1 settings example Quality Optimised Fig 2 16 Storage Settings Field Default Values Quality Optimised Recording Time Optimised Main Stream Sub Stream Main Stream Sub Stream Main Stream Sub Stream Resolution 1920 1080 352 288 1920 1080 704 576 1920 1080 352 288 Frame Rate 15fps 15fps 15fps 15fps 10fps 10fps Bit Rate Type CBR CBR CBR CBR VBR VBR Bit Rate 2048Kb s 320...

Page 11: ...high voltage wires or other sources of electrical interference 3 Installing Cameras 3 2 Mounting Surveillance Cameras Following the guidelines outlined in Fig 3 1 to 3 4 mount your surveillance cameras 1 Loosen the camera mount assembly by adjusting the locking screw with the included wrench 2 Mark the screw position on the mounting surface 3 Drill mounting holes for the wall plugs 4 Drill a large...

Page 12: ...lugs Self tapping screws Camera Enclosure Locking screw Allen key Pedestal Fig 3 4 Tri axis fixed dome adjustment Fig 3 2 Tri axis fixed bullet adjustment Locking screw Locking screw Cables NOTE Diagrams shown below assume camera to be mounted on masonry Cameras mounted on drywall gyprock plasterboard etc will require special mounting screws or toggles not included 3 2 Mounting Surveillance Camera...

Page 13: ...th stored footage indicated by coloured bars in the timeline Click anywhere on the timeline to begin footage playback Other cameras will automatically sync their playback to the selected camera 5 For greater precision playback control zoom in on areas using the Timeline Zoom up to 30 minutes 6 Using the Playback Controls you can speed up or slow down playback place marks on key footage times and t...

Page 14: ... or MP4 file A DAV file will require conversion for sharing whereas an MP4 file is compatible with most video players on Windows or Mac PCs Each file type is covered in Section 5 2 There are two different ways to backup footage to USB via the Search menu through searching playback footage and by performing a direct backup via the Backup menu Both are accessed via the Main Menu NOTE Backup file typ...

Page 15: ... footage playback such as synchronous playback of multiple channels 4 Open the Options menu Here you can set the directories and formats for saved snapshots BMP JPG and videos DAV AVI You can also adjust video aspect ratio and other options The MP4 file format is a common video format compatible with Windows Media Player and most other video players MP4 videos can also be played by VLC Media Playe...

Page 16: ...urn orange when enabled 3 Select the Face Detection tab and select the Channel that you want to enable face detection Click the Enable box 4 Select Rule to draw the motion detection area of the camera If the face appearing in the camera is bigger than the box drawn it will trigger the face detection alarm smaller box higher sensitivity The other options on the Parameters tab configure the actions ...

Page 17: ...en Fig 6 3 5 Left click on the screen to start drawing the Tripwire line Left click again to finish the line optionally you can add additional corners to the line by continuing to left click Right click to finish placing the line 6 In the top left window you can alter the Direction that the line must be passed from to activate the event as indicated by the arrow going across the line A to B B to A...

Page 18: ...n is enabled however check by navigating to Main Menu Setting Event Video Detect The Enable check box should be checked for all relevant channels Ensure that a period has been selected in the Recording Schedule for motion detection recording and that the period is filled in yellow Check motion sensitivity and adjust motion detection area see Main Menu Setting Event Video Detect Region Set Section ...

Page 19: ...Visit www vip vision com for full user manual and support 19 Notes ...

Page 20: ...Version VIPNVR Q119 1 For more information please visit www vip vision com Crucial Evidence Always ...

Reviews: