


VIP Vision NVR Quick Start Guide - Version: VIPNVR-Q119
16
6. Intelligent Functions
6.1 Face Detection
(Requires supporting camera)
NOTE:
Before enabling Face Detection or Tripwire, ensure that you’ve configured Intelligent recording schedules (refer to
2.1.5 Configuring Recording Schedules), or these functions will not work.
NOTE:
Only one channel can use Face Detection. Face detection and other IVS cannot be used at the same time!
Intelligent Video Systems (IVS) let your CCTV system go beyond surveillance, delivering advanced & powerful detection
tools. When properly configured, these functions can alert you to suspicious activity in real time via email/smartphone
notification and let you easily search through surveillance footage via event history.
• Face Detection
- Uses smart technology to detect human faces, snapshotting and saving them in a directory.
• Tripwire
- Detect when any object crosses a set warning line in the video.
• Intrusion
- Detect when any object intrudes inside a set zone in the video.
•
Abandoned/Missing Object
- Detects if an object has been left/taken from a set zone in the video.
6.1.1 Enabling Face Detection
6.1.2 Face Detection Trigger
1. From the Main Menu, select
Event
and then
Smart Plan.
Select the camera with face detection functionality.
2. Click the
Face Detect
icon and then
Apply
to enable face detection. The icon will turn orange when enabled.
3. Select the
Face Detection tab
and select the Channel that you want to enable face detection. Click the
Enable box.
4. Select
Rule
to draw the motion detection area of the camera. If the face appearing in the camera is
bigger
than the
box drawn, it will trigger the face detection alarm (smaller box = higher sensitivity).
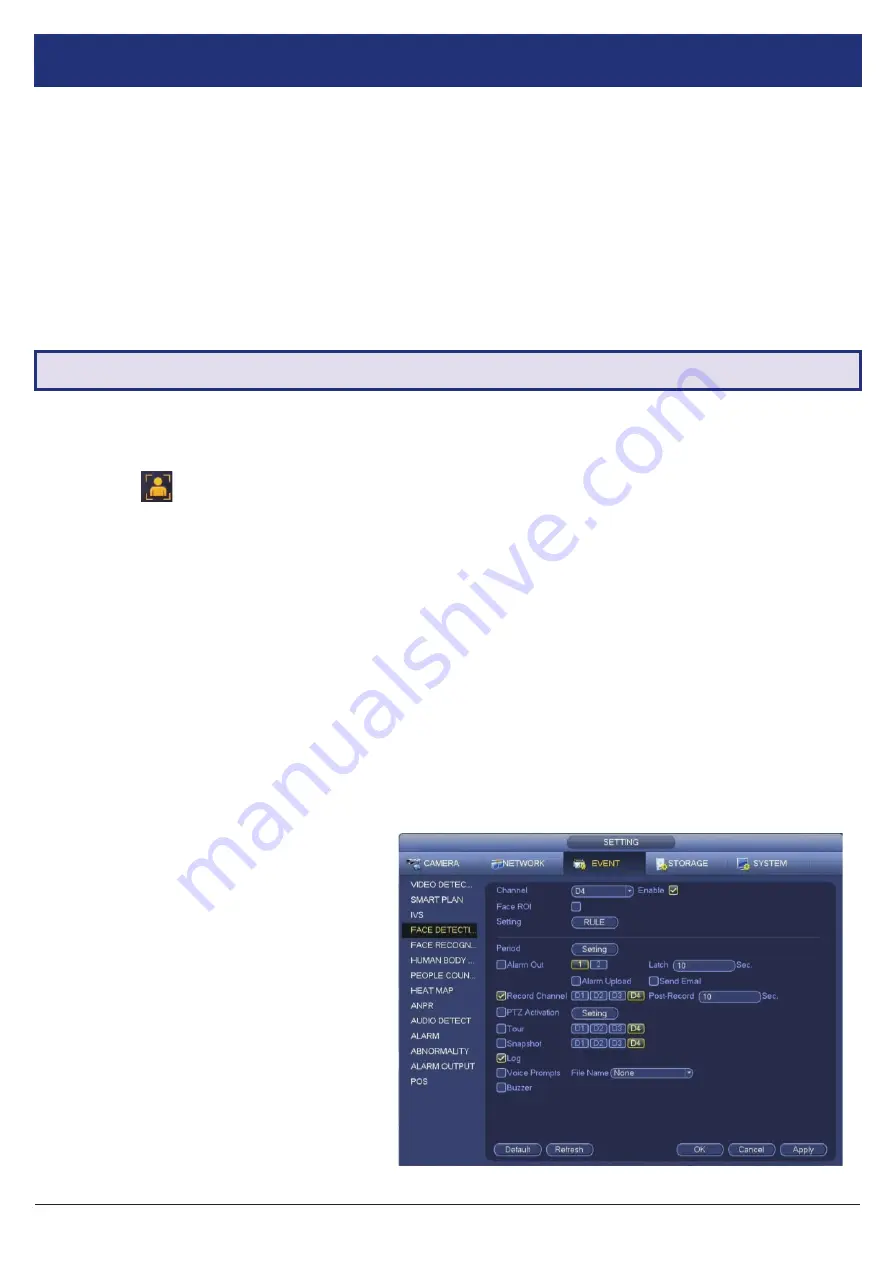
The other options on the
Parameters
tab configure the actions taken after a face detection event is triggered.
1. Period
sets the times of day that
Face Detection
is activated (always on by default).
2. Alarm Out
sets an external alarm to activate whenever a face is detected.
3. Latch Time
sets how long the system waits after detecting a face before detecting again (10 seconds by default).
4. Alarm Upload
updates the alarm system status on the network (Unused for this system).
5. (Requires internet connection & setup)
Send Email
notifies a specified email address whenever a face is detected,
also attaching a photo of the face.
6. Record Channel
sets which camera to
record to when the face detection alarm is
triggered.
7. Post Record
sets the amount of time
recorded after the face is detected. This clip
can be played back while searching through
faces (10 seconds by default).
8. (PTZ camera only; not included)
PTZ
settings set PTZ behaviors in response to a
face detection, such as selecting a Tour to
perform, etc.
9. Buzzer
sets the NVR to beep whenever a
face is detected.
10. Voice Prompts
plays a designated .wav file
in response to face detection.
11. Click
Apply
to save changes.
Fig. 6.1:
Face Detection Parameters menu.


