background image




UT 

Handbook for Use and Maitenance – 50000 WB-80-87-95 

Edition

 01/11 

Revisione 

00 

50000WB_e111_E.doc 


IDENTIFICATION OF THE MAIN CRANE COMPONENTS  

The  major  crane  components  are  listed  below  in  order  to  make,  the  reading  and 
understanding of the operator’s manual easier.  

LIST OF MAIN COMPONENTS


1  Right outrigger beam 

26  

2  Stabilising cylinder 

27  

3  Crane control valve 

28  

4  3 point linkage 

29 Fitting bolts 

5  Basement (chassis) 

30 Top fitting plate 

6  Control station 

31 Bottom fitting plate 

7  Left outrigger beam 

32 Fitting nut 

8  Screws of bearing inner ring 

33 Power take off 

9  Screws of bearing outer ring 

34 Shaft 

10 Bearing 

35 Pump 

11 Main lifting cylinder 

36  

12 Column 

37 Hydraulic load limiting device 

13 Main boom 

38 Hydraulic load limiting device 

14 Hydraulic oil tank 

39  

15 Second (knukle) boom cylinder 

40 

16 Second boom 

41 Sub frame 

17 JIB boom extension cylinder 

42 Vehicle chassis 

18 Acces stairs 

43 Grab suspension 

19 Joystick 


20 Foot pedals 


21 Hydraulic extensions 


22 Lifting capacities sticker 


23 Outriggers looks 


24 Links 


25 Main boom extension cylinder 


Summary of Contents for 50000 WB 50000 WB80

Page 1: ...00 1 50000WB_e111_E doc ENGLISH 50000 WB HANDBOOK FOR USE AND MAINTENANCE EDITION 1 2011 Models 50000 WB80 50000 WB87 50000 WB95 25018 MONTICHIARI BRESCIA ITALIA Via Madonnina n 27 C P 199 Tel 39 030...

Page 2: ...imited to the front 180 The rotation towards the rear is prevented with mechanical means The load charts for the crane vehicle assembly apply only to the authorised working area When full stability is...

Page 3: ...AFTER THE FIRST 20 HOURS OF OPERATION 37 3 2 AFTER THE FIRST 300 HOURS OF OPERATION 37 3 3 PERIODIC MAINTENANCE 37 3 3 1 EVERY 20 HOURS OF OPERATION 37 3 3 2 EVERY 100 HOURS OF OPERATION 39 3 3 3 EVER...

Page 4: ...sn t build up other tensions on the structure the those of the hook itself Lifting capacities are calculated for a crane servicing the vehicle on which it is installed The use of the crane with the gi...

Page 5: ...oil supplied by S r l contained in the hydraulic system and in the tank when the crane is mounted directly by the same is type For cold climates we recommend the use of lower viscosity oils mineral ty...

Page 6: ...itting plate 6 Control station 31 Bottom fitting plate 7 Left outrigger beam 32 Fitting nut 8 Screws of bearing inner ring 33 Power take off 9 Screws of bearing outer ring 34 Shaft 10 Bearing 35 Pump...

Page 7: ......

Page 8: ......

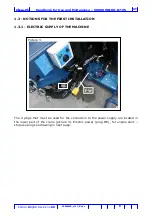
Page 9: ...doc 1 3 NOTIONS FOR THE FIRST INSTALLATION 1 3 1 ELECTRIC SUPPLY OF THE MACHINE The 2 plugs that must be used for the connection to the power supply are located in the lower part of the crane picture...

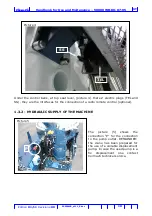
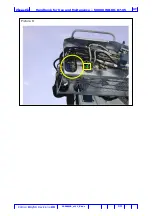
Page 10: ...S they are the interfaces for the connection of a radio remote control optional 1 3 2 HYDRAULIC SUPPLY OF THE MACHINE The picture 5 shows the connection P for the connection to the pump outlet REMAIND...

Page 11: ...ank Set the flow controller of the pump in such a way that the difference between the two pressure read at the two pressure gauges is equal to 17 bar 247 psi No one lever of any function shall be move...

Page 12: ...UT Handbook for Use and Maitenance 50000 WB 80 87 95 Edition 01 11 Revisione 00 12 50000WB_e111_E doc Picture 6 1 4 Picture 7 2...

Page 13: ...UT Handbook for Use and Maitenance 50000 WB 80 87 95 Edition 01 11 Revisione 00 13 50000WB_e111_E doc Picture 8 3...

Page 14: ...ched to the crane fit the crane and have been verified for the use they are intended to be used DANGER OF INTOXICATION It is necessary to deviate the exhaust gases in case the operator s station is lo...

Page 15: ...used whenever it is necessary to halt all of the movements of the crane instantly For example A control lever remains stuck and does not allow for the movement to stop The emergency button does not s...

Page 16: ...be overloaded in order to check if the load limiting device works properly verify that the distance correspond to the right one indicated on lifting diagram make sure that the red lights are on and th...

Page 17: ...s all the controls have been powered on A green light installed on the electric box picture 11 gives the indication to the operator that the crane has the correct electric supply This can be seen be v...

Page 18: ...In the rest position extension of the stabiliser cross member supplied as standard is prevented by means of a pin which is removed by rotating the handle 180 Picture 12 After release activate the ext...

Page 19: ...nt Right and left stabilisers must be moved alternatively in order to maintain the truck chassis as straight as possible Make sure the vehicle is levelled by using the level gauges located near by the...

Page 20: ...ting in B The wheels of the vehicle must not be completely off the ground Whenever working off the road on soft ground or asphalt arrange distribution plates under the stabilisers supplied on request...

Page 21: ...retracted turn the handle of the looking system by 180 degree and verify that the beam is properly secured Picture 12 Repeat this procedure for each stabiliser DANGER OF CIRCULATION WARNING IF ANY ONE...

Page 22: ...oise only it can stand the weight of one person only 100 Kg It is expressly forbidden to have more than one person on the catwalk at any time Walking on the catwalk must be made with extreme care payi...

Page 23: ...Main boom rising cylinder control lever 4 Rotation control lever 5 Main boom extension cylinder control foot pedal 6 Knuckle boom extension cylinder control foot pedal 7 Fork opening and closing func...
Page 24: ...he radio remote controls supplied on demand 5 Green light which is on when the controls from the radio remote controls have been activated 6 Start button which if connected can be used to start the tr...

Page 25: ...oad no one is standing within the boom range of action the area where the load is to be deposited is clear the main boom is over the horizontal line IT IS FORBIDDEN to lift object when the main boom i...

Page 26: ...alled behind the driver s cab use particular care because the load carrying capacity on the front is usually greatly reduced which means that the vehicle is very likely to overturn Picture 12 DANGER O...

Page 27: ...slope of maximum 5 with the boom full retracted and the boom angle 45 For working with the boom extended or at high boom angle the base of the crane must be put in horizontal level During descent with...

Page 28: ...this working way may end up in serious damage to the crane structure and create dangerous situations for the operator Picture 24 The extension and retraction capacity of the outer boom retraction cyl...

Page 29: ...or anything else which may cause similar action on the crane is not permitted The slinging and the holding devices are always included in the useful load capacity Before the load is lifted make sure...

Page 30: ...only instrument to establish the capacity of the crane b The device installed stops the machine when there is an overload However the values shown in the load capacity chart must always be observed c...

Page 31: ...he system in order to overload the crane As an example we can mention the pressure available inside the main lifting cylinder is higher than the pressure at which the load limiting device is set for t...

Page 32: ...elation to the horizontal line 20 means that the function is forbidden only when the angle is bigger than 20 Function First boom load limiting device Second boom load limiting device Inner 1st boom ri...

Page 33: ...on of the electric valve shown in the picture and operate in such a way that bring the crane back into safety conditions During emergency operation keep an eye on the load indicator so that the crane...

Page 34: ...escriptions and illustrations are given as information and are not binding they are subject to change without notice 50000 WB80 02 D 783 28 26 24 22 20 18 16 14 12 10 8 6 4 2 0 ft m 95 90 85 80 75 70...

Page 35: ...trations are given as information and are not binding they are subject to change without notice 50000 WB87 02 D 821 30 28 26 24 22 20 18 16 14 12 10 8 6 4 2 0 ft m 100 95 90 85 80 75 70 65 60 55 50 45...

Page 36: ...formation and are not binding they are subject to change without notice 50000 WB95 02 D 813 32 30 28 26 24 22 20 18 16 14 12 10 8 6 4 2 0 ft m 110 105 100 95 90 85 80 75 70 65 60 55 50 45 40 35 30 25...

Page 37: ...to the chassis using a torque wrench torque 67 daN m lubricated 72 9 daN m not lubricated Check the torque of the bolts securing the thrust bearing to the crane base and eventually tighten with a tor...

Page 38: ......

Page 39: ...attention to the moving parts Through the grease nipples Zerks on the side grease the stabilisers and also the pin of the 3 points linkage 3 3 3 EVERY 200 HOURS OF OPERATION Lubricate all the articul...

Page 40: ...is before 2000 hours of operation IF THE OIL IS NOT CHANGED AT THE SET INTERVALS THIS MAY CAUSE DAMAGE TO THE SYSTEM AND SERIOUSLY AFFECT OPERATION OF THE SAFETY VALVES N B The type of oil used is mar...

Page 41: ...YLINDER RELEASE THE PRESSURE BY COMPLETELY SLACKENING THE REGISTERS CAREFUL REGULAR MAINTENANCE WILL EXTEND THE LIFE OF THE CRANE AND MAKE IT SAFER 3 5 MAINTENANCE TO BE CARRIED OUT AFTER A LONG PERIO...

Page 42: ...tes and in workshops authorised by Cormach S r l Here follows a table memorandum in which for every due date the operations necessary on the crane are reminded The workshop that materially carried out...

Page 43: ...urs of functioning Points where the perations to be xecuted are described Date of execution Stamp and sign of authorised workshop Notes 4800 3 3 4 5000 3 3 5 5400 3 3 4 6000 3 3 4 3 3 5 3 3 6 6600 3 3...

Page 44: ...AINS INSPECTIONS The wire ropes and chains used on the crane must be verified and results must be recorded inside the following table For the timing of each inspection refer to local prescriptions For...

Page 45: ...3 8 NOTES FOR EXCEPTIONAL PARTS EXCHANGES Repairs or exchanges of structural components electric or hydraulic components related with the crane safety must be recorded in this section N of repair Dat...

Page 46: ...he dump valve does not close Press the emergency button if the solenoid is powered red light in the connector on replace it If it is not powered check the system If it does not work in spite of pressi...

Page 47: ...d by repeatedly operating movements fully to end of stroke 4 5 THE EXTENSION CYLINDERS VIBRATE WHEN MOVING OUTWARDS OR INWARDS AND ARE OUT OF SEQUENCE a Were pads not lubricated Lubricate sufficiently...

Page 48: ...UT Handbook for Use and Maitenance 50000 WB 80 87 95 Edition 01 11 Revisione 00 48 50000WB_e111_E doc APPENDIX A ADDITIONAL RISKS...

Page 49: ...UT Handbook for Use and Maitenance 50000 WB 80 87 95 Edition 01 11 Revisione 00 49 50000WB_e111_E doc SPECIAL NOTES SPECIAL VERSION...

Reviews: