background image

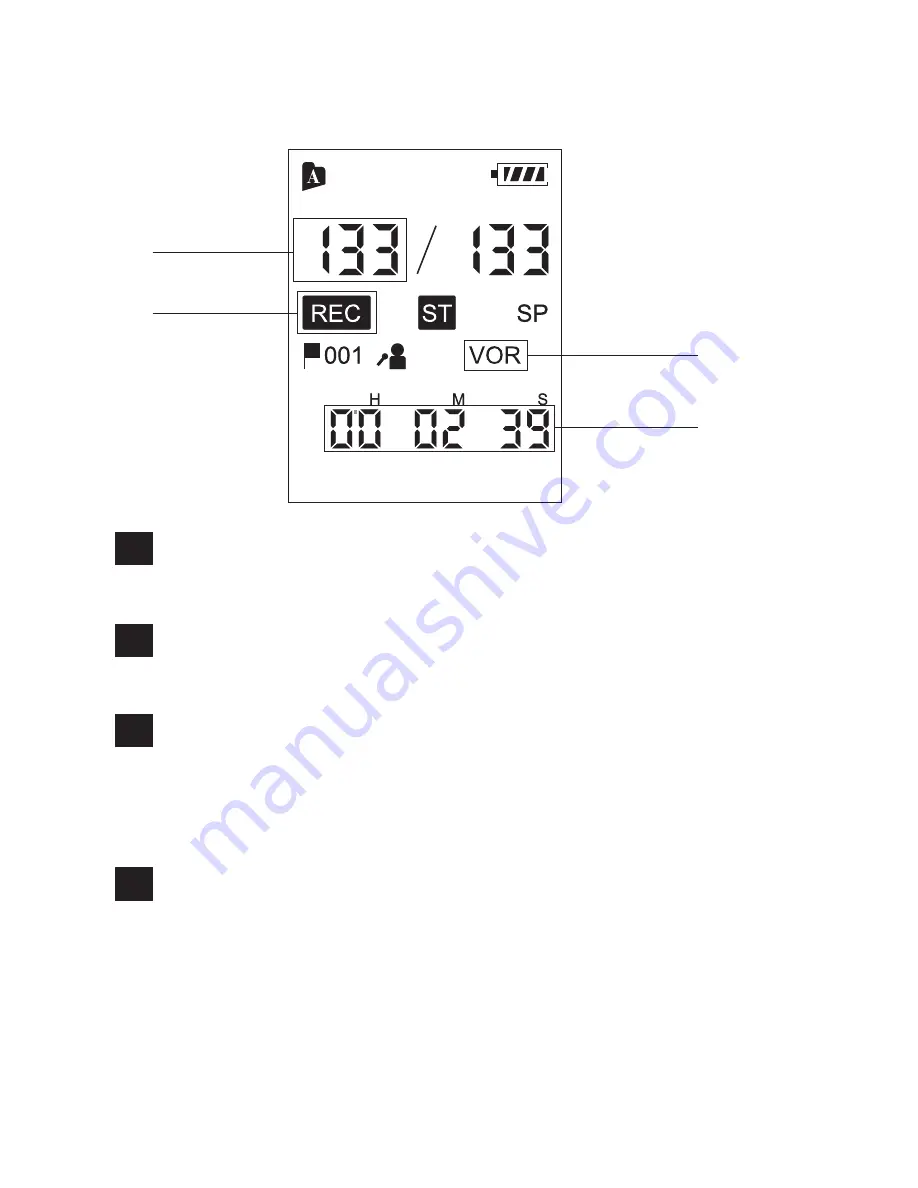
Display when recording

File number indicator

Displays the file number you are recording.

1

Recording indicator

Appears while the Coredy recorder is recording.

2

VOR (Voice Operated Recording) indicator

Appears while the Coredy recorder is recording with 

the VOR function.

You can set “VOR” to “ON” in the menu.

3

Counter indication

Displays the following file information. You can 

switch the display mode by pressing MENU briefly: 

Elapsed time -> Remaining time (with “REMAIN” 

indicator)

4

1
2

3
4

06

Summary of Contents for VM3311

Page 1: ...COREDY VM3311 Digital Voice Recorder GET STARTED EN ...

Page 2: ...er 1 4 3 Recharging the battery using a USB AC adaptor 1 4 4 Disconnecting the Coredy recorder from the USB AC adaptor 1 4 5 Turning the power on 1 4 6 Turning the power off 1 5 Setting the Clock 1 5 1Setting the clock after preparing a power source 1 5 2 Setting the clock using the menu 1 6 Selecting a Folder and a File 1 7 Switching the Counter Information Display 2 4 9 11 11 12 13 14 16 16 17 1...

Page 3: ... a recording mode 2 3 Starting to Record Automatically in Response to Sound the VOR Function 2 4 Recording via Other Devices 2 4 1 Recording with an external microphone 2 4 2 Recording from other equipment 2 4 3 Recording from Telephone 2 Recording Files 3 1 Basic Playback 3 1 1 Stopping playback 3 1 2 Other operations 3 1 3 Searching forward backward during playback Cue Review 3 2 Changing the Pl...

Page 4: ...ty 3 5 Playback via Other Devices 3 5 1 Recording with other equipment 4 1 Erasing a Files 4 Erasing File 5 1 Adding a Playback marks 5 2 Skip the Playback marks 5 3 Erasing a Playback marks 5 Playback Marks 6 1 Making Settings for the Menu 6 2 Menu Settings 6 About the Menu Function 7 1 Using the Coredy recorder with Your Computer 7 1 1 Connecting the Coredy recorder to your computer 7 1 2 Struct...

Page 5: ...om your computer to the Coredy recorder drag and drop 7 3 2 Playing back music files copied from your computer using the Coredy recorder 7 4 Using the Coredy recorder as USB Memory 8 1 Precautions 8 2 Specifications 8 2 1 System requirements 8 2 2 Design and specifications 8 2 3 Battery life 1 8 2 4 About compatible memory card 8 Additional Information 9 1 Troubleshooting 9 1 1 On the Coredy recor...

Page 6: ...enjoy exclusive deals by following us on social media Want new product releases for Free Sign up for our Super Member Project facebook com coredytech Scan me to learn more coredytech com smp Scan me to learn more coredytech ...

Page 7: ...for the voice recorder VM3311 You cannot connect other voice recorders Display windows in this manual may differ from what are actually displayed on your voice recorder depending on the area you purchased the voice recorder and the settings you have made What you record is for personal enjoyment and use only Copyright laws prohibit other forms of use without the permission of the copyright holders...

Page 8: ...ls 1 Operation indicator 2 Built in microphones stereo L R 3 switch 4 SCENE MY VOICE CLASS switch 5 DISPLAY MENU button 6 Repeat A B button 7 Back button 1 Preparing the recorder A B REC SAVE 1 2 6 5 8 10 12 11 15 2 3 7 4 9 13 14 16 01 ...

Page 9: ...s P MARK 11 Volume Next P MARK 12 Review fast backward button 13 Cue fast forward button 14 Play Pause Enter button 15 P MARK button 16 Erasing button 1 Microphone jack 2 Headphone jack 3 RESET button 4 M2 microSD card slot 5 USB Port 6 Speaker 1 2 3 4 5 6 02 ...

Page 10: ...1 Audio Output Jack 2 RJ11 LINE Jack 3 RJ11 TELPHONE Jack 4 Telephones Cable 5 LINE IN Audio Cable 1 3 2 4 5 1 2 Using the Display Window Display During Stopped 1 4 5 2 3 03 ...

Page 11: ...ing mode STSP Stereo standard play recording mode 3 The above and other windows in this section display indications numbers or items for explanatory purposes The actual windows may differ from those displayed here Folder indicator Displays the folder you have selected Folders where you can record a file Files you record with the Coredy recorder will be stored and managed in these folders Music A f...

Page 12: ...the recording scene when the recorder is in the stop or recording mode My Voice recording mode Class recording mode 4 Current date and time display Displays the current date year month and day and the current time hour and minutes 5 05 ...

Page 13: ...der is recording 2 VOR Voice Operated Recording indicator Appears while the Coredy recorder is recording with the VOR function You can set VOR to ON in the menu 3 Counter indication Displays the following file information You can switch the display mode by pressing MENU briefly Elapsed time Remaining time with REMAIN indicator 4 1 2 3 4 06 ...

Page 14: ...1 Total file number indicator Display the total file number of the folders 2 Counter indication Displays the following file information You can switch the display mode by pressing MENU briefly Elapsed time Remaining time with REMAIN indicator 3 A B repeat play mode indicator 4 1 2 3 4 07 ...

Page 15: ...tional operations HOLD status when you carry the Coredy recorder etc Slide the switch in the direction of HOLD to disable the buttons while the power is on HOLD will appear for approximately 3 seconds indicating that all the button operations are disabled To disable the button operations HOLD status A B REC SAVE 08 ...

Page 16: ... switch towards the center When the HOLD function is activated during recording all the button operations are disabled To stop recording cancel the HOLD function first To enable the button operations A B REC SAVE 09 ...

Page 17: ...the battery is charging the battery indicator are displayed in an animation When the battery is fully charged the battery indicator will indicate When you charge the Coredy recorder for the first time or when you have not used the Coredy recorder for a long time charge the rechargeable battery until the indicator appears on the display It takes about 3 hours and 30 minutes to fully charge an exhau...

Page 18: ...he bottom right of the desktop left click the following icon Left click Eject COREDY RECORDER Windows 7 or Safely remove USB Mass Storage Device Windows XP Windows Vista The icon and menu displayed can be different on different operating systems The icon may not be always displayed on the taskbar depending on your computer settings 1 4 2 Disconnecting the Coredy recorder from your computer Make su...

Page 19: ...y is fully charged the battery indicator will indicate When you charge the Coredy recorder for the first time or when you have not used the Coredy recorder for a long time charge the rechargeable battery until the indicator appears on the display It takes about 3 hours and 30 minutes to fully charge an exhausted battery 1 4 3 Recharging the battery using a USB AC adaptor Disconnect the USB connect...

Page 20: ...ording the operation indicator lights or flashes in red or accessing data the operation indicator flashes in orange the Coredy recorder should not be connected to or disconnected from the USB AC adaptor connected to the AC outlet the USB AC adaptor connected to the Coredy recorder should not be connected to or disconnected from the AC outlet Follow the procedures below otherwise when the Coredy re...

Page 21: ...nd then disconnect the USB AC adaptor from the AC outlet During recording the operation indicator lights or flashes in red or accessing data the operation indicator flashes in orange the Coredy recorder should not be connected to or disconnected from the USB AC adaptor connected to the AC outlet the USB AC adaptor connected to the Coredy recorder should not be connected to or disconnected from the...

Page 22: ...itch in the direction of for more than 1 second OFF appears and the Coredy recorder is turned off 1 4 5 Turning the power on 1 4 6 Turning the power off When the Coredy recorder is in the stop mode and you leave the Coredy recorder without attempting an operation for approximately 5 minutes the auto power off function will take effect Hint A B REC SAVE 15 ...

Page 23: ...nd time When you power on the recorder for the first time the SET DATE appears and then the year section begins to flash in the clock setting display window Press or to set the year and then press ENTER Select the last two digits of the year When you press ENTER the cursor moves to the month section Set the year REC SAVE 16 ...

Page 24: ...desired figures and then press ENTER When you set the minute and press ENTER the ACCESS animation is displayed and then the stop mode window appears Set the month day hour and minute in sequence in the same way M Y D M Y D 17 ...

Page 25: ...ill be displayed 2 Press or to select SET DATE and then press ENTER The clock setting window will be displayed Press or to set the year the last two digits of the year and then press ENTER Repeat this procedure to set month day hour and minute in sequence 1 5 2 Setting the clock using the menu Select SET DATE in the menu Set year month day hour and minute REC SAVE 18 ...

Page 26: ...SS animation is displayed and then SET DATE will appear again If there is no operation for 1 minute or longer between steps the clock setting is canceled and the window will return to the display of the stop mode 1 6 Selecting a Folder and a File Press the back button to exit the menu mode REC SAVE 19 ...

Page 27: ...con stops flashing You can select the following folders 4 Press the back button to exit the menu mode In the stop mode press ENTER into playback mode then press or to select the desired file You can select a folder and a file for recording playing or editing as follows Select a folder in which you want to record play or edit a file Select a file which you want to play or edit Recordable area to be...

Page 28: ...ollows Elapsed time Displays the elapsed playback recording time of one file Remaining time Displays the remaining playback time of the current file in the playback mode or the remaining recordable time in the stop and recording modes both with the REMAIN indicator 1 7 Switching the Counter Information Display 21 ...

Page 29: ...ay be recorded if an object such as your finger etc accidentally rubs or scratches the Coredy recorder during recording Before you start recording we recommend you make a trial recording first or monitor the recording p 2 1 1 2 1 Basic recording 2 Recording Files Built in microphones L R Operation indicator REC SAVE 22 ...

Page 30: ...last file in the current folder Slide the switch in the direction of to turn on the Coredy recorder p 1 4 5 or towards the center to release the Coredy recorder from the HOLD status p 1 3 Select the desired folder p 1 6 Select the desired scene for recording p 2 2 Place the Coredy recorder so that the built in microphones face the direction of the source to be recorded Press REC in the stop mode 2...

Page 31: ...volume by pressing but the recording level is fixed 2 1 1 REC MON Monitoring the recording The ACCESS animation appears and the Coredy recorder stops at the beginning of the current recording file The Coredy recorder is recording data and storing it on the memory when the ACCESS animation appears on the display 2 1 2 Stopping the recording Press SAVE to stop recording Note while accessing REC SAVE...

Page 32: ...se pause and resume recording Press During recording pause the PAUSE appear on the display window Press again Recording resumes from that point To stop recording after pausing recording press SAVE button review the current recording instantly Press button Recording stops and playback starts from the beginning of the file just recorded Do this 25 ...

Page 33: ...ted scene To record a lecture in your classroom Useful for a variety of situations such as recording in a spacious conference room 2 2 Changing the Recording Settings 2 2 1 Selecting a recording scene for each situation Scenes CLASS To record your voice in front of your mouth Useful for language study or other occasions MY VOICE Descriptions REC SAVE SCENE 26 ...

Page 34: ...r recording Set the SCENE switch to CLASS Place the Coredy recorder so that the built in microphones face the lecturer By placing the Coredy recorder on a handkerchief etc you can record with clear low noise sound without vibration noise from the desk Recording a lecture at a classroom S AV E R E C 27 ...

Page 35: ... mode DISPLAY MENU Set the SCENE switch to MY VOICE By placing the Coredy recorder close to one side of your mouth you can prevent breathing on the built in microphones and record with clear Sound Recording your voice REC SAVE 28 ...

Page 36: ...nu Mode Press or to select MODE and then press Press or to select ST HQ or ST SP and then press Press to exit the menu mode Scenes ST HQ MY VOICE 192kbps To record in the stereo high quality mode You can make a higher quality recording while the total recordable time becomes shorter than that in the STSP mode CLASS 80kbps Descriptions SP ST 29 ...

Page 37: ... Coredy recorder start recording when the Coredy recorder detects sound and pause when no sound is heard eliminating recording during soundless periods REC DISPLAY MENU SAVE REC SAVE Scenes ST SP MY VOICE 128kbps To record in the stereo standard play mode You can make a longer recording than you can in the STHQ mode CLASS 128kbps Descriptions 30 ...

Page 38: ...n press Press to exit the menu mode Press REC Press SAVE to stop recording The menu mode window will be displayed VOR and appear in the display window To cancel the VOR function Set VOR to OFF in step The recording pauses when no sound is detected and VOR and PAUSE display When the Coredy recorder detects sound the VOR recording starts again REC 31 ...

Page 39: ...ed by the sound around you Set the SCENE switch according to the recording conditions If recording is not satisfactory after you have changed the SCENE setting or for an important recording set VOR to OFF in the menu The built in microphones are automatically cut off If the input level is not strong enough change the SCENE switch position on the Coredy recorder REC SAVE stereo microphone jack 32 ...

Page 40: ...h as a radio cassette recorder a tape recorder Smartphone MP3 etc connected to the Coredy recorder You also can recording the Telephone call with the Coredy recorder Hint If the input level is not strong enough connect the headphone jack minijack stereo of other equipment to the jack of the Coredy recorder and adjust the volume level on the piece of equipment connected to the Coredy recorder REC S...

Page 41: ...o stop recording 2 4 3 Recording from Telephone Note VOR Function can not be used for Telephone recording p 2 3 Connect the audio output connector stereo mini jack of other equipment to the jack of the Coredy recorder using an audio connecting cable The built in microphones are automatically cut off and the sound from the connected piece of equipment is recorded LINE IN Audio Cable Telephone Recor...

Page 42: ...rder from the HOLD status p 1 3 Press REC to start recording Start dial out or answer the telephone calls connected to the Recorder Press SAVE to stop recording The built in microphones are automatically cut off and the sound from the connected Telephone 3 1 Basic Playback 3 Playing Files SAVE Operation indicator REC SAVE 35 ...

Page 43: ... file to be played back p 1 6 Start 3 1 1 Stopping playback Hold on Press to adjust the volume Press The stop mode window appears Playback starts and the operation indicator will light in green DPC X 001 M H S A SP ST 36 ...

Page 44: ...ful to check one word forward or back Then if you press and hold the button the Coredy recorder starts to search at higher speed To stop at the current position Playback Pause function Press To resume playback from that point press again go back to the beginning of the current file go back to previous files skip to the next file skip to the succeeding files Press once Press once Press repeatedly D...

Page 45: ... which is useful for language study The file is played back in natural tones by means of a digital processing function The menu mode window will be displayed 3 2 1 Adjusting the playback speed the DPC Digital Pitch Control function In the stop or playback mode press and hold DISPLAY MENU to enter the menu mode Press or to select DPC and then press Press or to select NO and then press 38 ...

Page 46: ...old each button you can change the speed continuously The playback speed is set to 1 00 when you purchase the Coredy recorder Playback sound reflects the setting immediately In the stop mode the current file is played back automatically at the specified playback speed for confirmation Press or to adjust the playback speed 39 ...

Page 47: ... will be played back repeatedly Press A B again Press to exit the menu mode To resume normal playback speed 3 3 Changing the Playback Mode 3 3 1 Playing back a file repeatedly To resume normal playback Set DPC to OFF in step DPC X 001 M H S A SP ST DPC X 001 M H S A SP ST 40 ...

Page 48: ...A B REC SAVE During playback press A B to specify the starting point A A B is displayed and B flashes 3 3 2 Playing back a specified section repeatedly A B repeat DPC X M H S B ST HQ 41 ...

Page 49: ...t playback During A B repeat playback press A B again to specify a new starting point A Then specify a new finishing point B as in step A B is displayed and the specified section is played back repeatedly To resume normal playback To stop A B repeat playback Press A B Press DPC X M H S B ST HQ 42 ...

Page 50: ...nnecting Cable To listen with the headphones Connect the supplied stereo headphones to the headphone jack The built in speaker will be automatically disconnected Connect an active or passive speaker to the headphone jack You can record the sound of the Coredy recorder with other equipment Before you start recording we recommend you make a trial recording first To listen from an external speaker RE...

Page 51: ... Coredy recorder and the connected equipment at the same time to stop recording Slide the switch in the direction of to turn on the Coredy recorder p 1 4 5 or towards the center to release the Coredy recorder from the HOLD status p 1 3 A file from the Coredy recorder will be recorded on the equipment connected Once a file has been erased you cannot retrieve it 44 ...

Page 52: ...button about 2 seconds the ERASE appeared Then press the ENTER button the file number and ERASE flash Press ENTER The stop mode window appears The ACCESS animation appears and the selected file will be erased The remaining files will advance so that there will be no space between files To cancel erasing Press in step to return to the previous window 45 ...

Page 53: ...1 1 During playing back or recording pausing press P MARK at the position you want to add a audio mark Note Each file can add a maximum of 10 Playback marks You can add a playback marks at a point at which you would like to divide a file later or locate during playback You can add a maximum of 10 playback marks to each file 46 ...

Page 54: ...rd to the playback marks after the current point When a playback marks is set the Coredy recorder goes backward to the playback marks before the current point You cannot add audio mark to music files or during recording You can add audio mark when the Coredy recorder is in the transcription playback mode DPC X 001 M H S A SP ST Press Volume Next P MARK once 47 ...

Page 55: ...ill be displayed DISPLAY MENU REC SAVE Notes Once a P MARK has been erased you cannot retrieve it During playing back or recording pausing select the file from which you want to erase playback marks press the P MARK button about 2 seconds press the or to select the playback marks then press the ERASING button press Enter 48 ...

Page 56: ...etting that you want to set and then press If you do not press any button for 10 seconds the menu mode is automatically canceled and the window will return to the normal display Press DISPLAY MENU during menu mode To return to the previous window To exit the menu mode Press to exit the menu mode SP ST SP ST 49 ...

Page 57: ... VOR DPC SET DATE REC MON BEEP LED SYSTEM FORMAT FOLDER MEMORY Stop mode Playback mode Recording mode Operation mode the setting can be made the setting cannot be made 6 2 Menu Settings o o o o o o o o o o o o o o 50 ...

Page 58: ...fied speed xn nn n 0 to 9 using the DPC function You can adjust the playback speed in a range from 0 60 times to 1 80 times the normal speed x1 00 OFF The DPC function does not work SET DATE p 1 5 2 REC MON Sets the clock by setting year month day hour and minute in sequence 17Y 1M 1D 0 00 Sets the REC MON Monitoring the recording function ON If you connect the stereo headphones does not supplied ...

Page 59: ...editing CARD Select a memory Card do not supplied of MicroSD Card or M2 Card to recording playing or editing FORMAT Formats the built in memory erasing all the data in the memory and resetting the folder structure to its default status YES The ACCESS animation appears and the built in memory will be formatted NO The built in memory will not be formatted Notes When you format the built in memory al...

Page 60: ...s USB memory p 7 4 You can store image data or text data stored on the computer temporarily in the Coredy recorder For details on the system requirements for your computer see page 7 2 The Coredy recorder supports MP3 files only Files of other formats transferred from your computer cannot be recognized nor displayed on the Coredy recorder System requirements for your computer Note This Coredy reco...

Page 61: ... Computer or Computer and make sure that COREDY RECORDER has been recognized On the Macintosh screen make sure that an COREDY RECORDER drive is displayed on the Finder The Coredy recorder is recognized by the computer as soon as the connection is made While the Coredy recorder is connected to the computer PC LINK is displayed in the display window of the Coredy recorder The folders and files on th...

Page 62: ... the files recorded in the Coredy recorder You cannot transfer files from your computer to those folders 2 The music files transferred separately or by folder from your computer to the MUSIC folder are recognized and displayed as files in the Music folder of the Coredy recorder 3 The Coredy recorder can recognize up to 8 levels of folders transferred to it from a computer COREDY RECORDER VOICE 1 F...

Page 63: ...erent from that seen on the display of a computer The folder indicators in the display window of the Coredy recorder are as follows Folders where you can record a file Files you recorded with the Coredy recorder will be stored and managed in these folders Music A folder for playback only Music files transferred from your computer to the MUSIC folder will be displayed and managed in this folder If ...

Page 64: ...ayed on the taskbar depending on your computer settings On a Macintosh screen click the COREDY RECORDER ejection icon on the Finder For details on disconnecting the Coredy recorder from your computer refer to the operating instructions supplied with your computer You can copy files and folders from the Coredy recorder to your computer to store them Drag and drop the files or folders you want to co...

Page 65: ...r computer to the Coredy recorder by dragging and dropping them and you can play them back using the Coredy recorder Click and hold drag and then drop To copy a file or folder Drag and drop Coredy recorder Your computer Disconnect the Coredy recorder from your computer p 7 1 3 A Removable Disk Removable Disk A B MUSIC 58 ...

Page 66: ...Macintosh screen using Finder drag and drop the music files onto the MUSIC folder of the COREDY RECORDER Make sure to drag the music files from your computer and drop them onto the MUSIC folder of the Coredy recorder If you drop files onto other folders or destinations on the Coredy recorder the Coredy recorder may not be able to recognize the transferred files or other problems may occur The musi...

Page 67: ...o select the music file you want to play Press to stop playback The menu mode window will be displayed A music file copied from your computer can be played back with the Coredy recorder Dividing a files may not be performed When the Coredy recorder is connected to your computer image data or text data on the computer as well as files recorded using the Coredy recorder can be temporarily stored on ...

Page 68: ... to splash on the unit The unit is not waterproof In particular be careful in the following situations When you have the unit in your pocket and go to the bathroom etc When you bend down the unit may drop into the water and may get wet When you use the unit in an environment where the unit is exposed to rain snow or humidity In circumstances where you get sweaty If you touch the unit with wet hand...

Page 69: ...of your recorded files to a computer etc To use your computer with the Coredy recorder or to use the Coredy recorder as a USB mass storage device your computer must meet the operating system requirements and port environment described below Windows 10 Windows 8 1 Windows 8 Windows 8 Pro Windows 7 Ultimate Windows 7 Professional Windows 7 Home Premium Windows 7 Home Basic Windows 7 Starter If you h...

Page 70: ...be by default pre installed Any operating system other than those indicated above Windows 98 Windows 2000 or Linux etc upgraded operating systems or multi boot environment are not supported 64 bit versions of Windows XP are not supported For the latest version information and compatibility with your operating system please access the support home page for the Coredy recorder p 9 1 1 Hardware envir...

Page 71: ...olders 796 files Frequency range Compatible file formats MP3 MP3 192kbps STHQ MY VOICE MODE 75 Hz 20 000 Hz MP3 128kbps STSP CLASS MODE 75 Hz 17 000 Hz MP3 80kbps STHQ CLASS MODE 75 Hz 8 000 Hz MP3 128kbps STSP MY VOICE MODE 200 Hz 8 000 Hz Bit rate 32 kbps 320 kbps Supports variable bit rate VBR Sampling frequencies 16 22 05 24 32 44 1 48 kHz File extension mp3 The playback of MP3 files recorded ...

Page 72: ...t incl projecting parts and controls Approx 45 0 mm 120 0 mm 20 0 mm Mass Approx 60 g Supplied accessories See supplied Quick Start Guide Coredy VM3311 Digital Voice Recorder x 1 User Guide x1 Power and Sync Cable x1 Telephone recording adapter x1 3 5mm Line in Cable x1 RJ11 Cable x1 Design and specifications are subject to change without notice MP3 USB Micro B jack High Speed USB compatible minij...

Page 73: ...3 128kbps STSP Approx 22h Approx 18h Approx 12h MODE recording modes Recording Playback through speaker 2 Playback using the headphones When you are going to record continuously for a long time you may have to recharging the battery in the midst of recording The maximum recording time in the above table is for your reference only Recording MODE Built in Memory 4 GB ST HQ Stereo high quality record...

Page 74: ... microSDHC cards from 4 GB to 32 GB supported microSDXC cards of up to 64GB supported M2 cards of up to 16 GB supported Due to the file system specifications of the Coredy recorder you can record and play back an MP3 file smaller than 1 GB using a memory card Operations of all types of compatible memory cards are not guaranteed Note 67 ...

Page 75: ...orded Noise Power source The Coredy recorder was placed near an AC power source a fluorescent lamp or a mobile phone during recording or playback The plug of the connected external microphone not supplied is dirty Clean the plug The plug of the connected headphones is dirty Clean the plug The battery is weak The power of the Coredy recorder is off Slide and hold the switch in the direction of for ...

Page 76: ...55 is based on playback with the volume level set to 13 The battery life may shorten depending on the operation of the Coredy recorder Even if you do not use the Coredy recorder the battery is consumed slightly If you do not intend to use the Coredy recorder for an extended period of time it is recommended that you turn the power off You are using a battery in an environment with a temperature of ...

Page 77: ...menu p 2 3 Connect the headphone jack of other equipment to the microphone jack of the Coredy recorder and adjust the volume level on the piece of equipment connected to the Coredy recorder Continued The built in speaker is mainly for monitoring and the playback volume is low Use the supplied headphones Headphones are plugged in p 3 4 3 Sound comes from the speaker even when the headphones are plu...

Page 78: ...d time of recording will not be displayed if you recorded the file when the clock was not set During playback or recording modes there are menu items that are not displayed p 6 2 2 The remaining time displayed in the display window is shorter than that displayed in the computer The Coredy recorder requires a certain amount of memory for system operation That amount is subtracted from the remaining...

Page 79: ... under the A B or C folder you can play them back as files in the or folder of the Coredy recorder In case files are copied by using neither of the above methods they may not be able to be found or played back because of the system limitations of the Coredy recorder If the file size of a file is large it takes a considerable time to finish copying Wait until the copying is finished 2 The Coredy re...

Page 80: ...r with the Coredy recorder connected to the computer the computer may freeze or may not start properly Disconnect the Coredy recorder from the computer and reboot the computer again Follow the instructions below if a message appears in the display Message HOLD SET DATE Cause Remedy All the button operations are disabled because the Coredy recorder is in the HOLD status to prevent unintentional ope...

Page 81: ...aunhofer IIS and Thomson All other trademarks and registered trademarks are trademarks or registered trademarks of their respective holders Furthermore and are not mentioned in each case in this manual Symptom You cannot display or play back music files in order When you set A B repeat playback the set positions move a little Cause Remedy If you have transferred music files using your computer tho...

Page 82: ...oredy VM3311 Toll Free US 1 800 999 8470 English Service Mon Fri 10 00 19 00 CST Toll Free UK 44 808 134 9909 English Service Mon Fri 15 00 01 00 GMT E Mail support coredytech com Website www coredy com ...

Reviews: